
You are using an out of date browser. It may not display this or other websites correctly.
You should upgrade or use an alternative browser.
You should upgrade or use an alternative browser.
leather and Motorized bicycles
- Thread starter paul
- Start date

silverbear
The Boy Who Never Grew Up
So if I'm guessing right you started out with some kind of Styrofoam (what kind) and shaped it with a sureforrm scraper, then started laying on the fiberglass cloth and glass in layers. What made the original foam disappear? Some kind of solvent? Then did the cutout with maybe a hacksaw blade. Then built up the cushioning with some kind of closed cell foam and attached it with contact cement maybe? Just guessing... please correct so we know how you went about it. Well done, sir!
SB
SB
wret
Active Member
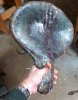
The form started with floral reservoir foam. Very easy to shape. I used a couple different saws for the basic shaping. To round out the seat area I built it up with children's modeling clay. Yes I actually sat in it. ")
No need to let the clay dry. Just laid the glass mat (8 layers) and epoxy on it. I will add that I have VERY little experience with fiberglass. What's up with the non-woven mat? That stuff just falls apart!
Next I wrapped with stretch wrap and electrical tape to make sure that the edges of the mat conformed to the foam mold. I even sat on it again when it started to set up.
After it set the foam is easily broken out and the clay washes out with water.
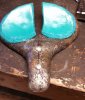
Next I trimmed the edges of the base plate, mostly with a saber saw. Here's were I would have done it differently if I had to again: I left some curved edge around the back of the seat. I would trim this flush to make a sleeker / flatter look and make it easier to stretch the leather.
Then came two layers of half inch yoga mat with contact cement. A single layer may look better but I'm all about comfort.")
The mounting hardware is 3/8" carriage bolts/washers/nuts and a piece of steel flat bar I had laying around. I'll use a bobber style seat mount hinge so I may not need the flat bar.
Next came the hard part. I had zero experience with leather. I had the preconceived notion that I would stretch the cased leather in place, dry it, cut it dye it and leisurely hand stitch it (just like the youtube videos). I soon realized that the ONLY way to hold the cover in place was to stitch it on.
For anyone wanting to try something like this, the Tandy hand stitcher is AWFUL! I got one at Michael's with a bobbin inside the handle that is MUCH better.
No need to let the clay dry. Just laid the glass mat (8 layers) and epoxy on it. I will add that I have VERY little experience with fiberglass. What's up with the non-woven mat? That stuff just falls apart!
Next I wrapped with stretch wrap and electrical tape to make sure that the edges of the mat conformed to the foam mold. I even sat on it again when it started to set up.
After it set the foam is easily broken out and the clay washes out with water.
Next I trimmed the edges of the base plate, mostly with a saber saw. Here's were I would have done it differently if I had to again: I left some curved edge around the back of the seat. I would trim this flush to make a sleeker / flatter look and make it easier to stretch the leather.
Then came two layers of half inch yoga mat with contact cement. A single layer may look better but I'm all about comfort.
The mounting hardware is 3/8" carriage bolts/washers/nuts and a piece of steel flat bar I had laying around. I'll use a bobber style seat mount hinge so I may not need the flat bar.
Next came the hard part. I had zero experience with leather. I had the preconceived notion that I would stretch the cased leather in place, dry it, cut it dye it and leisurely hand stitch it (just like the youtube videos). I soon realized that the ONLY way to hold the cover in place was to stitch it on.
For anyone wanting to try something like this, the Tandy hand stitcher is AWFUL! I got one at Michael's with a bobbin inside the handle that is MUCH better.
silverbear
The Boy Who Never Grew Up
It certainly turned out well. By the time you're done with a first time project like this you have a pretty good idea of how to go about it. Lots easier next time.
SB
SB
Intrepid Wheelwoman
New Member
What a great seat! Thank you for sharing your method with us
paul
Well-Known Member
as i have said in the past leather is very easy to work with, you can mold it, fold it, carve it, color it and do about anything you like with it, for me i could not find a bag that would hold up for my needs so i made my own and have been making more stuff since then, motorized bicycles are all about customization. making your own custom bags, saddles, grips the list goes on is a great way to personalize your motorized bicycle.
hey nice work Paul . I dabble in leather a little ...well maybe more the dabbele lol
i used to do a lot of leather carving and got fairly good. been looking for months now for a nice custom leather rack bag for my cruiser and decided i was going to rebuild my leather tool collection ect and bling out my bike in leather. here is a seat someone did and was all i needed to see to start doing leather projects again. for now i plan on doing a seat and rack bag (to hold the battery) for the cruiser. will post pictures as i progress. already ordered a lot of the things and going to the states next week and going to bring back some nice carving leather

Attachments

Thanks man . Yep all hand made . It's what I do .
did you make that seat? Looks great.
paul
Well-Known Member
ya i been at it since the 60's and love it. i retired back in December and now sell leather tools on eBay. I am on the outer banks right now for the week and open my eBay store back up when i get back this weekend. Can't beat a good leather bag for these bikes, the nylon ones wear out way to quick
paul
Well-Known Member
mr-leather is my eBay store however closed till i get back home so not sure if anything will show up. if you need something spacial just text me and i will look, my store is majority tandy and i am also an osborne dealer. older stuff i have not had time to list. i carry 1200 different new items
Some time ago --some member/follower-- I think in New Hampshire mentioned access to cheap heavy grade leather!!!!
Anyone and everyone who has a source/s for thick leather cheap
please private message me or post here .
the leather couches I skin here in Los Angeles are just not heavy enough for what I want- but good material for some uses.
Thanks Buba--ride safe
Anyone and everyone who has a source/s for thick leather cheap
please private message me or post here .
the leather couches I skin here in Los Angeles are just not heavy enough for what I want- but good material for some uses.
Thanks Buba--ride safe
Hey Buba ,How many ounce did you want ? What kind of leather did you want ?
Some time ago --some member/follower-- I think in New Hampshire mentioned access to cheap heavy grade leather!!!!
Anyone and everyone who has a source/s for thick leather cheap
please private message me or post here .
the leather couches I skin here in Los Angeles are just not heavy enough for what I want- but good material for some uses.
Thanks Buba--ride safe
Intrepid Wheelwoman
New Member
Some time ago --some member/follower-- I think in New Hampshire mentioned access to cheap heavy grade leather!!!!
Anyone and everyone who has a source/s for thick leather cheap
please private message me or post here .
the leather couches I skin here in Los Angeles are just not heavy enough for what I want- but good material for some uses.
Thanks Buba--ride safe
Is couch hunting dangerous? What's the best way to track and sneak up on a couch in the wild and what is the best weapon to use to safely dispatch a couch when you finally manage to catch one? Are you able to advise the best method for skinning a couch, - or are they like cats and there are several methods that can be used?
Couches are not easy to catch. They are very close to 'Naugas which can be dangerous and difficult to deal with. Be careful when dealing with either of these elusive and rare creatures. Nevertheless their skins make beautiful upholstery.Is couch hunting dangerous? What's the best way to track and sneak up on a couch in the wild and what is the best weapon to use to safely dispatch a couch when you finally manage to catch one? Are you able to advise the best method for skinning a couch, - or are they like cats and there are several methods that can be used?
Tom
Hi Chain et al.
I am looking for CHEAP belt thickness leather exactly what ounce I do not know
pieces 12 X 10 inches and up
Intrepid and Tom--
Couches in Los Angeles are not so elusive -best method is a sharp matt knife for the cut away method and a good school grade scissor is always helpful or the more time consuming vice grip and pull the staples and cut away at any and all fabric and upholstery connecting tissue -- Dr. Buba
came across two in a back alley I plan on flaying first thing tomorrow- both nice cream tan in color - lots of square feet!!!!
all this before or after I figure out how the **** I am going to get a Bridgeport mill I scored while scraping today from across the street of my commercial building without a fork lift??? maybe add wings????
ride safe
.
Last edited:
QUOTE=buba;620167]Hi Chain et al.
I am looking for CHEAP belt thickness leather exactly what ounce I do not know
pieces 12 X 10 inches and up
Intrepid and Tom--
Couches in Los Angeles are not so elusive -best method is a sharp matt knife for the cut away method and a good school grade scissor is always helpful or the more time consuming vice grip and pull the staples and cut away at any and all fabric and upholstery connecting tissue -- Dr. Buba
came across two in a back alley I plan on flaying first thing tomorrow- both nice cream tan in color - lots of square feet!!!!
all this before or after I figure out how the **** I am going to get a Bridgeport mill I scored while scraping today from across the street of my commercial building without a fork lift??? maybe add wings????
ride safe
.[/QUOTE]