HoughMade 71- done, but never done

Houghmade, that is an awesome looking bike. I love the old timey motorcycle look. How fast will it go?

I was wondering where you got the parts for it from. I want to use the Honda GXH50 on my trek cruiser classic. I hope the engine will fit. Any wisdom you can share would be greatly appreciated.

Thanks,
Fred
 
The best place to get an angine that I know of is Small Engine Warehouse. The gearbox and other kit items seem pretty hard to find these days. I bought mine over a year ago. Right now I do not know of anyone selling the kit and I cannot recommend the vendor I bought from. Sorry.

Advice? Take your time. Sounds simple, but to get this thing the way I wanted, I could not decide when I wanted it done. Also, I built and rebuilt some items several times. Can't be afraid to do that to get it right.

Ditch the original nuts and bolts and go to you local Ace and get new hardware.
 
Hello.Just wanted to let everyone know the new kits are in.I just bought the installation kit with the new stage III Gru-Bee gearbox for $199.99 from Bicycle-Engines.com on monday 10/13/08 & it has an Estimated delivery date of Friday 10/17/08 through Fed-Ex.My Honda GXH50QHA I ordered from SmallEngineWarehouse.com should be arriving with it this Friday also.Bicycle-Engines.com has the 4 stroke kits with the Huasheng engine & Stage II & III gearboxes also in now. I can't wait to put it together.It will be my first gas powered motorized bicycle :-)
 
HoughMade - I was looking at your bike again, and can't get over how well you did on your build. There is not a thing I would change, it is perfect. You have to be having a good time out with that bike. I wish my grandfather was still around he would love to see a bike like that. I think he would be in seventh heaven, he may be there, LOL. He had a cool old Harley, there is a pic of him with is somewhere. There is so much talent in this forum. Keep up the forever build. Have fun, Dave
 
Thank you. It has been fun and I greatly enjoy it.

I will be on the road tomorrow. The bike may be featured in an online article on a website connected to a popular tech magazine. If it is, I will post a link.
 
Well after some modifications, it's done...again...but I am already contemplating more refinements.

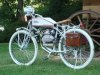
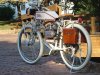
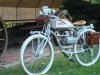
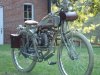
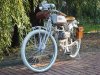
First, the rear view. Here, you can see the new saddlebags, tail light and turn signals. The right saddlebag hold the 12v 7ah SLA battery and fuses (not fusing the charger jack originally led to a Lucas Electric inspired smoke out and new wiring). The left saddle bag hold my stuff- my motorcycle permit, lock, glasses, etc.

In the first 2 pics, you can also see the spring loaded chain tensioner I made. It works flawlessly. The tail light uses an LED 1157 replacement bulb with 4 extra LEDS for the brake lights. The turn signals use the LEDs out of 1156 LED replacement bulbs- how these were built is covered elsewhere in the site.

Finally, I replaced the springs on the seat. The original springs were pitted and fatigued. I had painted them, but they compressed so much, the paint was constantly getting messed up. Plus, they were so fatigued that I bottomed out very easily- very uncomfortable at times. I found brand new chromed springs on- you guessed it- eBay. they are not direct fit, but did not take much modification to work. I am very happy with them- no bottoming, no paint to mess up.
 

Attachments

  • DSC00747-2.jpg
    DSC00747-2.jpg
    250.7 KB · Views: 177
  • DSC00754-2.jpg
    DSC00754-2.jpg
    255.6 KB · Views: 155
  • DSC00756-2.jpg
    DSC00756-2.jpg
    308.1 KB · Views: 183
Last edited:
Next, on the front you can see some changes since the last "formal" pics.

I added front turn signals also (amber LEDs). Also, I added a horn. It is more of a "clacker". It is an originals '40s vintage I bought on eBay.

I also added the front "roll" bag. This now holds my tool roll which used to be under the seat. I found this roll at Walmart and could not resist it. I originally mounted it with straps, but given the uneven weight of the tools, it would not hang straight...this bothered me. I used very strong clamps on the handlebars and made solid mounts for the roll. I used a similar clamp to mount the horn. The clamps are actually clamps used to mount an electrical grounding wire of large gauge to a grounding rod of between 3/4" and 1"- the handlebars being 7/8", they fit well.

I also changed the light mount to make room for the roll. It is higher and further back. I like it and personally, I think it looks more pre-WWI than before. It also mounts the light more solidly.

Finally, I fabricated a steel, boxed mount to attach the front brake caliper. It has no flex and is much, much stronger than what I used to have. Before, the mount flexed and I was afraid to dial in the amount of front brake bias needed to provide for maximal braking. Now, I have the brakes adjusted to call upon the front brakes the proper 75% and it stops quickly and reliably. I never, ever use the coaster now.
 

Attachments

  • DSC00748-2.jpg
    DSC00748-2.jpg
    224.1 KB · Views: 194
  • DSC00749-2.jpg
    DSC00749-2.jpg
    269.4 KB · Views: 171
  • DSC00755-2.jpg
    DSC00755-2.jpg
    307.5 KB · Views: 151
nice refinements mr lawyerman !!!
always a joy to read your work-in-progress threads :)

is anyone's bike EVER done ???
 
Where did you find a pair of matching Polaroid cases? Those are the EXACT color I'm looking for for my bike. If I wasn't so stubborn I'd just buy a set of black MC saddle bags off ebay but dang it I want brown! lol
 
VERY well done Sir: I am surprised that as much as I am in and around Valpo as much as I am I havent seen this machine, Its not something I would miss. Do you put many miles on? Is your tank a cover? Those of us in Northern Indiana need a couple annual rides so we can gualk at each other creations. Finally to poke at one of the previous posters: Lawyer or nay that is one FINE ride
 
Back
Top