You are using an out of date browser. It may not display this or other websites correctly.
You should upgrade or use an alternative browser.
You should upgrade or use an alternative browser.
first btr build
- Thread starter monark
- Start date
Cycoracer8
New Member
Yup, I have to agree with that filler neck. Very nice first build.
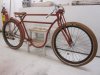
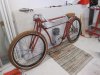
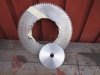
thanks for the inputs everybody and here come some more.waiting for welding of the tank i looked at another milestone on the build namely the rear sprocket,beeing the first build and a certain lack of knowledge i went with a pair of Surly single speed MTB hubs.The big dipper with these is that the rear sprocket is of the threaded type.Will probobly bite my ass later but ill stick with it.i bought a ordinary sprocket for the threading and grind down the cogs,then i took a old mainsprocket and drilled up the center,centered it and weld it,when turning the wheel it was remarkebly straight and the looks ok.On the photos is a new caliper i found that looks a little better and that have a v shape so it fits the frame better,havent found any mtb discs that look good so thats going to be made also and both front and rear.The stuff i collected for this first build isnt gonna take much throttle but im going to be really happy if i can ride with style atleast.also there is some work beeing done on the briggs,cut of the fins on the flywheel and grind them down flat,balancing is next.
Attachments
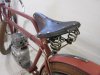
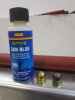
hello everybody! there are small steps in my petproject right now but some steps are beeing made,the welding of the tank are in progress and yesterday i cut and welded the "pin" for the sadel as i probobly going to use the undercarriege with the springs and all for the built one later.Im trying to change as much nuts and bolts as i can to brass so the tankmounts are the same.a tip for you vintagefans out there,the bottle in the picture below are i think of american origin and used for "bluing" gunmetal (prob. can find it in armstores).and works wonders for making metal old really fast.I got it from a customer of mine but to use on furniturehandles and candleholders for lampettes.
Attachments
harry76
Well-Known Member
Looking AWESOME Monark. That tank is looking real nice.
I saw an episode of Biker Build Off where someone did a whole frame in that blue gunmetal stuff..... it looked really nice, if my memory serves me correctly it was The Indian Larry Legacy shop.
Keep it coming, this is going to be one very very nice bike!!!!!
I saw an episode of Biker Build Off where someone did a whole frame in that blue gunmetal stuff..... it looked really nice, if my memory serves me correctly it was The Indian Larry Legacy shop.
Keep it coming, this is going to be one very very nice bike!!!!!
thanks Harry,has it cooled down-down under? ") looking at your latest build i must say i value your op. high,im having a quick peek at the forum almost every evening but just havnt got the energy left to comment so much after work,kids and everything else between heaven and earth.but i followed one of your replays tonight on the e-bike twin and christ is that a leap forward!
looking at your latest build i must say i value your op. high,im having a quick peek at the forum almost every evening but just havnt got the energy left to comment so much after work,kids and everything else between heaven and earth.but i followed one of your replays tonight on the e-bike twin and christ is that a leap forward!
looking at your latest build i must say i value your op. high,im having a quick peek at the forum almost every evening but just havnt got the energy left to comment so much after work,kids and everything else between heaven and earth.but i followed one of your replays tonight on the e-bike twin and christ is that a leap forward!harry76
Well-Known Member
No it's still damn hot here unfortunately. It's over 35 degrees Celsius today. Very uncomfortable. We are having crazy weather here at the moment. Floods everywhere.
Thanks for the kind words. I'm a lot rougher then I see some other builders, but we have some unique engines readily available here in OZ which help a lot.
Not sure what you mean by "my replay" on the EBike twin, but yeah that bike is awesome and I see one in my future, I don't really have a choice here in OZ unfortunately.
I know your bike is going to turn out awesome and looking forward to seeing more.
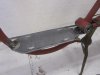
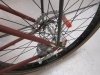
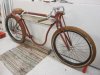
hello everybody! still working towards some of the big goals in the build but something happens every weekend,the mount for the caliper is done and the fitting of the engineplate is also done (6mm steelplating would do it).just gona bring it with me to work for milling of the holes for the enginebolts (v-belt clutch to centerhub so i must be able to adjust lengthvise) and theres going to be some kind of diagonal support down to the bottom of the frame.im still on search for the perfect brass petcock before i can leave the tank to the welder to finish but its coming, see ya
Attachments

harry76
Well-Known Member
Lookin really good Monark.
I quite like your disc caliper, it has a vintage look to it, whats it from?
If you could find a vintage disc rotor it would look even better, just a thought
http://www.ebay.com.au/itm/Vintage-Shimano-Disc-Brake-Rotor-Nos-1970s-/290597605491
I quite like your disc caliper, it has a vintage look to it, whats it from?
If you could find a vintage disc rotor it would look even better, just a thought
http://www.ebay.com.au/itm/Vintage-Shimano-Disc-Brake-Rotor-Nos-1970s-/290597605491
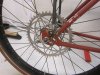
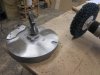
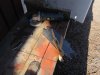
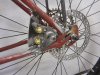
Hello down under! yes the caliper doesnt just has to be removed but i have to split it to remove the wheel (no biggie),the location of the caliper seemed to demand that action,just didnt realise it before i tacked the mount in place. oouufcorse the disc is going to follow the thin red line of vintage (how vintage can a discbrake be?).I have looked after just that old rather massive discs with just a few holes in them but couldnt find them so what to do,then i remembered we had some worn old sawblades at work and they are just the right thickness and all just demand a little work but it should come out ok.The caliper i found in a "china"atv and minibikeshop we have here,cheap stuff but last as long.A thing i realised when using the erlier mention gun"acid" on aluminium is to do it a well ventilated area!! theres a lot to be learned by certain fumes.
oouufcorse the disc is going to follow the thin red line of vintage (how vintage can a discbrake be?).I have looked after just that old rather massive discs with just a few holes in them but couldnt find them so what to do,then i remembered we had some worn old sawblades at work and they are just the right thickness and all just demand a little work but it should come out ok.The caliper i found in a "china"atv and minibikeshop we have here,cheap stuff but last as long.A thing i realised when using the erlier mention gun"acid" on aluminium is to do it a well ventilated area!! theres a lot to be learned by certain fumes.Attachments
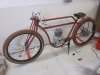
im with you guys,since this is the first bike im doing im going to take all the little hassles im going to have with certain things and see it as a learning process.the thing i want out of this one is mainly to see if the measurments of the frame and the drivelayout is going to work,theres more things on this one that im not so pleased with (my crappy welds on a rather flimsy frame is one) just going to finish this one in good vintagestyle and take the learnings with me to the next one! the hunt is on.....
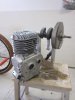
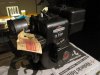
the hunting trofe of the day! Scored a old still in the box never started 3 hp briggs today and it turned out it was a 3/4 inch ball bearing shaft on it and it seems to be a well sought after motor on the minibike forum 80332 0037-01.dont know if this one is going to be "vintaged" for the next build or sitting in a minibike?! nice as it is,or can anybody here change my mind?
Attachments
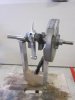
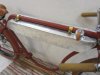
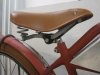
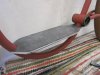
hello everybody,a little update here.the build is coming along in small steps but its coming.still waiting for the tank from the welder but the briggs is soon to be together,built a jig to be able to perform some sort of dynamic balancing.got the rod from ARC racing the other week and it was probobly the most expensive 195 grams in my life.on the frame ive been pulling some coppertubing to be housing the brakewire to the rear.the engineplate is in place and a more suitable saddle is in place (its a little narrow but it`ll work till i find a ladies mod. thats a little wider).Me,myself and i are having disscusions over paintscheme for the build but probobly its going to be all high gloss black (Reading Standard!) a little boring maybe but allways right.
.on the frame ive been pulling some coppertubing to be housing the brakewire to the rear.the engineplate is in place and a more suitable saddle is in place (its a little narrow but it`ll work till i find a ladies mod. thats a little wider).Me,myself and i are having disscusions over paintscheme for the build but probobly its going to be all high gloss black (Reading Standard!) a little boring maybe but allways right.