Excalibur ‘09

10-28-10 IMPOSSIBLE RUST

I painted covers for the battery box, added the small badge logo and made them to look rusty and crusty (they’re aluminum duct caps).

Also added a retainer strap so it looks like the box is clamped to the rear stays.
 

Attachments

  • 77 .jpg
    77 .jpg
    181.9 KB · Views: 333
  • 78 .jpg
    78 .jpg
    176.1 KB · Views: 325
10-31-10 PICS

Outside photo shoot today...

A newer exhaust system with the original crusty muffler that came with the motor has been finished.

Front fender & stays are finished.

And a new dark gray foam air filter, it doesn’t show as much as the previous lime green one did since I decided to remove the old drain cover.

The new white “Dura” brand tires are an Ebay find.

These replace some white Kenda’s, even though both sets were labeled 26 x 2.125 the Dura’s have a nicer, larger profile.

Perhaps the Kenda’s will be used for a Excalibur ‘03 someday!

Happy Halloween!
 

Attachments

  • 79 .jpg
    79 .jpg
    253.5 KB · Views: 426
  • 80 .jpg
    80 .jpg
    220.9 KB · Views: 406
  • 81 .jpg
    81 .jpg
    241.5 KB · Views: 396
2-19-11 TOOL BOX

Finally got the rear mount tool box done: Sheet metal graciously donated from an recently expired microwave oven...
 

Attachments

  • 82 .jpg
    82 .jpg
    112.4 KB · Views: 273
  • 83 .jpg
    83 .jpg
    118.3 KB · Views: 272
  • 84 .jpg
    84 .jpg
    176.3 KB · Views: 333
  • 85 .jpg
    85 .jpg
    171.9 KB · Views: 300
2-27-11 HEADLIGHT

Finished modernizing my antique Solar headlight.

I used a 12v “GX5.3” LED sealed beam replacement bulb for a tungsten house lamp and a home made holder created from a old chain link fence post cap.

I found the proper 2 pin socket on line and attached strips of brass to bend over the front of the bulb and simply hold it in place.

A hardware store lamp switch was put where the Solar’s reservoir cap originally was. (knob to be covered with a brass tube later)

All wires connecting it to the battery box are hidden in a rubber hose & brass tube to appear to just be an old gas system.

The rubber hose is actually a heavy cord from a old dead power tool-

Ha, easy, it came with nice wires already inside :-)

OK, so Solar's were originally self contained, but still I think it has a believable antique feel to it...
 

Attachments

  • 86 .jpg
    86 .jpg
    173.5 KB · Views: 316
  • 88 .jpg
    88 .jpg
    195.4 KB · Views: 323
  • 87 .jpg
    87 .jpg
    141 KB · Views: 333
  • 89 .jpg
    89 .jpg
    185.3 KB · Views: 343
3-6-11 NEW TAILLIGHT, YES

New Taillight:

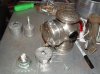
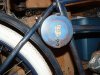
I wasn’t happy with using a miners helmet lamp for a taillight because, well...

It still looked like a miners lamp...*

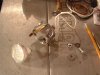
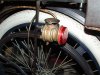
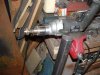
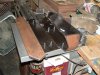
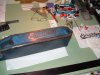
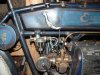
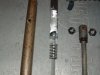
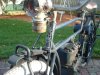
For the actual light I’m using a semi-truck LED side marker- Bicycle Bill’s idea from way back.

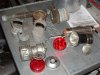
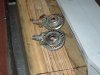
Considered using another fence post cap to replicate some cool little aluminum Indian re-pop's I saw at the Davenport show, or parts from a Ebay antique flashlight find, and even parts from a antique toilet flush valve.

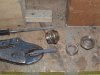
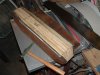
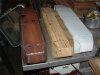
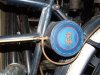
I finally just decided to reconfigure the miners lamp. The little cupola was made from parts from the old junk box. I’m not sure what the decorative button topper was originally used for, but it’s old (1901 pat. date) & nickel plated.

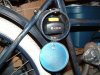
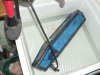
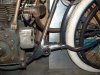
Experimented with 12v, 14.4v and 18v portable drill batteries.

The 14.4 was a little weak and the 12 wouldn't even light all of the taillight LED’s. The 18v works well, but is is probably a little too hot.

Oh well, they’re very bright... in fact the headlight is “hurts you in your eyes” bright!!!*

Funny thing about the 18V battery though, I have to press the charge level tester button before it will work...?

Kind of negates the off/on switch since l have to open the battery box cover. Weird.

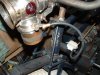
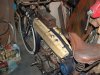
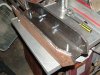
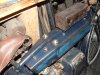
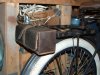
Added a little brass clip to the rear fender stay to help secure the brass tubing.
 

Attachments

  • 90 .jpg
    90 .jpg
    177.4 KB · Views: 339
  • 92 .jpg
    92 .jpg
    177.9 KB · Views: 359
  • 93 .jpg
    93 .jpg
    189.4 KB · Views: 310
  • 94 .jpg
    94 .jpg
    193.3 KB · Views: 304
3-14-11 BUNGS OF BRASS

For the gas tank bungs I’ve cut up old nickel plated brass bath tub faucet.

The “caps” have a nice shape and I’ll fill the holes with stainless carriage bolts. One side will be drilled for a vent.

I decided to cut a step into the “filler tube” side so I could easily solder it into a hole in the tank later.

I had a cutting blade but no lathe so I jury rigged my own using a drill & vise. I used a locking pliers to hold the blade and a chunk of tube to steady it while I made the cut.

Pretty sure this trick wouldn’t work for precision steel cutting! Ha!
 

Attachments

  • 98 .jpg
    98 .jpg
    193.6 KB · Views: 340
  • 97 .jpg
    97 .jpg
    186.5 KB · Views: 338
3-25-11 BUCK

Today I finally built a wooden buck for forming the gas tank.

I added a small radius all along the outside edges.

I just couldn’t help but to set in the frame for a quick look-see... Ha!

The little knob on top is a old snare drum part and is meant to look like a through-the-top gas shut off valve, or perhaps a mechanical oil pressure pump that a lot of antique motorcycles used.
 

Attachments

  • 99 .jpg
    99 .jpg
    144.2 KB · Views: 322
  • 100 .jpg
    100 .jpg
    191.3 KB · Views: 394
5-11-11 GAS TANK

Finally I’ve finished the long awaited gas tank fabrication!

In order to keep the old rusty theme going I’m using actual rusty 20g sheet metal. However, the inside surfaces were thoroughly sanded bare!

It’s made in 4 carefully cut parts, a top & bottom, and 2 sides.

The sides wrap around the edges of the buck about 3/4 of inch, this was done by carefully hammering them over the radius.

Not hard to do but surprisingly slow to get them smooth & flush. A lot of back & fourth passes!

To get the sides to stay in place I drilled two holes in each and secured with screws. To be filled with weld later.

The top & bottom pieces simply overlay the edges of the sides.

Small wood screws were driven into the overlapped areas and will be used to later reassemble all the parts for indexed square and true welding.

All the necessary holes were then drilled.

Bosses for the tank straps and other attachments are rod connector nuts held in place with screws from the outside and the opposite ends welded shut.

I’ve made a careful guess for the left side shift gate location, but since I haven’t actually designed the final drivetrian yet this may be a risk?

Now awaiting welding.

This is a milestone step!

I also reworked a double gear speedometer driver into a single. This will work better with the rockers and having the brake lever on the left side.
 

Attachments

  • 103 .jpg
    103 .jpg
    136.9 KB · Views: 336
  • 105 .jpg
    105 .jpg
    143.1 KB · Views: 347
  • 104 .jpg
    104 .jpg
    166.7 KB · Views: 326
  • 106 .jpg
    106 .jpg
    202.2 KB · Views: 308
  • 107 .jpg
    107 .jpg
    181.1 KB · Views: 382
5-16-11 TANKED

Today Big J welded the tank,

Yea!

Here’s a picture of him at work!

This thin metal was a bit of a challenge to weld and we got a little bit of warpage in the larger flat areas.

But because of my barn found aesthetic I’m actually quite pleased with this happy accident!

However in the future if I want a perfect tank I will have to use a heavier gauge metal.

Also welded the speedometer driver and a chainring made from early 10 speed front cluster.

Another big day!
 

Attachments

  • 108 .jpg
    108 .jpg
    145.7 KB · Views: 303
  • 110 .jpg
    110 .jpg
    167.6 KB · Views: 339
  • 109 .jpg
    109 .jpg
    144.6 KB · Views: 362
5-20-11 GRINDING IT OUT

Finished grinding the tank welds smooth today and did a leak test by plugging the holes and pumping it full of air via a sports ball needle through a cork plug.

Submerged it in a utility sink and I’ve got major bubbles. :-(

Apparently I’ve ground a little to close to the seam along the top upper right-hand corner.

I think I’ll use a tank sealing epoxy system but I better have a new bead of weld run on that corner anyway.
 
5-30-11 FIXED

Big J welded the tank corner today and unlike his usual very fine looking “stacked coins” bead he laid it on plenty thick in regards of my recent grinding skills.

He was then embarrassed to learn I intend to leave it un-ground for the looks of a ancient repair one might actually find on a 100 year old tank.

Sorry J!

Ordered some tank sealer today, a product named “Kreem”.
 
6-8-11 KREEMED

I started to Kreem the tank today, pretty simple, just follow the directions.

(I’m not used to having directions with this project...)

:-)
 
6-13-11 PRESSURE TEST

The tank passed the pressure test!

As you can see I’ve already started painting & distressing it.
 

Attachments

  • 112 .jpg
    112 .jpg
    142.4 KB · Views: 301
6-16-11 PAINTED!

Finished pin striping and painting the logos on the tank today.

Attempted to give extra distress to areas that would of seen more wear such as corners and paths around levers, etc...

At one point I got a little help from Cid...

Actually he’s not much help.
 

Attachments

  • 113 .jpg
    113 .jpg
    156.9 KB · Views: 317
  • 114 .jpg
    114 .jpg
    151.3 KB · Views: 334
6-23-11 MOUNTED

Mounted the tank today!

Made little clamps for the headlight “gas line” and the throttle cable.

I guess this means that it’s all done.

Mounted the old leather Indian tool box too.

Cross off couple more punch list items. Yea!
 

Attachments

  • 115 .jpg
    115 .jpg
    213.6 KB · Views: 328
  • 116 .jpg
    116 .jpg
    230.7 KB · Views: 311
6-27-11 BRIAN STORM

Bicycle Bill stopped over tonight for the first time in awhile.

I pointed out that I thought the big red Wisconsin on the engine shroud clashed with the Excalibur logo on the tank. And he agreed

He suggested adding a thin aluminum plate that folds over Wisconsin’s existing spec plate and adding a Excalibur logo to that...

Genius!
 
7-4-11 DETAILS

Recently finished items...

-Fuel line installed

-Remote choke lever, linkage fabbed and installed.

-Leather retaining strap attached to the magneto's kill switch.

-Aluminum logo plate attached to the Wisconsin’s spec plate.
 

Attachments

  • 119 .jpg
    119 .jpg
    211 KB · Views: 335
  • 118 .jpg
    118 .jpg
    163.7 KB · Views: 321
7-30-11 LEVERAGE

I’ve fabbed a clutch lever (slip belt) with push button release and cut a ratchet gate.

In my wife’s aunt’s garage I found a perfectly rusted tube with a crimped and drilled bottom end already included.

I think it may of been part of a children's swing set at one time?

I reinforced the area below the spring by pounding a oak dowel into it.

Started the linkage to nowhere too.
 

Attachments

  • 120 .jpg
    120 .jpg
    137 KB · Views: 291
  • 121 .jpg
    121 .jpg
    134.1 KB · Views: 298
7-31-11 SHIFTY

Mounted the shift lever to the engine and the ratchet gate to the tank.

The lever is attached with a section of door hinge mounted where the engine governor plate used to be.
 

Attachments

  • 122 .jpg
    122 .jpg
    229.2 KB · Views: 373
8-6-11 J S GUSSET

Fabbed a new heavy gusset to mount jackshaft pulley blocks.

Fabbed a idler pulley lever that will fit on the pedal crank.

It has some light duty flanged 3/4” ID bearings that fit into tube that the lever will be welded to.
 

Attachments

  • 127 .jpg
    127 .jpg
    175.7 KB · Views: 340
  • 128 .jpg
    128 .jpg
    174.2 KB · Views: 329
Back
Top