Copper Board Tracker

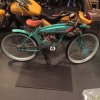
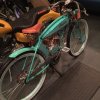
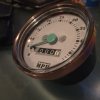
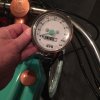
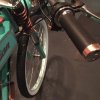
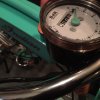
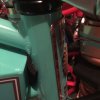
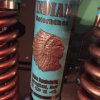
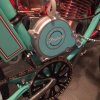
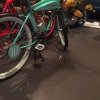
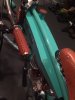
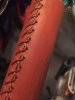
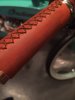
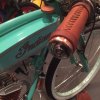
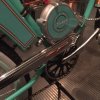
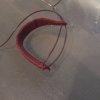
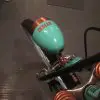
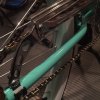
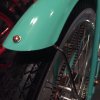
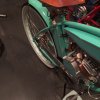
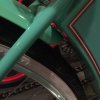
Thanks much MEASURETWICE/ The aesthetics are a fine balance of trial and error for a fool like me, but one cant blame me for trying. I wanted analog speedometer... but dang they sure are cheap looking so I copper taped the edge and then made a new face for it ( I'm gonna redo it again but one gets the idea. Then I painted the florescent puke orange needle sea glass green as it just slides off for painting and clear coated it for a subtle tied in look that I was looking for. The Speedo bracket Is now painted copper and is now drying. I'm somewhat happy. I also copper taped and burnished the throttle and hand grip plus copperized the stock orange Kill Switch"... Here are the picts. Putzy subtle stuff for sure.

Zip/
 

Attachments

  • sIMG_5879.JPG
    sIMG_5879.JPG
    120.6 KB · Views: 234
  • sIMG_5880.JPG
    sIMG_5880.JPG
    128.1 KB · Views: 235
  • sIMG_5883.JPG
    sIMG_5883.JPG
    144.3 KB · Views: 241
  • sIMG_5882.JPG
    sIMG_5882.JPG
    56.2 KB · Views: 239
My homemade Head badge is now done and installed, Im not sure if it looks ok, I can always start over. I added a few motor badges and a snap on number plate that can be snapped on solidly and off easy, it has a plastic axle protector I salvaged on the back side of the number plate screwed on with a sheet metal screw painted white so it just press fits solid.
I am officially done as of today. It was a fun and a time consuming project.
Thanks for all the feedback Guys!!!!

Zip
 

Attachments

  • dIMG_5908.JPG
    dIMG_5908.JPG
    118.1 KB · Views: 251
  • cIMG_5897.JPG
    cIMG_5897.JPG
    133.6 KB · Views: 256
  • cIMG_5896.JPG
    cIMG_5896.JPG
    141 KB · Views: 239
  • cIMG_5898.JPG
    cIMG_5898.JPG
    165.8 KB · Views: 257
  • cIMG_5900.JPG
    cIMG_5900.JPG
    135.3 KB · Views: 270
Do you have and plan to post photos of how you made the badge? I think some one posted some pics of theirs if I remember.

Even up close I see nothing wrong with the work, Amazing!

I do have to admit though I may one day have a showy look to my bike, but right now it is steam punk. That is it is really in a different realm from even the ratty bikes.
 
Here is the Photos on how The number plate constructed, what I like is being able to remove it fast and snap it back on really solid. The Plate I made out of thick plastic from a thick black folder. Axle nut protectors usually are on new bikes for shipping protection as you know. I love steam punk stuff and its probably more work for those type of creative details.
Post a picture or provide a link Id love to see something?
 

Attachments

  • eIMG_5911.JPG
    eIMG_5911.JPG
    66.4 KB · Views: 243
  • eIMG_5912.JPG
    eIMG_5912.JPG
    104 KB · Views: 285
  • eIMG_5913.JPG
    eIMG_5913.JPG
    64.3 KB · Views: 251
MeasureTwice, ooops... if your talking about the headbadge instead of the number badge I posted those on the previous page. Just a copper 1/16 Inch thick sheet , cost 6.00 and tin snips and a file and then polish and used double face tape to attach the brass Indian head jewlery I bought on ebay. I then painted the head copper and clear coated for a raised 3D look and my son made the laminated graphics based on the art I provided him. pretty simple to do.
 
Zip I posted earlier that I eagerly awaited the outcome of this build & I'm not disappointed in your results. Quite innovative from the get go with color selection for the tins matched with much copper for striking contrast and graphic details that draw ones interest & attention. Speedometer face & super head badge are just two of the standouts in my take on your work, but your overall attention to detail makes this bike a show stopper.

One detail that attracts my attention in a negative way is the kit bike bar grips. I suggest you consider an upgrade to a motor cycle style alloy throttle set, as the kit throttle internal plastic is prone to failure. Real leather wraps dyed to match your saddle also are an outstanding way to complement the nice leather of your vintage style saddle...even if you decide to stay with the kit grip set.

This bike will draw a lot of attention where ever it's seen & deservedly so!

Rick C.
 
Hey Rick, Thanks for the kind words and most of all your observations. So I present to you the matching Leather Handgrips. I used after market throttle set up that are really solid ones so no worries there. Yep I've had a cheap plastic throttle bodies where the plastic was so thin it was scary, so I know what you mean. Mine are super well built and made from aluminum, only the kill switch is plastic. I used water based acrylic paint to color them and give em some character and get em to match perfect. This paint is 100 percent waterproof when dried. Ill do more detail stitching on them tomorrow. Thanks again Rick!
Here are the picts.
 

Attachments

  • hIMG_5915.JPG
    hIMG_5915.JPG
    114.3 KB · Views: 232
  • hIMG_5916.JPG
    hIMG_5916.JPG
    106 KB · Views: 258
  • hIMG_5917.JPG
    hIMG_5917.JPG
    95.2 KB · Views: 224
Ok..I know... you all are most likely sick of looking at picts of this bike and details but I just truly finished all the stuff ( except for maybe a stubby rear fender I may try to customize? That I had hoped to do and a few unplanned ones like the leather sewn hand grips (thanks to Indian 22/ The only tip in making your own hand grips is to pre-punch holes in the leather for sewing ( ask me how I know) I used a sharp tiny Philips screw driver as a pinch and a block of wood. Below is a pict of the leather end caps. Sewing is then so darn easy if the holes are already there. Today I added the leather borders to finish them. I posted one picture of how I pre- sewed them and then just pulled the thread tight, tie it off and snip done...super fast if everything is pre-stitched. Note: there is no sponge under the leather. I also added a down tube decal, a vintage stainless steel chain guard on pedal side and added two feathered copper wings to it. I bought everything at a fabric store. I made a chain guard rear bracket out of a chrome bracket from Autozone. I Tightened up the seat and adjusted it, so I got to ride the bike for the first time and dang its a small bike. Now I think I need a lay back seat post system. darn. PS These Schwinn panther frame is by far the shortest wheelbase bike I have been on or so it seemed. Id have to compare it to a cranny for official confirmation on how much shorter it really is. .shft.
 

Attachments

  • gIMG_5926.JPG
    gIMG_5926.JPG
    155.1 KB · Views: 237
  • gIMG_5933.JPG
    gIMG_5933.JPG
    143.2 KB · Views: 247
  • gIMG_5935.JPG
    gIMG_5935.JPG
    168.4 KB · Views: 277
  • gIMG_5922.JPG
    gIMG_5922.JPG
    122.2 KB · Views: 229
  • gIMG_5931.JPG
    gIMG_5931.JPG
    122.2 KB · Views: 223
Last edited:
More picts below: Down tube decal and bracket for chain guard
 

Attachments

  • gIMG_5936.JPG
    gIMG_5936.JPG
    120.3 KB · Views: 229
  • gIMG_5934.JPG
    gIMG_5934.JPG
    60.3 KB · Views: 219
I like the grips, finishes off the bike.

Thanks Bill and welcome to the forum! I still liked them too after the second day of looking at them. Lol. I'm gonna use the same method to do a couple of my other bikes before I forget how I did them. Old age memory is rough.
Zip
 
I got bored today so I thought id fabricate up a Mini bobbed fender, paint it and mount it solid to the frame and make a custom stainless bracket for the rear support. Here is the result.
I think it adds some visual length to the overall look of the Motorbike.
 

Attachments

  • mIMG_6002.JPG
    mIMG_6002.JPG
    118.4 KB · Views: 264
  • mIMG_6003.JPG
    mIMG_6003.JPG
    162.3 KB · Views: 228
  • mIMG_6001.JPG
    mIMG_6001.JPG
    114.3 KB · Views: 233
How about the front now?LOL Ten some strips like your tank has...Looks good. Were did you get the fender brace, eBay? .............Curt
 

Attachments

  • aIMG_6007.JPG
    aIMG_6007.JPG
    163.7 KB · Views: 261
  • aIMG_6008.JPG
    aIMG_6008.JPG
    176.3 KB · Views: 241
Last edited:
Thanks, they do look nice................Curt

Thanks Mr Fox, Yes Curtis, just for you... I am going to get a paper pattern done and do the art in adobe for the matching pin stripe on that fender. Just because it will be something to keep me from getting the dreaded cabin fever for one more day in this cold weather... I'm also going make a real short front fender as I have the materials to do it. May look like heck, but I can always remove it in a snap. I will paint the speedo body blue-green too as it bugs me bad...laff
When you going do another build Curtis, it will help make the long winter breeze by?

Zip---
 
KOOL test fit it first and see what it looks like.

I am working in the shop every day when i can. I am working on a build, just so slow i haven't posted yet. Doing other small parts for it headlight, tail light. Found a old model T clamp on spotlight, all brass for head light. Hours of polishing, but coming along, just so much other stuff to do, going slow............Curt
 
You just have more patience, I'm always racing to the end like a kid. Sounds like your up to something good. Don't keep us all in the dark too long. The forums been kinda slow as of late on new interesting builds.
Zip
 
...Just because it will be something to keep me from getting the dreaded cabin fever for one more day in this cold weather...
I know what you mean... It's nice to work indoors, heck it's starting to get brutal here, only 70's for highs and 40's for lows!
I mean jezzz, put on long pants and a jacket to go outside?
No Thanks!


Save
 
Back
Top