Copper Board Tracker

Hey,Guess I got sidetracked co signing on a Car loan today for my 18 year old Daughter so she can start building her credit, more paper work than buying a house. Anyhow I also just found that ebay link also for the tank as it was listed under a Schwinn Panther Gas tank... at roughly 180.00.
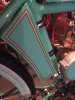
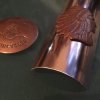
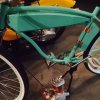
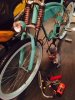
I like this tank as the lines are a one piece curve at the top line for a streamliner look and love all the coffin angles on the rest of it. Besides shallow bracket nuts...
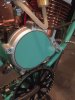
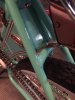
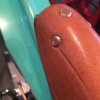
its good quality. Love the lines of the panther frame, subtle but so slick.
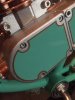
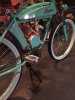
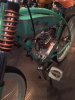
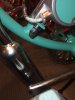
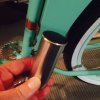
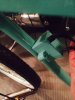
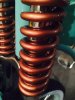
The fork is just a standard 70.00 modern full topper triple tree, hidden spring fork. The top springs are heavy duty springs of 1.4" inside dia. SECRET Here/ -They do nothing but look good., so ...I had this idea and didn't know if it would vintage the fork. I then painted them copper, clear coated and mounted them between Rubber mounts so they are tight and do not rattle. It worked well visually and look fully functional and have fooled experts.
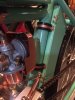
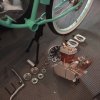
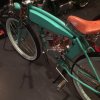
--just installed a one piece crank that went smooth even the cups went in fine without any tools but a leather hammer (TIP: Wash them with Dawn dish soap so the grip the sides of the opening. Even with oil from my hands they want to slip out one side or the other when pounded. Once squeaky clean.. they pounded in perfect and even almost instantly. added tons of grease to bearings ,cups and threaded all the do dads in.
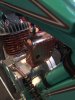
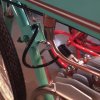
--Installed throttle cable in a defective carb where the mini guide needle was missing so I had to fix that by pounding the flush needle in so it would guide the slide. also the carb clamp was defective and bent at the clamp flanges so I removed it and bent it back so when tightened it will seal well on the intake.
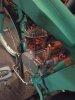
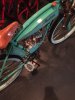
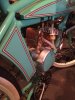
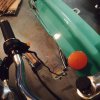
I copperized the ugly red air cleaner cover and carb bowl. Installed the throttle and clutch and squeeze brake handle for the front brake. All that is left is to drill out the pedestal mount for the wider PK80 front studs and then install it and then add two greasy gopher gut chains. I found the seat post on the panther to be only 22.0 MM instead of the usual 25.0 mm post that I have 3 of sitting here, drats... So I am close on Mechanicals.
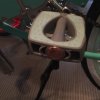
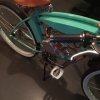
I Made a aluim junction box with rubber hole plugs I just need to drill 2 holes in it for wires to pass thru and painted the CDI and little clamp green so it blends into the bike frame. Never done that before but looks good I think.
Thanks Harold, Ill shoot in square format and see if it helps pictures

KC I bought 3 cans of rattle paint 2 sea glass and one clear cans of Krylon. about 25 bucks I am guessing, 2 drop cloths,masking tape... total about 35 bucks.
 

Attachments

  • cxFullSizeRender.jpg
    cxFullSizeRender.jpg
    129.1 KB · Views: 302
  • cccFullSizeRender.jpg
    cccFullSizeRender.jpg
    139.9 KB · Views: 361
  • ccFullSizeRender.jpg
    ccFullSizeRender.jpg
    151.3 KB · Views: 296
  • cs FullSizeRender.jpg
    cs FullSizeRender.jpg
    142.5 KB · Views: 310
  • cIMG_5733.JPG
    cIMG_5733.JPG
    82.7 KB · Views: 257
A close up picture of the visible upper fork spring and the painted CDI that should blend in super nice . I've also included a picture to point out the curved top of this streamliner style coffin tank. The curved upper bar is subtle but is pleasing to the eye at least mine.
Tomorrow Ill Install the engine and chains and then Monday night the large tank decals and tool box decals should be done...?
 

Attachments

  • sssFullSizeRender.jpg
    sssFullSizeRender.jpg
    35.7 KB · Views: 284
  • ssssvFullSizeRender.jpg
    ssssvFullSizeRender.jpg
    54.1 KB · Views: 325
  • spring FullSizeRender.jpg
    spring FullSizeRender.jpg
    36.4 KB · Views: 270
Tony01 Sorry , I forgot to give you the exact fork link and anyone else who may be interested in it , here it is.
http://www.ebay.com/itm/MOTORIZED-B...646191?hash=item41aeed10ef:g:slcAAOSwWfFXkAjm
-the springs are from ebay also. search 331-Heavy-Duty-compression-spring-Lot-Of-4
I paid 38 bucks for 4 of them and will be using the other 2 on another build. Monarch Springer forks seem wimpy after looking at this style of fork with my upper springs in my humble opinion.

-Venice I'm glad you like the color, that means a lot from someone that build so many cool builds.
 

Attachments

  • Fork FullSizeRender.jpg
    Fork FullSizeRender.jpg
    48.7 KB · Views: 283
Well, Installed the motor and a wire junction tube, that went smooth as did the chains as they both came out with perfect tension on both sides, Ill still add a spring loaded tensioner on the engine to keep it perfect at every evolution. However had a big issue that took hours to solve and fix. The vintage style tool box was in the way of the chain big-time. Total oversight on my part... I thought of cutting off the bottom 2 inches of the tool box and installing a new bottom. But I thought to make offset brackets as to tuck the tool box I/2 " away from the chain, but with that method the tool box door wouldn't open as it would hit the chain. My son had the good idea to just cut the door so just the top 3/4s of it would swing open and then screw the bottom half permanently closed. So we did the scary cutting deed of tool box door, fabricated two new weird offset brackets and 3 hours later it was perfect again after a little touch up painting. See picture. Anyhow just decals left and a chain tensioner on Monday night and looking for any issues I may of overlooked plus getting the cables sorted out. I got a big mess to clean up now.
Zip
 

Attachments

  • aIMG_5774.JPG
    aIMG_5774.JPG
    152.7 KB · Views: 242
  • a IMG_5789.JPG
    a IMG_5789.JPG
    149.7 KB · Views: 257
  • a IMG_5782.JPG
    a IMG_5782.JPG
    138.4 KB · Views: 250
  • a IMG_5779.JPG
    a IMG_5779.JPG
    122.4 KB · Views: 242
You are freaking killing me right now!!

I just found the reproduction frame, and the gears started spinning in my head again. Now I want to build another bike. Like I need another project right now. Seriously. I'm transferring in less than 2 months and I need to shed some weight! No, the Enfield bike will not be for sale.
 
Agreen the bare tank and frame is calling you...can you hear it? That voice drives me nutz. I get a vision and then like an addict I have to build it. The frame and tank are of great quality platform, I think you would be pleased. Hope your staying in warm weather where you are transferring to. Honestly two months is more than enough time for planning and building if you do something each day. I actually only spent 21 hours of real building and painting and detailing the bike. Plus a odd couple of hours maybe ordering parts.
OK, my son just brought me a test print of the vintage look tank insert decal and tool box decal with what (he) Mr. Jr. know it all... laff
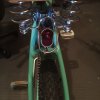
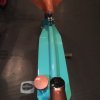
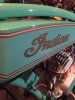
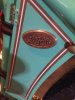
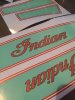
, thought would look best in his opinion / with the blue green turquoise color in the center without white, except for the tiny white separating the copper pinstripe space. I liked it alot as the bike looks like it wants to stay mostly turquoise. So maybe Jr. did know better than his foolish ole Dad. Now I have to wait just another day for the cherry on top for the build. Ill roll it outside for a clear picture or two after they are on. The oval medallion will be attached to the tool box too after the decals are on it. Planning is everything in having a successful build of this nature even with all that something always comes up that throws a monkey wrench in those plans that has to be changed.
zip...
 

Attachments

  • gIMG_5791.JPG
    gIMG_5791.JPG
    95.4 KB · Views: 220
  • gIMG_5752.JPG
    gIMG_5752.JPG
    122.5 KB · Views: 237
  • gIMG_5796.JPG
    gIMG_5796.JPG
    96.3 KB · Views: 228
  • gIMG_5786.JPG
    gIMG_5786.JPG
    103.7 KB · Views: 228
  • gIMG_5798.JPG
    gIMG_5798.JPG
    94.1 KB · Views: 266
Last edited:
Shown below are rubber lined universal hardware store clamps cut and re-bent and cut to be offset and with copperized steel inserts.
 

Attachments

  • gIMG_5797.JPG
    gIMG_5797.JPG
    123.5 KB · Views: 217
Well The copper Indian is all done!
Ill let the pictures below do the talking. I like it a bunch and the decals really make it look vintage. Kudos to my son who made the graphics. We also did the engine graphics that make the engine look more like part of the bike. It was dark out by the time we were done so maybe a daytime outside pict asap.

Zip
 

Attachments

  • dIMG_5805.JPG
    dIMG_5805.JPG
    118.1 KB · Views: 239
  • dIMG_5813.JPG
    dIMG_5813.JPG
    121.2 KB · Views: 234
  • dIMG_5812.JPG
    dIMG_5812.JPG
    117.1 KB · Views: 233
  • dIMG_5821.JPG
    dIMG_5821.JPG
    112.4 KB · Views: 236
  • dIMG_5814.JPG
    dIMG_5814.JPG
    117.4 KB · Views: 223
A couple of wide shots and a photo of the one piece graphics before installation that we color matched to the paint pretty exact.
Later
Zip
 

Attachments

  • dIMG_5819.JPG
    dIMG_5819.JPG
    148 KB · Views: 275
  • dIMG_5817.JPG
    dIMG_5817.JPG
    136.9 KB · Views: 241
  • dIMG_5802.JPG
    dIMG_5802.JPG
    121.6 KB · Views: 233
Thanks so much KC! That means a lot coming from you!
 

Attachments

  • a IMG_5837.JPG
    a IMG_5837.JPG
    132.1 KB · Views: 256
  • aIMG_5828.JPG
    aIMG_5828.JPG
    115.9 KB · Views: 217
  • aIMG_5830.JPG
    aIMG_5830.JPG
    50.8 KB · Views: 242
ZipTie, That an exceptional build! Curious to how close the frame is to an original Schwinn? Nice color and paint job turned out really good especially for rattle cans. I see why you like Krylon products. You needed a respirator instead of a dusk mask! It would have saved your lungs. I just re-skimmed your thread and didn't see what your copperizing method is.
 
Thanks Robert, I would think by visual comparison its pretty exact to the Panther except for the added and handy 2 stroke motor pedestal pre installed. ( see pict) I was amazed how the motor fit exact and dropped on darn perfect. All the welds looked really good on it also. It saved me from having to add a Motor mount at the front and stripping old paint off. For copperizing I used 2 methods.
A. copper tape for the air cleaner and anything that wont get too warm or hot
B Metalizing Paint. The key is to lightly clear coat first then paint the copper then clear coat again so it looks anodized. They sell copper anodized wheel kits at autozone.
yep id never do it again with out a booth or a respiratory. I was amazed at how much fumes are created painting a skinny bike frame. Im still coughing Blue green dust. LOL
 

Attachments

  • wIMG_5840.JPG
    wIMG_5840.JPG
    134.4 KB · Views: 244
  • wIMG_5841.JPG
    wIMG_5841.JPG
    108.4 KB · Views: 235
Thanks so much KC! That means a lot coming from you!
Thanks but you don't need to thank me zip. I call 'em like I see 'em and this a fine example of how to take the 'extra time' to do things nice.

Enjoy the feeling and be proud of yourself, you earned it!
 
Thanks a bunch Wret, Its what this hobby has evolved into for me as a personal challenge of some sort. Today I added copper look studs to the hairpin seat and copperized the pedal end plugs, and added a more period correct copper gas Line just for looks. Not much but was time consuming.
 

Attachments

  • zIMG_5866.JPG
    zIMG_5866.JPG
    55.8 KB · Views: 208
  • zIMG_5867.JPG
    zIMG_5867.JPG
    107.2 KB · Views: 253
  • zIMG_5868.JPG
    zIMG_5868.JPG
    61.5 KB · Views: 245
Last edited:
I noticed The high price of Indian Motorcycle Head badges so I thought Id pick up a sheet of thin copper and try to make my own. So far so good. Graphics next... The roundel logo is for the clutch plate.
 

Attachments

  • cIMG_5875.JPG
    cIMG_5875.JPG
    119.3 KB · Views: 213
For engines and other motor bike stuff in kit form, I'm not as interested in, but for sure the modifications for esthetic looks you are doing I find this really great!
 
Last edited:
Back
Top