
You are using an out of date browser. It may not display this or other websites correctly.
You should upgrade or use an alternative browser.
You should upgrade or use an alternative browser.
Chief say "how" :)
- Thread starter Velodrome
- Start date
truckd
Well-Known Member
Velodrome
Well-Known Member
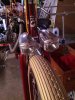
Got the hammer and torch out again and played blacksmith for a bit today to make a bracket for the twin headlights. Got em mounted and locked down pretty good. Used neoprene backed washers to protect the paint on the fork. stainless allen heads and chrome acorn nuts. I wantted to support the aluminum butterfly shaped bracket as I have no idea as to its strength and bouncing along at 30 mph it wasnt designed for. Plus its heavy! One D cell in each side!
Attachments
truckd
Well-Known Member
I like the lights maybe you could fab eye brows for them (no pun intended thats what there called) something about them would fit the look of the bike well.
The SS mesh for the lines just gives a bike a solid mechanical zeal, if you do buy some E-Mail me and I'll give you some instructions for install,Tricky but yet really simple once you know how to do it.
The SS mesh for the lines just gives a bike a solid mechanical zeal, if you do buy some E-Mail me and I'll give you some instructions for install,Tricky but yet really simple once you know how to do it.
JustAnotherBozoOnABike
New Member
...yeah, any chance you'd consider posting those instructions here in public forum so others can benefit as well?I like the lights maybe you could fab eye brows for them (no pun intended thats what there called) something about them would fit the look of the bike well.
The SS mesh for the lines just gives a bike a solid mechanical zeal, if you do buy some E-Mail me and I'll give you some instructions for install,Tricky but yet really simple once you know how to do it.
peace, bozo
btw Velodrome, the "chief" is a real looker although every bike of yours that i've looked at has been so well put together it's almost intimidating to read your threads, lol. ...thank you for sharing your work and your knowledge and skills.
Velodrome
Well-Known Member
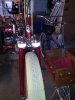
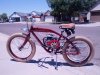
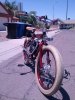
Well the bike is almost complete. Had a POOP of a time getting it to run. I stole the carb and filter from the Twin as AGK had the stock one to make into a big bore and my spare is at Dan Orabona's having a brass velocity stack made. Fussed with it for over an hour gapping and re gapping the plug doubel checking the kill switch, and cleaning the idle jet. But is running AND RIDING!! This thing takes off like a SHOT! Problem is its geared SO LOW my top speed is about 15 MPH.... Looks like I'll need to go to a bigger pulley or switch to the 80 tooth primary wheel. But here she is all polished and wax'd Just need some well nuts for the handlebars.
Attachments
Velodrome
Well-Known Member
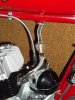
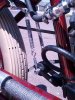
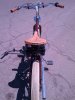
and a few more. Notice where I put the kill switch. Its on the seat post. I figured I can still get to it in an emergency and I have enough crap on the bars. I shrinkwrapped the wires and cut to perfect length running them down the seatpost and under the motor and popping back up at the front of engine.
Attachments
Last edited:
JustAnotherBozoOnABike
New Member
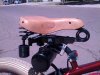
Hey Truckd!! Check it!!
...man, i love that seat! ...is it as comfortable as it looks?
...and is this the place to get one? ...if not can you post a link? ...i want one for real, lol.
tia, bozo
Velodrome
Well-Known Member
No... This is where I got mine and its WAY less. ") http://www.ebay.com/itm/36061288279...X:IT&_trksid=p3984.m1497.l2649#ht_2597wt_1234 WAY WAY WAY COMFY saddle. EDIT: Disclamer: Not all a$$es are alike. Your results may vary...
http://www.ebay.com/itm/36061288279...X:IT&_trksid=p3984.m1497.l2649#ht_2597wt_1234 WAY WAY WAY COMFY saddle. EDIT: Disclamer: Not all a$$es are alike. Your results may vary...
http://www.ebay.com/itm/36061288279...X:IT&_trksid=p3984.m1497.l2649#ht_2597wt_1234 WAY WAY WAY COMFY saddle. EDIT: Disclamer: Not all a$$es are alike. Your results may vary...
Last edited:
Velodrome
Well-Known Member
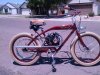
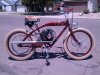
Where did you get the pulley cover, that's kinda cool too!
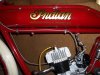
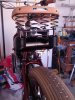
Thats the stock 4G cover. Its been chopped and modified slightly. Opened it up to show the wheel but retained all 3 attachment points. Got the idea from Phantom Bikes. They do something similar. Wish I could find a spray bomb can that has a color closer to the frame. I have another cover coming from bicycle-engies.com and will play around with that one too.