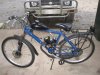
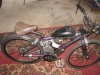
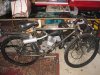
Building a Ht Motorized Bicycle or Three.

The Goat,

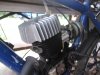
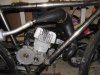
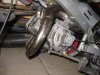
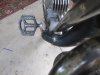
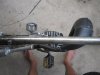
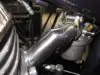
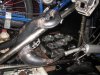
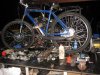
Is mostly waiting on me finding a pair of 45mm long M6 counter sunk screws to attach the reed and new pulse pick up, made this time out of alloy, as I didn't trust the nylon? one.
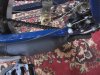
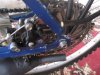
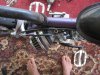
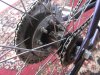
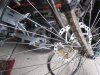
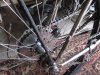
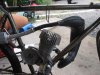
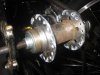
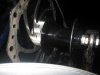
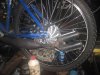
Also still awaiting the new 203 front rotor for the brakes, otherwise, I have all the chains and cables sorted, but also need to drill a couple more of the rear disc mounting holes out to 6mm.
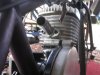
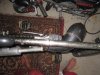
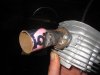
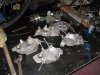
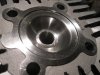
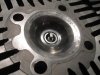
otherwise, I have filed the head fins up, and need to reshape the squish band a little, and give the head a light shave.
IMG_4393_zpsda18858d.jpg

IMG_4386_zps07b11475.jpg

IMG_4375_zpse3078088.jpg

IMG_4373_zps228e89f2.jpg

IMG_4377_zps4ba56b3b.jpg
 

Attachments

  • IMG_4393_zpsda18858d.jpg
    IMG_4393_zpsda18858d.jpg
    136.5 KB · Views: 129
  • IMG_4386_zps07b11475.jpg
    IMG_4386_zps07b11475.jpg
    103.5 KB · Views: 120
  • IMG_4375_zpse3078088.jpg
    IMG_4375_zpse3078088.jpg
    107 KB · Views: 123
  • IMG_4373_zps228e89f2.jpg
    IMG_4373_zps228e89f2.jpg
    78.2 KB · Views: 120
  • IMG_4377_zps4ba56b3b.jpg
    IMG_4377_zps4ba56b3b.jpg
    88.8 KB · Views: 116
IMG_4391_zpscce4cece.jpg
The Phantom.
Is all sorted except the intake manifold, she's going back to "speed' carb, and as tight a fit against the frame with the carb as possible.
IMG_4381_zps4489dda1.jpg
IMG_4382_zpsa4d6b202.jpg
IMG_4383_zpsa977aead.jpg
IMG_4379_zps0b99e970.jpg
 

Attachments

  • IMG_4391_zpscce4cece.jpg
    IMG_4391_zpscce4cece.jpg
    140.7 KB · Views: 119
  • IMG_4381_zps4489dda1.jpg
    IMG_4381_zps4489dda1.jpg
    77 KB · Views: 111
  • IMG_4382_zpsa4d6b202.jpg
    IMG_4382_zpsa4d6b202.jpg
    71.9 KB · Views: 105
  • IMG_4383_zpsa977aead.jpg
    IMG_4383_zpsa977aead.jpg
    103.3 KB · Views: 110
  • IMG_4379_zps0b99e970.jpg
    IMG_4379_zps0b99e970.jpg
    117.3 KB · Views: 113
The Mongoose.

All the Chains and brakes are sorted except cables. Silver outers might be cool?
I,m not any closer to cutting the cases, but slowly getting the rest of the bike sorted, including shortening the stinger a little and getting the exhast into final position before I finalize the welding.
plan to build an exhaust flange with a slide fit while I'm welding , and have taken her for the odd no brakes pedal, but not far. She feels good, fast!
IMG_4392_zpsb7b17a4c.jpg
IMG_4389_zps5e1ef0b6.jpg
IMG_4388_zps10df8fbe.jpg

Photo probs?
 

Attachments

  • IMG_4392_zpsb7b17a4c.jpg
    IMG_4392_zpsb7b17a4c.jpg
    144.9 KB · Views: 112
  • IMG_4389_zps5e1ef0b6.jpg
    IMG_4389_zps5e1ef0b6.jpg
    112.9 KB · Views: 118
IMG_4388_zps10df8fbe.jpg
IMG_4385_zpse8882e1b.jpg
IMG_4384_zps63c18106.jpg
IMG_4390_zps15aa3db4.jpg

there they are, and an interesting pipe on this pocket bike, but it's staying where it is.
 

Attachments

  • IMG_4388_zps10df8fbe.jpg
    IMG_4388_zps10df8fbe.jpg
    119.9 KB · Views: 112
  • IMG_4385_zpse8882e1b.jpg
    IMG_4385_zpse8882e1b.jpg
    124 KB · Views: 113
  • IMG_4384_zps63c18106.jpg
    IMG_4384_zps63c18106.jpg
    117.1 KB · Views: 116
  • IMG_4390_zps15aa3db4.jpg
    IMG_4390_zps15aa3db4.jpg
    105.8 KB · Views: 119
Nice job on the mongoose... I've got my KTM pipe cut up and was experimenting with routing and mine came out almost the same way with the expansion chamber crossing the frame at pretty much the same location. Mine's not welded yet because I'm still fine tuning the routing, but it seems to look and work the best in just about the same position you got yours.

Yeah, the exhaust on that pocketbike is one of the higher performance versions and it does work really good with these engines too.
 
I have finalized the reshaping of my exhaust, with a nice snug fit around the frame and the belly of the pipe as far forward as possible.
I also gave a little kink in the stinger to allow a bit more clearance for my thigh.
As well as a slip joint in the header.
IMG_4412_zps096b884e.jpg
IMG_4411_zps7b1fe159.jpg
IMG_4410_zpsec3c8a55.jpg
IMG_4409_zpsc259dc8d.jpg
 

Attachments

  • IMG_4412_zps096b884e.jpg
    IMG_4412_zps096b884e.jpg
    81 KB · Views: 112
  • IMG_4411_zps7b1fe159.jpg
    IMG_4411_zps7b1fe159.jpg
    76.2 KB · Views: 121
  • IMG_4410_zpsec3c8a55.jpg
    IMG_4410_zpsec3c8a55.jpg
    96.5 KB · Views: 115
  • IMG_4409_zpsc259dc8d.jpg
    IMG_4409_zpsc259dc8d.jpg
    127.9 KB · Views: 123
Nice fit on the pipe, Good to keep in mind that the pipe needs to be as far away from your leg as possible. I had my old header pipe close to the frame but still burned my leg once before but it was because I got on the bike from the wrong side and I was wearing shorts. The only thing I could think of on yours would be maybe make the stinger pipe longer until right past the seat and putting the muffler further back so you can run the pipe as close to the frame as possible until it gets to where the seat post is.

Good job on the intake too, I'll need to do something similar when I get back to that point in the build, my bike doesn't even have room for the air filter. It'll go on but I need to loosen up the engine mounts and tilt the engine over to get it on or off.
 
The Mongoose is getting her new wheels made up, I have a nice old set of polished rims to go on her.
and just a liitle more finishing off on the exhaust welding.
So I have the cases on the bench and trying to decide on final reed mount.
Have also done a little more on my reed cage, and it's nearly finished.
Have carbon pocket bike reeds, which fit, but also have a sheet of polini reed which seems the same thickness as my pocket bike reeds, un sure the best way to cut the reeds from the sheet.
IMG_4431_zpsacb5f2df.jpg
IMG_4430_zpsb4af8082.jpg
IMG_4426_zps909f1609.jpg
IMG_4425_zps304c0733.jpg
IMG_4423_zps9acf418b.jpg
 

Attachments

  • IMG_4431_zpsacb5f2df.jpg
    IMG_4431_zpsacb5f2df.jpg
    86.3 KB · Views: 120
  • IMG_4430_zpsb4af8082.jpg
    IMG_4430_zpsb4af8082.jpg
    62.1 KB · Views: 109
  • IMG_4426_zps909f1609.jpg
    IMG_4426_zps909f1609.jpg
    60.3 KB · Views: 114
  • IMG_4425_zps304c0733.jpg
    IMG_4425_zps304c0733.jpg
    122.2 KB · Views: 112
  • IMG_4423_zps9acf418b.jpg
    IMG_4423_zps9acf418b.jpg
    120.1 KB · Views: 114
The Goat is getting so close.
I have new front brake,
Mounted up the Knobbies on there rims, notice the spoke pattern.
Have to shorten the stinger and mount the muffler, I quite like this twin muffler.
Can't find any M6 CS screws 45mm long in this little contry town!
Which I need to mount the reed block, should have just ordered 20 for $6 of ebay.
A week ago!
I have done a few mods to the Puch head, and hope I havn't got my compression to high, I have another!
IMG_4416_zpsfb0d78e5.jpg

IMG_4415_zpsf0e86a37.jpg
IMG_4418_zps5e647958.jpg
IMG_4438_zps72706f5b.jpg
IMG_4441_zps6f09738b.jpg
 

Attachments

  • IMG_4416_zpsfb0d78e5.jpg
    IMG_4416_zpsfb0d78e5.jpg
    97.8 KB · Views: 116
  • IMG_4415_zpsf0e86a37.jpg
    IMG_4415_zpsf0e86a37.jpg
    81.7 KB · Views: 117
  • IMG_4418_zps5e647958.jpg
    IMG_4418_zps5e647958.jpg
    143.7 KB · Views: 118
  • IMG_4438_zps72706f5b.jpg
    IMG_4438_zps72706f5b.jpg
    107.9 KB · Views: 110
  • IMG_4441_zps6f09738b.jpg
    IMG_4441_zps6f09738b.jpg
    99.5 KB · Views: 105
Nice job on the exhaust header coming off the cylinder... the rest of the system looks really familiar to me too, but mine is still cut up and temporarily held together with turbo couplings and clamps... not gonna weld mine until I got the engine installed to ensure a good fit.

For the Polini reed sheet, if it's carbon fiber you should be able to cut it cleanly with a pencil grinder (or a dremel) and cutting wheel for the large straight sections, then use a diamond burr to cut the split between the petals. The daimond burrs act like a really fine sanding drum so use high rpm and a light touch to avoid kickback, you may need to rig up some kind of straight edge for cutting the split nice and straight.
Option B would be to use an x-acto knife and a straight edge, do light cuts and multiple passes and it should come out ok, be patient with this method, the carbon fiber tends to crack with too much blade pressure.

If it's fiberglass, the same methods can be used with ease... the daimond burrs in a pencil grinder or dremel will cut thru it like butter.
 
And I found another nice old bike at the dump the other day and had to take it home and fix her up a little.
Hope to keep this one as my peddle bike, but we'll see.
IMG_4432_zps747696d7.jpg
IMG_4436_zps7971547d.jpg

Easier to see the spoke pattern on this one.
 

Attachments

  • IMG_4432_zps747696d7.jpg
    IMG_4432_zps747696d7.jpg
    108.3 KB · Views: 108
  • IMG_4436_zps7971547d.jpg
    IMG_4436_zps7971547d.jpg
    79.2 KB · Views: 109
The Goat looks really cool... I'm liking the dual tips on the pipe...
How much did you shave off that Puch head? You should be ok as long as you got around .75 to 1mm squish clearance and the spark plug doesn't get in the way. You could shim the plug if you have to for a little extra clearance. Another trick here is use a plug like the Bosch Platinum 2 or the +4 since the ground electrodes are on the side of the center electrode instead of the conventional ground over center which will give you even more clearance without needing to shim the plug, they work pretty good too.
 
I'd love to get a Screamimng Roo motor for the old trek, but my missus would probably not see that I need another motor bike.
Plus I can get a KTM motor for similar price, and have been considering selling the Phantom to fund a KTM build?
Not sure what I'd put it in yet though, liked the idea of putting it in my stingray.
The trek will likely stay peddles only.
Don't think the plug will hit on the Puch head, will be running around .7mm squish.
As I have about .2mm without head gasket.
 
that'll be just fine for the squish, compression may be a little high tho, but you can add some toluene to your fuel to boost the octane to a more respectable level if needed...

I'm still contemplating on getting a KTM clone and another bike to put that engine in... a stingray would be killer with that engine... I saw another engine I'd really love to put in a bike, it's an older Morini with a CVT built in, they were put in the Motobecane EW 50 but they're hard to find, Treatland has one on their site but they're always out of stock for this one... https://www.treatland.tv/ProductDetails.asp?ProductCode=FRANCO-MORINI-COMPLETE-ENGINE . Or I'd be happy to put this type transmission in a newer Morini clone if it could be done.

Here's my reed valve collection.. The carbs in the background are 20mm Tilly (18mm venturi) and the other one is a 13mm venturi Tilly...

7b9m.jpg


This is the reed for a 60cc RC model engine, it fits the 20mm Tilly with very minimal intake trimming, this one should flow enough to run the larger Tilly but it's very compact in size...

ph3bn.jpg


m781.jpg
 
Saw the pic you posted in the other post and yeah, it's the same reed... I said it came from a DLE 60cc twin engine, but it's really from the OS GT60, I just looked back on ebay at my purchase history... It seems that I saw another pic of an RSE with the smaller reed in it, a black plastic valve with 2 large petals.. JN has it pictured this way, but I've seen them with both reed setups so one might be bigger? Looks like this one could handle about the same size carb but could be an older or a newer version? http://www.jnmotorsbikes.com/product_p/jnm1252.htm
 
I'm almost tempted to put one of these engines in a bicycle... 17.5HP @9k rpm and that's without expansion chambered exhaust... It could be run as single speed, but it would really be quick with a variator setup... http://www.dle-engines.com/dleg0170.html they also make a 4 cylinder version that makes about 22Hp @7500 but it may be too wide to be practical... The price for the 111cc twin (11hp) is comparable to a KTM clone and the 170cc price isn't that bad either.
 
Davezilla, the problem with these engines is they are designed to run at a constant high rpm for a prop. The few I have seen used on other than planes all were peaky and very temperamental. I saw a guy stuff the inline twin in a monster/staduim/basher rc truck and while it was super fast, it was a pig in normal use and basically a on/off switch type of motor.
Your variator idea sounds interesting though...might be a way to spread useable power by clutching it correctly.
But be aware, they will never run like a motorcycle engine.
 
Back
Top