
HoughMade
New Member
I have the dual pull brake handle on my bike. I am adding a full lighting system, so there is the issue of building a brake light switch. Here is what I did.
I got a momentary, normally closed, switch from Radio Shack. this means the switch is spring loaded and unlike most swutches, it is always on until you push the button. When you push the button, it goes off.
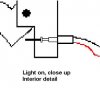
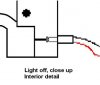
Between where the 2 brake cables come into the handle, there is a space a bit ove 1/2" wide. I drilled a small hole between the cables all the way through the handle. the hole is about 3/32". I then determined what size the switch itself is- that is, the switch has threads on it wear it is normally mounted to a panel with a nut. It is about 5/16", but uses a non-standard thread.
Having determined that I decided to use use a die to reform the threads to a standard 7mm, which is a but under 5/16". I then drilled out the original 3/32" hole to 1/4" about 2/3rds of its depth and threaded it with the 7mm tap. This allows me to thread the switch into the hole between the cables. Now, I need a plunger that would extend out the hole and contact the moveable part of the handle. I grabbed several different sizes of finishing nails and tried them out for size. The head of the nail goes in the hole, and with the head being larger than 3/32, it cannot fall out. I had to experiement with length, but I eventually got it right.
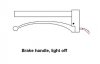
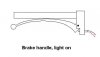
The way it workd is simplicity itself. When your hand is off the brake handle the flat part of the hinged portion of the handle pushes on the plunger and forced it into the hole. The head of the plunger (nail) pushes on the button of the switch and the light is off. When you squeeze the handle, the hinged portion moves away from the stationary portion of the handle and the plunger is pushed out by the spring action of the switch. When you let go of the switch, the plunger is pushed back in and the light goes off.
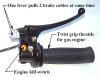
Here are some drawings to explain it. I left off the cables for clarity, but just know that the switch mounts between the 2 brake cables. The last pic the the dual pull handle I used...although I replaced the horrible kill switch with a quality piece before I started it once.
I got a momentary, normally closed, switch from Radio Shack. this means the switch is spring loaded and unlike most swutches, it is always on until you push the button. When you push the button, it goes off.
Between where the 2 brake cables come into the handle, there is a space a bit ove 1/2" wide. I drilled a small hole between the cables all the way through the handle. the hole is about 3/32". I then determined what size the switch itself is- that is, the switch has threads on it wear it is normally mounted to a panel with a nut. It is about 5/16", but uses a non-standard thread.
Having determined that I decided to use use a die to reform the threads to a standard 7mm, which is a but under 5/16". I then drilled out the original 3/32" hole to 1/4" about 2/3rds of its depth and threaded it with the 7mm tap. This allows me to thread the switch into the hole between the cables. Now, I need a plunger that would extend out the hole and contact the moveable part of the handle. I grabbed several different sizes of finishing nails and tried them out for size. The head of the nail goes in the hole, and with the head being larger than 3/32, it cannot fall out. I had to experiement with length, but I eventually got it right.
The way it workd is simplicity itself. When your hand is off the brake handle the flat part of the hinged portion of the handle pushes on the plunger and forced it into the hole. The head of the plunger (nail) pushes on the button of the switch and the light is off. When you squeeze the handle, the hinged portion moves away from the stationary portion of the handle and the plunger is pushed out by the spring action of the switch. When you let go of the switch, the plunger is pushed back in and the light goes off.
Here are some drawings to explain it. I left off the cables for clarity, but just know that the switch mounts between the 2 brake cables. The last pic the the dual pull handle I used...although I replaced the horrible kill switch with a quality piece before I started it once.
Attachments
Last edited: