
You are using an out of date browser. It may not display this or other websites correctly.
You should upgrade or use an alternative browser.
You should upgrade or use an alternative browser.
azbill's EZM stretch project
- Thread starter azbill
- Start date
azbill
Active Member
John,
I can't wait to get this on the road and see how she pulls,,,a ride/meeting you will be really cool")
Civilzed,
I have ONLY been able to pedal so far") ,,,the small pedal sprocket seems to be very easy going , slow but very easy pedalling
,,,the small pedal sprocket seems to be very easy going , slow but very easy pedalling
ps...I think the 72T is the biggest Jim has made... so far (very pleased with his work)
I can't wait to get this on the road and see how she pulls,,,a ride/meeting you will be really cool
Civilzed,
I have ONLY been able to pedal so far
,,,the small pedal sprocket seems to be very easy going , slow but very easy pedallingps...I think the 72T is the biggest Jim has made... so far (very pleased with his work)
Last edited:
azbill
Active Member
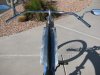
Barron,
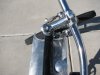
I am hoping to need no tensioners on engine side
(if my 1eyed measurements are correct LOL)
I may need 1 on top run to clear the crossbar that the fender bolts to
(I have always heard not to run on top with the 2strokes, I hope it will be ok with my EZM)
I am getting good karma from some of the builders here I respect the most...thanks a lot guys")
I am hoping to need no tensioners on engine side
(if my 1eyed measurements are correct LOL)
I may need 1 on top run to clear the crossbar that the fender bolts to
(I have always heard not to run on top with the 2strokes, I hope it will be ok with my EZM
)I am getting good karma from some of the builders here I respect the most...thanks a lot guys
Last edited:
azbill
Active Member
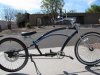
someone asked me if I was worried about the wheel/bike bearings (they don't have a good rep)
I am not using the original wheels, so that's not an issue...
all the upgraded parts I have gotten over the years for the Jag are going on the stretch, with the exception of the black springer (won't fit, the stretch has a much longer stearing-tube )
)
the headset and crank bearings were replaced with better ones and packed in high-temp bearing grease from Ace
I already have my bent crank from the Jag on it (using kiddie crank on Jag till the swap)
Vinnie has started on the tank (his 1st, and using aluminum) and I am hoping to be riding soon
I am not using the original wheels, so that's not an issue...
all the upgraded parts I have gotten over the years for the Jag are going on the stretch, with the exception of the black springer (won't fit, the stretch has a much longer stearing-tube
)the headset and crank bearings were replaced with better ones and packed in high-temp bearing grease from Ace
I already have my bent crank from the Jag on it (using kiddie crank on Jag till the swap)
Vinnie has started on the tank (his 1st, and using aluminum) and I am hoping to be riding soon
azbill
Active Member
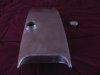
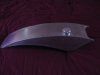
azVinnie finished my tank ( his first scratch-built)
all aluminum, tigged and ground smooth
suits the lines so nicely, holds about 1 gal
pic 1 left profile (some flames just buffed as a test)
pic 2 straddling rear wheel
pic 3 right profile showing cap n drain
pic 4 close-up of right side
pic 5 cut-out in front of tank so springer clears lock-to-lock
I am going to rough up the surface and use black primer, then black satin engine paint
thanks again Vinnie, you rock dude !!!
Attachments

Retmachinist
New Member
Wow, Sweet Tank Bill. I can see Vinnie has quite a bit of experience with the Tig welder. Anyone can use a Mig, but Tig takes alot of practice, I am impressed. Does Vinnie do Tig welding at his job?
It will be nice, I will actually be able to see your bike in the desert in late March. I will call you when we are there. Can't wait to get to where it is warm!
John
It will be nice, I will actually be able to see your bike in the desert in late March. I will call you when we are there. Can't wait to get to where it is warm!
John

azbill
Active Member
just 1 more set of pics before I primer/paint
1st pic detail of the bottm of tank (Vinnie turned 2 chunks of aluminum into the fuel outlet, and a 1/4-20 tapped hole that will be cross clamped to the canti-bars)
2nd pic showing the bung welding (bought the cap n bung)
3rd pic showing notch out to clear forks
4th pic right profile
1st pic detail of the bottm of tank (Vinnie turned 2 chunks of aluminum into the fuel outlet, and a 1/4-20 tapped hole that will be cross clamped to the canti-bars)
2nd pic showing the bung welding (bought the cap n bung)
3rd pic showing notch out to clear forks
4th pic right profile
Attachments


iRide Customs
New Member
Looking fantastic!
azbill
Active Member
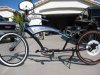
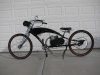
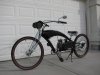
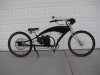
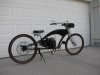
almost done ...
exhaust needs to be lengthened so muffler is under and parallel to frame,
couple of tensioners/chain guides to clear frame, (temporary zip-tie in pics)
fenders, and I think that's all
lights will be done at a later time
hope you like it
...exhaust needs to be lengthened so muffler is under and parallel to frame,
couple of tensioners/chain guides to clear frame, (temporary zip-tie in pics)
fenders, and I think that's all
lights will be done at a later time
hope you like it
Attachments
Last edited:
Retmachinist
New Member
almost done
exhaust needs to be lengthened so muffler is under and parallel to frame,
couple of tensioners/chain guides to clear frame, (temporary zip-ties in pics)
fenders, and I think that's all
lights will be done at a later time
hope you like it
Very nice Bill. You should have plenty of low end with that sprocket. Can't wait to see it in person, when we are in FH the third week of March.
John