
You are using an out of date browser. It may not display this or other websites correctly.
You should upgrade or use an alternative browser.
You should upgrade or use an alternative browser.
80cc chinese motor kit
- Thread starter dmpatanis
- Start date
chainmaker
Well-Known Member
Check Everything!
Cheers
Cheers
Al.Fisherman
New Member
Out of the box Engine.. This has been asked over and over and over. Time to have a copy for copy and paste.
1) Check inventory
2) Remove the OEM head studs and nuts and replace with metric grade 8.8 (I use all thread) and nylock nuts.
3) Remove and discard all OEM engine mounting studs, exhaust, and intake if you like. No strain on the intake. I use RED locktite on the studs, but if removal is needed heat must be applied. Blue is fine. Use 6mm Nylock nuts. I double nut (jam nut) and use a lock nut.
4) Torque... 8mm 150-200 INCH POUNDS, 6mm 50-70 INCH POUNDS. I use 50 and 150 INCH POUNDS. You might think either 50-70 inch pounds or 150-200 inch pounds is not enough, believe me it is. I have never broken a stud, a mount, stripped out a hole nor had anything come loose on the engine.
5) While head is off mill the head, by milling (sanding) head surface using 220 grit sandpaper on a sheet of glass (I use 220 DA paper stuck to the garage door window). Slide from side to side and rotate, until surface is shiny. Remove as little material as possible.
6) When reinstalling the head gasket, either spray both sides with copper kote or aluminum spray paint. I put 2 coats on either side and let dry.
7) Remove spark plug and wire from CDI (unscrews counterclockwise) and replace (screw clockwise) with a good grade of plug wire and boot, and a NGK plug.

8) Take the large sprocket (for the rear wheel) and slightly grind or file the sharp edges of the teeth, both sides.
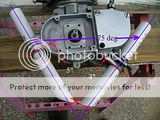
9) Now comes the MOST important part and that is mounting the engine to the frame. For fitting you might want to tape the seat tube, for scratch prevention. For a perfect engine fit, the tubes should be at a 75 degree angle.
10 When installing the engine start with the rear mount on the seat down tube. Mount the engine to the frame, not the frame to the engine. When tightening the engine mount nuts make sure that the engine mount, mounts flush with the seat down tube. Gaps in between can and will cause broken studs and or mounts from stress.
11 If the front mount can’t be tightened to the tube and be completely flush, a custom mount is NEEDED. This is one I made Custom front mount there are other types.
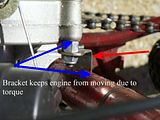
12) Once everything lines up remove the tape. DO NOT use tape, rubber or anything between the mount and tube. Some members do and get away with it, but most don’t. Should your engine want to rotate (twist to the left) due to torque you can make this bracket.
13) Remove the coil cover and cut off or cut and tape the white wire. Replace cover.
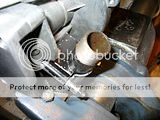
14) When installing the carburetor I insert an “O” ring. This “O” ring fits inside the carburetor and comes in contact with the outside lip of the intake manifold, thus lessening the chance for a vacuum leak. There are other methods.
15) Make sure both the exhaust and intake gaskets don’t inhibit the air flow. Trim as needed.
Others may add to this…I’ll do a edit.
1) Check inventory
2) Remove the OEM head studs and nuts and replace with metric grade 8.8 (I use all thread) and nylock nuts.
3) Remove and discard all OEM engine mounting studs, exhaust, and intake if you like. No strain on the intake. I use RED locktite on the studs, but if removal is needed heat must be applied. Blue is fine. Use 6mm Nylock nuts. I double nut (jam nut) and use a lock nut.
4) Torque... 8mm 150-200 INCH POUNDS, 6mm 50-70 INCH POUNDS. I use 50 and 150 INCH POUNDS. You might think either 50-70 inch pounds or 150-200 inch pounds is not enough, believe me it is. I have never broken a stud, a mount, stripped out a hole nor had anything come loose on the engine.
5) While head is off mill the head, by milling (sanding) head surface using 220 grit sandpaper on a sheet of glass (I use 220 DA paper stuck to the garage door window). Slide from side to side and rotate, until surface is shiny. Remove as little material as possible.
6) When reinstalling the head gasket, either spray both sides with copper kote or aluminum spray paint. I put 2 coats on either side and let dry.
7) Remove spark plug and wire from CDI (unscrews counterclockwise) and replace (screw clockwise) with a good grade of plug wire and boot, and a NGK plug.

8) Take the large sprocket (for the rear wheel) and slightly grind or file the sharp edges of the teeth, both sides.
9) Now comes the MOST important part and that is mounting the engine to the frame. For fitting you might want to tape the seat tube, for scratch prevention. For a perfect engine fit, the tubes should be at a 75 degree angle.

10 When installing the engine start with the rear mount on the seat down tube. Mount the engine to the frame, not the frame to the engine. When tightening the engine mount nuts make sure that the engine mount, mounts flush with the seat down tube. Gaps in between can and will cause broken studs and or mounts from stress.

11 If the front mount can’t be tightened to the tube and be completely flush, a custom mount is NEEDED. This is one I made Custom front mount there are other types.

12) Once everything lines up remove the tape. DO NOT use tape, rubber or anything between the mount and tube. Some members do and get away with it, but most don’t. Should your engine want to rotate (twist to the left) due to torque you can make this bracket.

13) Remove the coil cover and cut off or cut and tape the white wire. Replace cover.
14) When installing the carburetor I insert an “O” ring. This “O” ring fits inside the carburetor and comes in contact with the outside lip of the intake manifold, thus lessening the chance for a vacuum leak. There are other methods.
15) Make sure both the exhaust and intake gaskets don’t inhibit the air flow. Trim as needed.
Others may add to this…I’ll do a edit.
Last edited:
Bikeguy Joe
Godfather of Motorized Bicycles
Bikeguy Joe
Godfather of Motorized Bicycles
Also- most will run fine right out of the box once mounted to a suitable bike, there is no real need to replace everything on a kit.
I have built a few, and several I just took out of the box, mounted up, and rode off into the sunset.
I have built a few, and several I just took out of the box, mounted up, and rode off into the sunset.
Al.Fisherman
New Member
Also- most will run fine right out of the box once mounted to a suitable bike, there is no real need to replace everything on a kit.
I have built a few, and several I just took out of the box, mounted up, and rode off into the sunset.
You couldn't give me a unmodified engine if I couldn't do what I posted above...even if FREE.
")