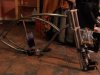
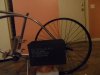
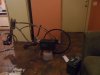
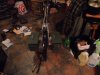
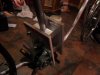
212 build

some more pics
 

Attachments

  • SAM_0587.JPG
    SAM_0587.JPG
    294.8 KB · Views: 229
  • SAM_0588.JPG
    SAM_0588.JPG
    299.1 KB · Views: 200
  • SAM_0589.JPG
    SAM_0589.JPG
    289.9 KB · Views: 189
  • SAM_0590.JPG
    SAM_0590.JPG
    285.1 KB · Views: 191
Hey quick question. Where are you getting your engine parts from? Like valve spring, clutch, and the other items you mentioned? Website names? I'm gonna start off with a 79cc build and see how it does. If it doesn't impress me enough I'll pick up a 212 and go to town on that too.

And the flywheel.
 
well I got my clutch from here http://3dmotorsport.net/ for you, you will need a adapter that you can find on ebay to use the clutch. Also as far as the other stuff nothing Im getting has any way to fit on a 79 cc. There are flywheels out there which Id advise you to get if you can afford it.

One other thing you can do is get a diffrent carb Id say between a 18 and 21mm.
 
Ok. I'll have to check that out. I'm gonna build the 79cc kit for my Wifey to ride and I picked up a 212 60363 today from harbor freight so Now I am going to tear it down and find a frame it will fit in. I'm pretty excited to get this project under way. Iv wanted to build a hefty 4 stroke for a long time but didn't know where to start till yesterday lol. The Chinese 66ccs were a hoot but the reliability of a 4 stroke is what I really wanted this whole time. I'll have to make a couple build threads for you guys. I live in Oregon too btw.
 
bussy day today got my wife a suv and ordered almost all the parts for the bike today. Going to film every step of it including the cam and spring install. using a Mod 2 arc cam with 18 lbs springs. should be fun.
 
here is what Im working on today while I wait on parts.
 

Attachments

  • 001.JPG
    001.JPG
    239.9 KB · Views: 178
  • 002.JPG
    002.JPG
    239.4 KB · Views: 167
  • 003.JPG
    003.JPG
    234.9 KB · Views: 172
  • 004.JPG
    004.JPG
    238.2 KB · Views: 166
  • 005.JPG
    005.JPG
    236.7 KB · Views: 170
I was looking at those shocks and thought how rugged the fork and shocks look. For my trail riding I was thinking those would help as the ones I have are not so great.

The only problem is I am probably looking at the future of a manufactured used trail bike. Larger tires, for far more surface area to go over obstacles and also rear suspension too is what I am realizing to do more areas.

I'll watch how you do the luggage box attachment. Better than wearing a nap sac with much weight. The weight also pushing on my jackets armor if I carry too much and can bruise shoulder blades. Never fallen, but full riding gear I always use.
 
Chicago roads are ruff these are the smoothest riding forks I have ever had. they could use some improvements but still damn good forks.
 
Test fitting everything I have here tomorrow will be adding the tank to the test fit
 

Attachments

  • 002.JPG
    002.JPG
    243.9 KB · Views: 179
  • 008.JPG
    008.JPG
    241 KB · Views: 170
  • 005.JPG
    005.JPG
    235.8 KB · Views: 207
got the saddlebags mounted today. Also think I have the jackshaft figured out now. should be slick when she gets her BlackHawlk paint job.

spent the day at school today making the back plate for the jackshaft to bolt to and then making the blocks for the saddlebags so they would be spaced away from the frame some. Very solid I hate to say it but surprised me how strong they feel bolted up just hand tight.
 

Attachments

  • saddle bags instaled 001.JPG
    saddle bags instaled 001.JPG
    240.8 KB · Views: 197
  • saddle bags instaled 002.JPG
    saddle bags instaled 002.JPG
    239 KB · Views: 203
  • saddle bags instaled 003.JPG
    saddle bags instaled 003.JPG
    236.5 KB · Views: 177
  • saddle bags instaled 004.JPG
    saddle bags instaled 004.JPG
    242.2 KB · Views: 163
here is the finished mount and jackshaft set up for the BlackHawlk build
 

Attachments

  • SAM_0611.JPG
    SAM_0611.JPG
    286.7 KB · Views: 244
  • SAM_0617.JPG
    SAM_0617.JPG
    283.8 KB · Views: 228
That is pretty nice and rugged looking. If you are not welding to the frame, it seems you still have a lot of good clamping area that makes it handle the stress.
 
by the math everything is about twice as thick as it needs to be and even though Im going to come up with some kind of front mount to make sure the motor does not shift left or right most likely it will not need it I can still tighten the mount about .2 of an inch and right now I could stand it up and put all my 260lbs on one side and it would not move at all. I will be test fitting every piece that I have of it together this weekend to see if there is anything I have forgotten.
 
I'm liking the though and work you've put into this. How much would you charge to make that whole mounting plate and jackshaft?
 
Its hard to say for one reason I dont know if Ill be able to make anymore yet. I made that one out of scrap I found at school. If I could get what I need to make another one and get the time on the HASS cnc it would be around 200 to 250. As I said thought I dont know if Ill be able to yet. I do plan on making more but it might be some time before I can.
 
I would fabricate half the mount on each plate as a solid piece, and tap the engine side so there are no nuts or bolts sticking out blocking the engine. The mount for the jackshaft should be wider, be directly fastened to the mount via welding, and the bearings should be permanent needle bearings. They can withstand higher speeds and temperatures and will last a whole lot longer.
 
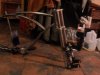
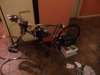
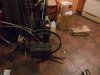
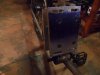
$200. More or less. Manuals only. I would do a different design though.


The Design I did is what fits my frame I started with a little diffrent design and ended up having to shrink it down for the 212 to fit right. It is the best set up for my bike. I would love to do one out of a solid block if I took the time to wright that program and had the money for the billet to do it I would do it diffrently that is for sure.

When you say Manuals only what do you mean?

and you think that mount is only worth 200?
 
Back
Top