Art Fish Mobile Motor Bike prior Motor Bike DIY'er build to add side car maybe?

GoldenMotor.com

MEASURE TWICE

Well-Known Member
Jul 13, 2010
2,744
1,219
113
CA
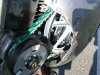
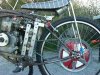
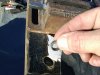
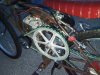
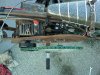
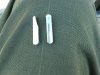
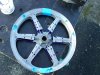
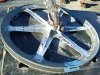
My replacement part for rear drive pulley just about done.

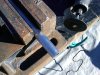
I have to jig up the part now to bend the tabs so that they are to the cone shape that the spokes make going from hub to rim.

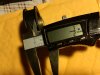
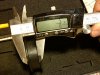
Hopefully the drill holes are close to where they should be.

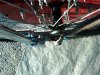
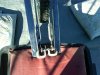
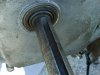
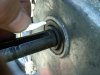
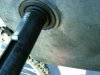
An axle tool of sort is next. It will pull or push the axle to the rear of the drop out tightening the belt. Putting the belt on should be easy with it slack and not damage the pulley.

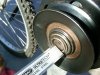
The adjustable diameter pulley on one of the twin stacked jack-shafts will go to this rear drive pulley, so I can have it be just enough tightness not to slip. Very important also is that it is not so tight that it crushes or cracks or fold or spindles or mutilates the rear drive pulley.

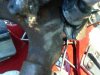
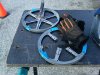
Similarly I will be doing something for the other large pulley that is spoked and also may be prone to this cracking. Now that I chose to use vee-belts that have next to no stretch as the link type belt that I first tried, I have to be very careful!

I may see about the link type belt, but the Accu-Link is not going to be used, it stretches too much. The Power Twist Plus is way more rigid and if necessary to get a length that if I cannot get in a regular vee-belt I will try that.


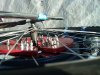
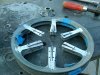
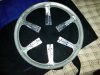
Just to clarify: The one tab that is broken off on the pulley that cracked along a short portion by the vee-belt slot was not due to the belt being popped into place. That actually happened when I was bending that tab back to allow copying the drill holes accurately to make a replacement pulley.

It does prove that bending one direction is all that can be done. If you bend it back it may crack, but this is not what I would be doing with a pulley that is finished and ready to install. Therefore it is of no consequence.

MT
 

Attachments

Last edited:

MEASURE TWICE

Well-Known Member
Jul 13, 2010
2,744
1,219
113
CA
I wonder if as someone said about heating up the tabs before bending them. They did not break before when I did not heat them up. I went slowly by bending a little, waiting and then bending a little more till it was right.

Since I already have a cracked old pulley since the belt I last used did not stretch any and I tried popping it on the pulley, I'll experiment with heating up the old scrap pulley to see how it works. I know I already bent them and back once. Bending them back I would not do except as the part was already scrap and I used it as a template to duplicate drill holes.

Anyone out there done this before? I mean use a torch to heat prior to bending. I know white metal could turn to soup if held heating at one point too long. I found a flame spreader tip that slips over the pencil point tip and modifies it. Burnsomatic part I found at OSH for like 7 bucks.

MT
 

MEASURE TWICE

Well-Known Member
Jul 13, 2010
2,744
1,219
113
CA
I finished making the replacement pulley and it is mounted on the rear wheel. I need to center it and torque down evenly all of the 24 stainless steel screws with split lock washers and nylon insert locking hex nuts.

On to finishing the tool to use in conjunction with rear drop outs to tension the 3rd belt. The 2nd belt already figured out using the adjustable lower jack shaft of the twin stacked jack shaft. A small length regular vee-belt is working out fine.

The 1st belt I am deciding if I can make a low profile idler pulley that pushes on the outside of the vee-belt. If that does not become a reality, I think I can remove the carburetor temporarily and just move the whole twin stacked jack shaft forward temporarily to put 1st belt on and then move it back tensioning it. It is sort of akin to once I heard of a car that you had to lift the engine out to change the spark plugs;)

Found on Google search on idler pulleys:

http://books.google.com/books?id=N9...ge&q=idler pulley for outside of belt&f=false

Another Link for Fenner Drives is a PDF file that mentions the flat idler pulley is also suitable for vee-belt back side. Now I just need to get the one for A section or 4L that will fit my belt back surface. See page 8 of 16 for this note.

http://www.fennerdrives.com/FetchFile.ashx?id=062df31b-a912-490a-8716-51b18577c9ce

Also Gates HTML page:

http://www.gates.com/idlers/
 

Attachments

Last edited:

MEASURE TWICE

Well-Known Member
Jul 13, 2010
2,744
1,219
113
CA
I think I may have to turn the centrifugal clutch around on the engine crank shaft to get space necessary to have the 3/4 overall width of the idler pulley to clear the engine if used on the outside of the belt. If I do this I will check to see if I will use it on the top or the bottom of the outside of the belt. I know I hear the best place is on the slack side which is the bottom, but I have to see if it will fit in the cover that is now completed. I cannot really extend the cover much on the bottom as my foot peg is right there.

MT

Note this is an older picture before using regular vee-belt and also beefing up the dual stacked jack shaft brackets and slotting the pillow bearing mounts to the bottom jackshaft for belt tensioning.
 

Attachments

Last edited:

MEASURE TWICE

Well-Known Member
Jul 13, 2010
2,744
1,219
113
CA
I found my local Yard Birds Lawn Mower Shop had a flat idler pulley he ordered for me and I should have it in about a week.

It looks like this one in the link from Ebay:

http://www.ebay.com/itm/166043-Flat...419&pid=100015&prg=1006&rk=1&sd=230837151765&

It is 1 an 7/8 diameter with a flat area for the back of my A section Vee-belt. The inside width is 3/4 inch and an A section is 1/2 inch width so it will work OK. The 1/2 inch bushing insert I will use with it will work with a 1/2 inch bolt.

The 1/2 inch steel bolt threads I will use with it are to end just right up to a smooth shoulder. That way it will fit in the bushing, not scratching it and should be plenty strong.

This type that has the bushings separate to purchase is no big deal. The pulley is about $10 and the bushing is about $1 to $2. The bearings are more sturdy with this than the integral type bushing pulleys I'm told. I also had some doubts about the synthetic pulley material, but I am told for flat idler pulley purpose, it runs cooler which is a good thing.

I'm thinking of how to make a bracket that will allow tension adjustment and firmly attach to the bike frame. I'll MIG weld and bolt, whatever works best.

MT
 
Last edited:

MEASURE TWICE

Well-Known Member
Jul 13, 2010
2,744
1,219
113
CA
I finished putting together my replacement pulley on my rear wheel. I could get pictures later, but it is really just the same.

The rear drop out used in conjunction with the tool I am going to make to pull axle into drop outs fully, I'll start on tomorrow probably.

Nice stainless steel turn buckles I got and some thick steel plate and some steel rod or heavy steel tube will be what I'll be using.

This will tension the belt nicely and evenly not like trying to pop a vee-belt over the edge of the large pulley and possibly having it crack the pulley again.

I'm waiting for the call about the flat idler pulley and then that will be for the first belt to get it tensioned without popping a vee-belt over it's large pulley.

The twin stacked jack shaft slotted bracket has its tensioning already done OK. I can pop the vee-belt over the edge of the larger of the two pulley connecting the top to bottom jack shaft with out worrying about cracking the pulleys as they are smaller and more sturdy.

It will be something to test it out without the belts slipping and see how 40:1 ratio can haul up steep slopes!

MT
 

MEASURE TWICE

Well-Known Member
Jul 13, 2010
2,744
1,219
113
CA
I have steel tubing I am going to slice and make a thin spacer to allow the hook end of the turn buckle go onto not just the round edge of the bearing keeper nut, but this spacer as well. It at the same time allows the larger lock nut to not interfere with the hook. I checked I have enough threads on the axle to do this, but I could possibly grind away each side of the hook slightly as it is strong enough.

The end I made the hook from happens to be the right hand thread side of the turn buckle.

I am going to add a cheap low profile coupler and 2 hex nuts and lock washers to extend the eye end of the turn buckle. This will allow me not to have to remove the banana seat mounting bars by the drop outs to get enough clearance to turn the buckles.

With a turn buckle on each side and a metal rod that goes through both eye ends, all I then am to finish is getting a temporary mounting from my threads I added to the drop outs. This will fasten a piece of metal rod or angle iron that will connect to the rod that goes through the turn buckle eyes.

The 3/8" threads for the art cover skeleton frame I added to the bike frame just happened to be also useful when I needed to tension a belt. I have two on the drop outs and two mid frame and two toward the front of the frame soon to be used to hold a fish skeleton that a fish print fabric will attach to.

When I get the flat idler for the 1st of the three vee-belts and also make the bracket attached to frame to tension that belt, I'll be finishing the fish art cover and also be looking where the best buy on krill is!

MT
 

Attachments

Last edited:

MEASURE TWICE

Well-Known Member
Jul 13, 2010
2,744
1,219
113
CA
I made this spacer twice for both sides of my rear drive axle. Now my tool for tensioning the vee-belt is coming along nicely. I had to put the sissy bar bolts holding at the bottom by the drop outs the other way around.

The tool clears easily now. I need to modify one of the eyes on the next turn buckle to be a hook tomorrow. The lengthening threaded rod and coupler with lock nuts and split lock washers is also working out nicely.

What I had not expected was that now that I added a spacer on both sides, I had too much pressure on the drop outs. I already had one spacer I made for the side with the pulley so it would clear the frame. Now it was too much. I took out that original spacer I put there. Then the pulley scraped a little. I made a very thin spacer added to the pulley side and now it is perfect.

I will most likely lengthen the drop outs some, but in any case I will weld on a nut thread so that I will have a redundant (hopefully fail safe) system to keep the wheel from coming out of the drop outs when riding if the outer nuts come loose.

I will have a keeper of sorts on each side that also has to be un-bolted before the axle can come out of the drop outs.

Since there are only so many size belts and I already have an adjustable diameter pulley that can go 180 turn increments to adjust, I will find that the axle will not probably be right at the end of the drop outs when the vee-belt is tensioned. I am going to put a shim on each side or possibly just weld the ends shorter. I will have the same amount of length added or a bit more where the axle enters though.

I have to see how it will all pan out, but it does seem I have made a good deal of head way with this tool coming together.

MT
 

Attachments

Last edited:

MEASURE TWICE

Well-Known Member
Jul 13, 2010
2,744
1,219
113
CA
I first tightened not all the way in the drop outs and made a mark in felt tip on the drop outs.

Next I tightened it fully in the drop outs. I suspect that the adjustable diameter pulley at the other end of the vee-belt on the bottom jack shaft left side is set just right so that this can be.

I have 180 degree rotation of adjusting increments on that adjustable pulley. I think I can spin it around 360 degrees about five times or so. This means about 10 size adjustments for this adjustable diameter pulley.

Now I still am waiting to get the flat idler pulley for the 1st belt. I contacted Yard Birds local shop again, but I don't want to bother them too much. He said about 1 week, but the other two workers said that he had not ordered any parts yet. I explained that he said one week. Two people not the guy that took the information at first, have said that they would tell him I am inquiring.

He was very helpful and although I did wait in his shop about 40 minutes to be served, I did not mind as I know I got good service. I mean he spent a bit of time looking in catalogs for me. He had some parts but not a very small diameter flat pulley. He has all kind of bushings to fit them already in his stock right now. I'd be set if I get them tomorrow!

I also know he does not make much on a 12 dollar small purchase, but I am at a point that I may have to just buy the same stuff online if I get nowhere with this.

MT
 

Attachments

Last edited:

MEASURE TWICE

Well-Known Member
Jul 13, 2010
2,744
1,219
113
CA
I just stopped by the store and found that they don't make an order until they get enough parts to order, but the owner said one week to get the part. Now I thanked them and was going to order the same part as they were going to get, but this other part I found seemed to be fine. This flat idler pulley is as small a diameter, but does not need a bushing. It does not seem to be less sturdy and has the same nylon or whatever the out surfaces that contacts the belt is. It is half inch bore and is only slightly less width. If centered exact the 1/2 inch width belt will have a 1/16 inch on each side. It is 5/8 instead of 3/4 like the one from the local shop.

Ebay:

http://www.ebay.com/itm/166043-Flat...419&pid=100015&prg=1006&rk=1&sd=230837151765&

Looking for the tracking to have it by Tuesday!

MT
 

MEASURE TWICE

Well-Known Member
Jul 13, 2010
2,744
1,219
113
CA
I believe I may have to put the centrifugal clutch on the other way so I could have room for the flat idler pulley and its mount. I have not gotten the pulley yet, but should be by Tuesday.

The cover then had to be modified so that the larger pulley on the top twin stacked jack shaft would fit and the belt would not rub. I cut away some of the cover and it now fits. I will add metal to cover within the area that was cut extending it some. Later I am to fiber glass and Bondo the cover that goes over the first belt, centrifugal clutch, flat idler pulley, and large pulley on the top jackshaft.

The keyway in the centrifugal clutch is not full length. When turning the centrifugal clutch around as I said I think will be necessary, I found the end of the engine crank shaft closest to the crank case cover seal is not a full right angle cut away. What I mean is as the center picture shows, it is like the round of a wood ruff key at that end.

This meant that to get the centrifugal clutch as close to the crankcase cover, I needed to modify the key or modify the crank shaft keyway. I opted first to do as the keys are easy to get more of.

Has anyone had this situation, and are there keys already made with a round radius at one end and right angle shape at the other end of the key? I know a wood ruff key is flat on one side and round on the other; this is not a part I am looking for though.

In any case I only cut half the thickness of the key and the set screw seemed to work well. It also has a second set screw that goes on the crank shaft directly at 90 degrees to the one with the key. I will make a flat spot for that one later on the crankshaft so it will work better. I have also heard of making ridges in the flat spot to get the set screw to hold better. I would also when it is finished use Loc-tite Blue.

With the shape I made on half the key, it was able to get the centrifugal clutch within 1.3 mili-meters of the end of the crankshaft. Maybe it can be flush if the key were to be made exact.

I also am thinking of putting threads in the hole in the end of the crankshaft and using that method to keep the centrifugal clutch from coming off the end with a screw and washer.

There are a few more pictures in the next reply of this work.

MT
 

Attachments

Last edited:

MEASURE TWICE

Well-Known Member
Jul 13, 2010
2,744
1,219
113
CA
With the crankshaft not removed from the engine, I would hesitate to try using some unprofessional way of changing the shape from rounded to right angles for the keyway. A mill I suppose is the only right tool to use and with the crank shaft removed to get what I think it should be. I will see if leaving the crankshaft as is would be best.

The picture of the modified key in the keyway shows it does sit flat. It is the Dremeled shape half thickness about 1/3 to 1/2 the length that is underneath by the end closest to the crankcase cover on the crankshaft that I think I am satisfied with. I would however like reduce that gap by the end of the crankshaft and the bore in the centrifugal clutch from the measured 1.3 mili-meter to be zero.

MT
 

Attachments

Last edited:

MEASURE TWICE

Well-Known Member
Jul 13, 2010
2,744
1,219
113
CA
I think I may just use the modified key almost as is, just shortening the end of it by grinding 1.3 mili-meters off the opposite end should have the centrifugal belt clucth pulley even with the end of the engine crankshaft.

Tomorrow I will hopefully have the flat idler pulley arrive in the mail and I can start making the mount for it.

MT
 

MEASURE TWICE

Well-Known Member
Jul 13, 2010
2,744
1,219
113
CA
Looking again at the key I modified and the keyway slot, I see that I need to round the end the opposite way at the tip some. Then I think it will seat in just right and I'll have the clutch flush with the end of the crank shaft. Too bad it is not a full length keyway slot in the Max Torque Clutch.

I may still find that I do not need use the clutch mounted on the engine crankshaft turned 180 degrees around. It depends on how I can fit the bracket for an idler pulley to arrive tomorrow.

MT
 

MEASURE TWICE

Well-Known Member
Jul 13, 2010
2,744
1,219
113
CA
I got the flat idler pulley and the picture on Ebay did not show both sides. I will get a picture of the item I already got in the mail today. It is the same as the one I would have waited for the local shop to order of more than a week and it was not yet ordered. By same I mean even better and the same.

It is a 1/2 inch bore using a bushing already installed and although shipping was about $3, it all cost total $14 just as in the local shop. The bushing also has a side that extends out a bit more than the opposite side and this is useful in the bracket mount I will make.

I was told by the shop that the bearings in the pulleys without the separate bushings had less ruggedness. The picture on Ebay did not let you examine both sides. Now I can see a separate bushing is already installed in it, making it for 1/2 inch bore.

What is better is rather than 3/4 inch width in the flat for the back of my 1/2 inch belt, this is 5/8 inch. It then gives less slop side to side. It is 1/16 inch on each side.

1/16 + 1/16 = 1/8 inch and belt is 1/2 or 4/8 inch and 1/8 and 4/8 is 5/8 inch

The bolt I bought that has 1/2 inch thread has a shoulder that works well for the inside of the bushing. I think I will see if I will mount from one or both sides of the bolt.

If I just use washers or spacers if I need then that is OK as the shoulder is a short as I could find in the 1/2 inch size thread. I think I could just get a 1/2 inch bolt with a long enough shoulder and then cut off the 1/2 inch threads. Then I bevel the end of the shoulder and go with a 3/8 fine thread die and cut just what I need exactly for the threads and remaining shoulder.

It has to be adjustable though, and then when running be static, unless I use a spring. I am ready to start the final bit for getting a good ride on the machine and no belt slippage.

The art fish skeleton and fabric cover to be next in line. I got a jump on that and have acquired I think everything I will need for that. There are 3/8 threads, 3 on each side of the bike front to back for the modular design that the skeleton will attach to.

I think I may even use guy wires that could make the strengthening of the skeleton frame lighter. I think I will use a button snap door of fabric and maybe a hinge for a space to open in the skeleton frame so I can access getting on the bike. A sky hook is not always available;)

Now the weather has arrived again and rain 60% chance but supposed to be light. I will have to wait another day before can be working on it again.

MT
 
Last edited:

curtisfox

Well-Known Member
Dec 29, 2008
6,048
3,955
113
minesota
If you have a full service hardware store like ACE they have sholder bolts 1/2 to 3/8that might work,keep in mind they are hard steel so cutting and filing is out...........Curt
 

MEASURE TWICE

Well-Known Member
Jul 13, 2010
2,744
1,219
113
CA
Yes Yes, I have been fooling with a shop to get the correct idler pulley. They had me wait a week saying that is how long it would take to get. Changed to it had not been ordered and they have to get enough parts ready to order before I can get my parts.

Nice it took a week, though the guy was helpful in looking at the printed catalogs in the shop.

Then onto Ebay where a seller had the wrong posted dimension for one of the dimensions on the page. The inside height or width as it is between the walls on the flat idler pulley are suppose to be 5/8 inch. They are 1/2 inch. 5/8 inch is not even the outside dimensions of the walls of the pulley.

The diameter inside is right on at 1 - 7/8 inch and the bore with the bushing that did not show in the picture online, though it came with it anyway and makes it 1/2 inch right on for the bore. I know the standard should be inside dimensions. This confirms it and so I get a sorry from the seller. The 5/8 inch is slightly smaller than the outer walls of the pulley so it does not match anything actually.

I buy it and then another week goes by and I find this out. Like a bunch of cr$p to have to deal with supporting my case taking pictures of the part. I have them saying sorry and I get my money and shipping both ways for the part returned. Still pending till I see it really happen.

Next I was to go back to the shop, but remembered that the shop told me of a distributor called Rotary International USA (also there is a Canadian Part), this is where they would have gotten the part they take some sweet as$ time to get.

Now I finally found the website and finally found the part and bushing for the flat idler pulley. I call them up and they have the person that knows the technical stuff, unfortunately is gone for the day. The part should be OK as the shop did guide me, thanks for that. I do not have the bushing information, but shipping is still about $7.95 to for another $1.50 bushing part and the $7.50 flat idler pulley I go to order it. Oh but no, the help at rotary say what is your commercial account (dealer). I have none I say. Then they say I cannot order parts sorry.

I check on the web site and order anyway thinking it is OK. I get a logon and it is not for a dealer. They ask if I want gift wrapped. Now I think this web page definitely is not for the dealer so I'm OK. Next I order and get a conformation. Then I find that Rotary International USA http://shop.rotarycorp.com/ has Shopatron https://www.shopatron.com in conjunction with them. This means the average joe blo$ can order and it ships to nearest dealer.

Shopatron:How in store pickup works

http://www.orderhlp.com/index.php?/Default/Knowledgebase/Article/View/43/4/how-in-store-pickup-works

I'll see when they contact me with tracking and I guess I may either get it in the mail or a few miles to pick up at the same shop that has still 2 weeks later waiting to get enough parts to order up.

Art Frame and cover yup, but I can't have any belts slipping and need the correct part so here I am.

MT

FCOL the weather is clearing and I could otherwise be working on the stuff, but it will happen eventually.
 

Attachments

Last edited: