Detailed budget build

GoldenMotor.com

ZipTie

Active Member
Jan 8, 2016
750
82
28
Mpls Mn
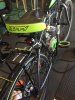
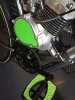
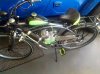
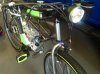
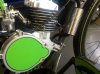
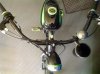
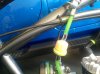
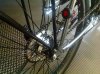
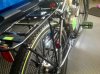
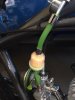
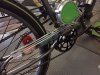
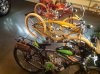
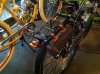
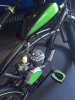
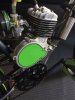
I've been extremely busy with work lately but took some time to build another little beast. Here is my latest low budget quick build. I did add some details and graphics. I will hopefully be seen at least with all the bright green. The bike was a Father's Day gift from my 2 of my sons, they picked it up at wally world for 74.00, so that makes it special for sure. Front and rear pull brakes plus a coaster brake as a back up, cheap Bell rear rack, LED lighting, tank and engine decal graphics from eBay, chrome chain guard, horn, cable organizer risers from ebay. All bolts have lock tight and all bolt ends have been capped with rubber or heat shrink tube to Prevent the annoying trail of bolts that fall off during shakeout (no pun). CNC rear 40 tooth sprocket hub adapter. It's ready for its first run happening tonight. Planning on a CNC head, expansion chamber, lighted digital speedometer this week.
 

Attachments

Last edited:

ZipTie

Active Member
Jan 8, 2016
750
82
28
Mpls Mn
With the 3 brakes it should be pretty safe, front and rear pull on a double pull handle and Ill stomp on the coaster brake too if needed. Rear rack could be handy, along with the velcro lined cup holder I use for garage door opener, phone or a pepsi.
A few more picts, remember less than 240.00 plus cost of Rear sprocket adapter was spent on this entire build, which really amazes me. Money well spent.
 

Attachments

Last edited:

ZipTie

Active Member
Jan 8, 2016
750
82
28
Mpls Mn
If anyone notices the chrome on the gas line... it locks the gas line tight to the nozzles and looks good. They are just car valve stem chrome covers available on ebay or any big box hardware store. 4 for a $ buck.
string it through the gas line during install and just push it up or down over the nozzles. if you wrap a bit of electrical tape over nozzel before sliding clamp onto gas line you can get it super tight depending on your gas line choice.

Also never ever re-tighten a cast aluminum fuel petcock with a full tank of gas or it could snap off at a weak point and spew the entire tank gas all over... ask me how I know. OMG drain it first and then re- tighten. Tip from a dumb experience. better yet install a solid brass one like i did on my skyhawk frame now. .xx.

Another tip especially for newbies is put some bright paint on the choke lever handle. It will help you find it fast at a glance...after starting.
 

Attachments

Last edited:

ZipTie

Active Member
Jan 8, 2016
750
82
28
Mpls Mn
Just added this sleek chrome wald pedal side chain guard, had to make to brackets, but turned out solid. Capped all the bolts with heat shrink so it never comes loose.
 

Attachments

Dec 11, 2014
628
14
18
Tucson
Bike looks awesome! I have built probably 40 Cranbrooks and I love this new color. Be careful of the stock coaster brake at speeds above about 15 mph. You can free wheel convert that hub. I have a kit but you already have most of it if you have calipers. If you want to do it I'll talk you thru it, p.m. me here or my contact info is on speedy66.com and we have a Cranbrook specific section that we intend to keep building on for parts, tips and tricks.
 

ZipTie

Active Member
Jan 8, 2016
750
82
28
Mpls Mn
Bike looks awesome! I have built probably 40 Cranbrooks and I love this new color. Be careful of the stock coaster brake at speeds above about 15 mph. You can free wheel convert that hub. I have a kit but you already have most of it if you have calipers. If you want to do it I'll talk you thru it, p.m. me here or my contact info is on speedy66.com and we have a Cranbrook specific section that we intend to keep building on for parts, tips and tricks.
Thanks LandSpeedRecord. Yeh I hear ya on the coaster brake, I don't plan on ever using it, so not sure if I need to convert it. My son had his bearings get loose multiple times using his coaster as his brake arm was spun out and stripped, we installed front and rear pull brakes using a double pull lever. He now wants to convert his to free wheel this week. Ill pm you. Ill just never use mine as I have front and rear pull brakes too. Like to see your kit for sure. This little inexpensive frame sure has nice lines and if I can figure out where to buy a proper layback seat post for more stretch for it that would be make it that much better.
I love the mag wheels you installed on one of your cranny builds. Does the stock kit sprocket just bolt to the rears wheel?
I just bought this oversized nylon grey tool kit from target store and works well on the rack side so ill buy another for the other side.
Thanks again..wee.
 

Attachments

Last edited:

ZipTie

Active Member
Jan 8, 2016
750
82
28
Mpls Mn
That is a fine looking ride at any price. Well done!

And I will be using your shrink tube idea for sure, excellent tip, thanks.
Thanks Chaz, yep, Heat shrink and rubber manifold caps pushed on the bolts are my new freinds. The manifold caps look nice too and here a good tight fit happens they work excellent. You can also cut them in half and use just the sleeve also. I get variety packs at a big box hardware store. It Got to the point where I was amazed at the vibration frequency that seems to magically losen one bolt after another.
If they do come loose a little now, at least they stay put. No more bread crumbs.
The shake out period is where my surprises keep happening.