
You are using an out of date browser. It may not display this or other websites correctly.
You should upgrade or use an alternative browser.
You should upgrade or use an alternative browser.
Tinsmith's in frame gas tank for cantilever Schwinn.
- Thread starter silverbear
- Start date
silverbear
The Boy Who Never Grew Up
The front fork came off of a 1995 Tomos moped. I have another moped fork which is going on a Panther frame back in Minnesota. That is is a 1979's Hercules made in Germany for Sachs. Both forks are a wee bit long, so that some shims from other 1" forks are needed to make the fit just right. I'm using the original Schwinn hardware as donor shims. The Herculese cost me $38.00 including shipping off of ebay. Pictures of that one are in this same thread earlier and are colored blue. The Tomos I got as a whole moped for $120.00 locally through Craigslist and am using other parts for a different build, including a running engine. If you have a vintage bike with a 1" threaded headset it is a good way to go. Both forks are very well made. I also like it that they have ears for mounting a headlight.
SB
SB
sportscarpat
Bonneville Bomber the Salt Flat record breaker
Hi Silverbear,
The tank came out real nice. An actual cantilever in-frame tank. Nice job you guys. The bike looks pretty heavy duty with that moped front end. Nice stuff those moped parts. The head light looks huge! It'll take 1 h.p. just to light it up!
Pat
The tank came out real nice. An actual cantilever in-frame tank. Nice job you guys. The bike looks pretty heavy duty with that moped front end. Nice stuff those moped parts. The head light looks huge! It'll take 1 h.p. just to light it up!
Pat
silverbear
The Boy Who Never Grew Up
While I'd like to take credit for the making of this tank, I can't. I took pictures and reported. Dan made the tank and figured out how to go about it. Some time ago I made a wish... wanting to make an in frame tank out of copper. Tinsmith happened to see the post and also saw that I would be spending the winter in Maryland only twenty minutes or so away from his home. He knew enough about metal fabrication to know that it might not be such an easy thing, especially with a tank having so many curves in it. He was kind enough to offer not only his help, but also his shop space. The tank as you see it would never have looked so good with me cutting and soldering away on my own. And I wouldn't have even considered tin, knowing nothing about it. To my eye the result of his work is spectacular. Who'd a thunk it... that tin would look so good? I'm the over aged apprentice in this endeavor and Dan is the master artisan, willing to share and pass along some of his craft. In a couple days I will begin my first tank, trying to make it as much like Dan's as I can and undoubtedly falling far short. However it turns out I will keep it as a measure of progress as I make other tanks for myself and perhaps for others... comparing the last tank to the first one and wanting the next effort to be better than the last. That attitude is something we share in common, wanting to make things as well as we can.
Pat, your compliment means more than you know. You sir, are the gold standard in gas tank fabrication. Yes, moped parts are a good resource I have msrfan to thank for. Until I saw his awesome Briggs builds I had no idea a moped fork would work on a vintage frame. Great quality and often at bargain basement prices. Yes, the headlight is a little much, but it sure does make a statement of some kind. The incandescent bulb will need to become LEDs if I end up using it. A nice old Puch moped light with the built in speedometer up top would be just right. As I scrounge dead and dying mopeds I may find one.
SB
I have been admiring your tank AWESOME. I was looking at the pictures again was thinking sence the cantilever frame tapers to the rear. How about trying a tank the would taper to the rear not much but just enough to be noticable. I think it would be more proportioned that way? Just my thinking .......Curt
Tim_B_172
New Member
Thanks for the reply. I've been looking at moped forks for the past hour. 
")
Anyway, good luck on the tank build. Can't wait to see how it turns out.
There are also adapters available from choppersus.com for the rest of us.If you have a vintage bike with a 1" threaded headset it is a good way to go.
Anyway, good luck on the tank build. Can't wait to see how it turns out.
silverbear
The Boy Who Never Grew Up
Thanks for the reply. I've been looking at moped forks for the past hour.
There are also adapters available from choppersus.com for the rest of us.
Anyway, good luck on the tank build. Can't wait to see how it turns out.
Hey Tim,
I got started on my tank this Saturday, first practicing with scraps on the burring machine. It isn't as simple as it looks and requires close attention and control. Dan makes it look easy. I make it look like a lot of work... ha! After a bit I felt like I was getting a feel for the machine and also some insight into how the metal does and does not want to bend. Straight pieces and then some with a gentle curve were going well enough, so I took the plunge...
With an awl I scribed the two side pieces onto a sheet of new tin using a tin pattern piece to follow. Cutting them out with tin snips I was comfortable with and managed to stay on the line with cutting them out. The first side flanges went pretty well, not like Dan's, but for a newbie pretty good. The second one went badly toward the small tapered end. Inside curves are more difficult than outside curves. So the second side is unusable and a new one will get cut out next shop session. Of course I want to be really good at it instantly, which isn't going to happen, but it is going well enough that I'm encouraged.
While I was working on tin tank #3, Dan cut out the same tank in copper and finished flanging both sides. I don't know that I'll finish next time, but I'll be much further along anyway. I'm not expecting this first tank to be a keeper. It is an important step, however, and the first on my journey in making in frame tin gas tanks. Pretty cool.
I'll download the few pictures I took into the computer and then upload to this thread in a day or two. Then you can see for yourself how badly the one side came out. If I can learn this, there's hope for you, too.
SB
silverbear
The Boy Who Never Grew Up
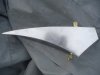
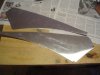
I promised a few photos from last Saturday's shop session. First is a side view of tank #2. I gave this tank a coat of Top Flite clear coat under less than ideal conditions for painting (wind and cold at the open shop door) so that later I can see what effect gasoline has on it.
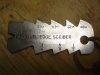
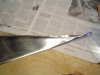
Second photo show a neat little tool for scribing a parallel line on the edge of the side pieces which is where the flange is made. For our flange Dan has chosen to make it 3/16". He says that trying to make it wider than than is difficult to get the bend to work right as the wider the flange is the more resistance there is to bend. He considered making it 1/8" and I may try that on a later tank to see how it goes. As you'll see in the next post, it isn't so easy when I try it...
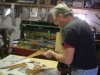
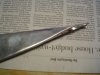
In the last two photos Dan is shown cutting the side pieces for the copper version of the tank.
(cont.)
SB
Second photo show a neat little tool for scribing a parallel line on the edge of the side pieces which is where the flange is made. For our flange Dan has chosen to make it 3/16". He says that trying to make it wider than than is difficult to get the bend to work right as the wider the flange is the more resistance there is to bend. He considered making it 1/8" and I may try that on a later tank to see how it goes. As you'll see in the next post, it isn't so easy when I try it...
In the last two photos Dan is shown cutting the side pieces for the copper version of the tank.
(cont.)
SB
Attachments
silverbear
The Boy Who Never Grew Up
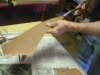
Pictured below are the two side pieces I cut for my solo attempt on tank #3. I was pleased at being able to follow the scribed lines with clean cuts. These tin snips than Dan and I used are sharp and neither has a serrated edge. I'll show photos next time of the different tin snips as some are designed for cutting straight lines and others for curves.
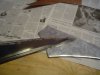
The second photo shows my attempts at doing the flanges on the two side pieces. I had practiced on scraps and felt like I was ready to try the curves of the real deal. The first one turned out pretty well and is good enough to use. It is underneath in the photo. I felt encouraged at this modest success and did the flange on the second one with more confidence and in the end less attention. I worked my way to the small end of the side at what would be the rear of the finished tank and things went wrong quickly. I'm not sure what I did, but it is a mess and is not usable. If it were copper which is more malleable it might be salvaged, but the tin is less forgiving and nothing can be done to make it look right. So next Saturday when I am fresh and have practiced some more on scraps I will cut out another side piece and do the flange again... also paying attention to which way the flange needs to go as one piece will be a right side and the other a left side with both flanges bent to the inside of the tank.
I console myself by knowing that the mistakes and the failures are one step in the road to success... not to be discouraged, but to do it again better the next time. See you at the Tinsmith's shop next time...
SB
Attachments
jose Pinto
Member
good night, friend SB, fascinating project, thank you for sharing all this fabulous information, I will say more (all this training) you knew the hands of DAN and friend describes how the whole process makes you an authentic journalist devoted to the technological information . I would like to ask you three questions?Pictured below are the two side pieces I cut for my solo attempt on tank #3. I was pleased at being able to follow the scribed lines with clean cuts. These tin snips than Dan and I used are sharp and neither has a serrated edge. I'll show photos next time of the different tin snips as some are designed for cutting straight lines and others for curves.
The second photo shows my attempts at doing the flanges on the two side pieces. I had practiced on scraps and felt like I was ready to try the curves of the real deal. The first one turned out pretty well and is good enough to use. It is underneath in the photo. I felt encouraged at this modest success and did the flange on the second one with more confidence and in the end less attention. I worked my way to the small end of the side at what would be the rear of the finished tank and things went wrong quickly. I'm not sure what I did, but it is a mess and is not usable. If it were copper which is more malleable it might be salvaged, but the tin is less forgiving and nothing can be done to make it look right. So next Saturday when I am fresh and have practiced some more on scraps I will cut out another side piece and do the flange again... also paying attention to which way the flange needs to go as one piece will be a right side and the other a left side with both flanges bent to the inside of the tank.
I console myself by knowing that the mistakes and the failures are one step in the road to success... not to be discouraged, but to do it again better the next time. See you at the Tinsmith's shop next time...
SB
how many mm is the gauge of the plate?
what type of material, brass, galvanized iron or copper?, I know I've said in previous post this but my translator was a bit confused. congratulations on your project
J.P
J.P., The metal we are using is call Tin Electroplate. It is sheet steel with a thin coating of tin electroplated to it. It's like nickel-plated or chrome-plated metal. The same type of process. Galvanized metal probably won't work too well, because using flux (an acid) in the soldering process will work on the galvanize and rust will likley occur later. The flux needs to be neutralized following any soldering in my book. I just wash the area with a baking soda rinse (alkaline). Sometimes soap and water will work, but not always. The guage of the sheet metal we are using on this project is about 28 guage. Hope that helps. Good luck, Dan
jose Pinto
Member
J.P., The metal we are using is call Tin Electroplate. It is sheet steel with a thin coating of tin electroplated to it. It's like nickel-plated or chrome-plated metal. The same type of process. Galvanized metal probably won't work too well, because using flux (an acid) in the soldering process will work on the galvanize and rust will likley occur later. The flux needs to be neutralized following any soldering in my book. I just wash the area with a baking soda rinse (alkaline). Sometimes soap and water will work, but not always. The guage of the sheet metal we are using on this project is about 28 guage. Hope that helps. Good luck, Dan
Thanks Dan, I did not know this type of metal tin, but I realized perfectly, excuse my ignorance, but when he says that the gauge plate 28 is referred to 2.8 mm?
MarkSumpter
New Member
Thanks Dan, I did not know this type of metal tin, but I realized perfectly, excuse my ignorance, but when he says that the gauge plate 28 is referred to 2.8 mm?
Jose this should help to better understand gauge sizes, it is a standardized list different sizes for various metals with inch to metric equivalents. As you can see 28ga metal will range from .0149" or .038mm for simple cold rolled steel to .016" 0r .041mm for galvanized... As this is a nickel plated tin it will most likely be within that spec or slightly thicker... :

If you have problems seeing it here the direct link is:
Standard Gauge Sizing
Last edited:
MarkSumpter
New Member
Dan I am just south of Dayton in Miamisburg and worked tin for a few years also and farmed and ranched too in my younger days LOL...Thanks Mark, I knew someone would have that info. Where in Ohio are you. Was up there last week. Used to farm in north central Ohio near Utica many years ago. Thanks again. Dan
This chart is for sheet metal gauges only and as yo see there is a wide differentiation in actual sizes and gauge sizes so I would believe that will hold true to rounds metals such as spokes also... I will look for a spokes gauge chart later.Does this chart cross with spoke sizes also?...(if so there is a vast difference between 14 and 10 guage spokes)
MarkSumpter
New Member
Corgi here is a short list of the world wire sizes:

The thing that has to be remembered is that Gauging wire or sheet metal is an almost obsolete terminology as most countries had very different systems of measurement prior to 1976 when the metric system was standardized, hence you still see 66cc engines advertised as being 80cc...
Prior to that time each country had their own standard of a meter and the stupid US had feet, inches, quarters, eights and other fractional equivalents...
So have fun understanding what it is you are really buying LOL...
jose Pinto
Member
Jose this should help to better understand gauge sizes, it is a standardized list different sizes for various metals with inch to metric equivalents. As you can see 28ga metal will range from .0149" or .038mm for simple cold rolled steel to .016" 0r .041mm for galvanized... As this is a nickel plated tin it will most likely be within that spec or slightly thicker... :
If you have problems seeing it here the direct link is:
Standard Gauge Sizing
hello, thank you Mark and the entire audience, this table is fantastic and there
J.P
jose Pinto
Member
J.P., The metal we are using is call Tin Electroplate. It is sheet steel with a thin coating of tin electroplated to it. It's like nickel-plated or chrome-plated metal. The same type of process. Galvanized metal probably won't work too well, because using flux (an acid) in the soldering process will work on the galvanize and rust will likley occur later. The flux needs to be neutralized following any soldering in my book. I just wash the area with a baking soda rinse (alkaline). Sometimes soap and water will work, but not always. The guage of the sheet metal we are using on this project is about 28 guage. Hope that helps. Good luck, Dan
Hello Dan, thank you once again, I am very happy to follow up this project, this forum has wonderful people like you giving this way the knowledge and the sharing of ideas, the table of gauges helped me understand much better the standardization of gauges. Take this opportunity to raise an issue, where you go to finish the tank?
is thinking of some paint, or just get the natural color of the tinned steel!