First build, vintage style

itchybird

Member
After a little practice posting pictures, I think I finally have it figured out so I thought it's time to post a few pictures of what I've been up to.

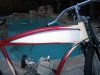
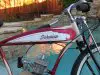
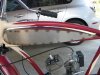
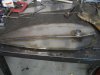
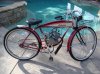
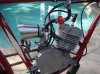
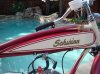
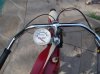
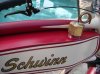
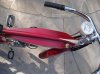
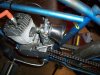
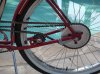
OK, so my brother aka Sportscarpat tells me to give up on my Stingrays and go for the 26" bikes and I say 'no way'. Now mind you, I have well over a dozen Stingrays, last thing I need to do is start collecting cruisers. Then he tells me he's building a motor bike and I still don't take the bait. Then he shows his straightbar board tracker build, so I tell him 'maybe I'll do a build'. Then I buy a kinda rough, but original '49 Schwinn cruiser to serve as the basis of my build. Call me sentimental, but I just didn't have the heart to tear up an original paint vintage bike. But I do have this double straight bar frame in the shed.... and you know the rest.

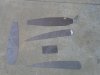
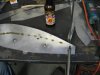
After a month or so of tinkering around, here is what I came up with.

What do you think?
 

Attachments

  • MB by the pool.jpg
    MB by the pool.jpg
    194.9 KB · Views: 983
  • close up of motor.jpg
    close up of motor.jpg
    165.1 KB · Views: 559
  • close up of tank.jpg
    close up of tank.jpg
    165.1 KB · Views: 479
Last edited:
...a few more pic's so you can get a feel for the bike.

A keen eyed Schwinn enthusiast might recognize the frame, it's actually quite unique. Schwinn only made this double straightbar cruiser in 1962 and it was only used on the Typhoon model which is a middle weight model, but it was generous enough to take the larger balloon tires.

I wanted an in-frame tank to get the look I was after -a vintage old-school look. Having a weldor/fabricator in the family actually comes in handy, and we came up with a custom tank that captured the look I was after.

I stole the theme for the paint job from the '49 and overall, I'm pretty happy with the finished product. Not too bad for a rattle can paint job, escpecially considering I did the bulk of the build with a cast on my arm.
 

Attachments

  • close up of speedo.jpg
    close up of speedo.jpg
    140.5 KB · Views: 361
  • close up of gas cap.jpg
    close up of gas cap.jpg
    125.9 KB · Views: 384
  • top view of tank.jpg
    top view of tank.jpg
    141.6 KB · Views: 332
Last edited:
i'm digging the stainless drink mixer velocity stack.

i went with the candle holder.

nice bike...
 

Attachments

  • velocity stack 002.jpg
    velocity stack 002.jpg
    341 KB · Views: 566
..a few other notes on the build.

I managed to find a deal on Craigslist on one of the re-issue bikes that Schwinn did in the late '90's. The frame was a tig-welded import job, but all the components were very nice repo's of the orignal hardware from the late 40's and early 50's. I had no use for the frame, but all the running gear was fantastic. The springer forks are simply awesome, and all the little bits like goose neck, wheels, etc. all found a new home. At $150, I scored.

To that initial investment, I purchased a Grubee Skyhawk motor, a pair of Felt Quick Brick tires, and upgraded chain. I used one of 'Sportscarpats' idler brackets (see attachment), tig welded to the top of the chainstay. Otherwise, no mods were made to the frame. The hub mounted sproket assy came from Pirate Cycles.

Fenders are from Husky Bikes, only 30 bucks shipped to my door. I cut them down to better fit the project and to give me the look I was after. I had to dimple the fenders to clear fit the frame, but finished, they look pretty good. The gas cap is a 3/4 pipe fitting, less than 5 bucks at home depot, with a handmade breather added to vent the tank. The speedo was a swap meet piece.

All these goodies were bolted to the '62 Typhoon frame, so it's got the 'vintage' aspect going for it as well.

The bike is rock solid and rides like a champ. I've got most of the bugs worked out and now I'm tweaking for a little more power.

In total, the project set me back right around 5 bills.
 

Attachments

  • close up of chain tensioner.jpg
    close up of chain tensioner.jpg
    168 KB · Views: 403
Bairdco has a keen eye, he noticed my stainless mixing cup, cut down for my velocity stack. Not many builders can claim they have parts from Bevmo on their ride!
 
i've got a few of those cups, but i don't have the clearance. then when i happened upon the candleholder with the wings (for 50 cents) i was all over it.

i think, visually, that really improves our engines. the plastic box just looks like crap.
 
Without a doubt a very sweet ride that keeps it's vintage roots while still being a true hot rod. I watched this build first-hand and must admit that Itchybird spent the time to make this bike right. He designed the gas tank from scratch, built up a few cardboard mock-ups until he was satisfied with the shape and then talked me into welding it together. At first I thought he was crazy with the shape of the tank, too complicated I told him, but once built it was definately worth the effort. As for the drink mixer velocity stack I thought he should just mix a few drinks with it and then buy an off the shelf air cleaner from one of the MB shops. He said it would work and it did. Looks really nice. Let's go for a cruise sometime!
 
I'm building a pre-war too! it's going to be a task to make me a tank any body willing to attempt a in bar tank? the dimensions abrubtly slim down on mine so it may take some doing
 
Last edited:
The tank is the hardest part, it's all down hill from there. You'll want start will a good paper template, don't just start cutting metal. I'll post some pictures of what I did for some perspective.

Once you have a good pattern, you can start looking for someone to cut/weld.

Rich
 
Itchybird is right about the tank being the hardest part. If these tanks were easy we all would have them. Itchybirds tank and the tank on my own build represent a fair amount of design time before the fab work even begins. Once the design work is complete more tanks can be cut using the existing pattern. The first one for a specific frame shape is the hardest. Hopefully Itchybird will post pictures of what he did to get his shape nailed down.
 
Here are a few photos showing the evolution of a tank. Accuracy is very important, the more you sweat the details up front, the better the build goes.

1. First photo shows the basic tank template. Note dimensions....
2. Second shows the mock up in the frame. If it doesn't fit now, it's back to the scissors/tape.
3. Don't forget to plan for mounting hardware. You can even do a 'paint job' at this point.
4. The pre-cut pieces. Note holes already in place for mounting and for petcock. Ready to weld.

Rich
 

Attachments

  • paper mock up.jpg
    paper mock up.jpg
    74.3 KB · Views: 265
  • check fit.jpg
    check fit.jpg
    108.4 KB · Views: 269
  • with mount hardware and faux paint.jpg
    with mount hardware and faux paint.jpg
    150.7 KB · Views: 255
  • cut pieces.jpg
    cut pieces.jpg
    234.7 KB · Views: 259
Last edited:
...and the tank build continues.

1. Initial tack welds. Note the acorn nuts welded to the floor. These will serve as mounting points.
2. The pieces are tacked together. Note how well the panels fit, a reminder that accuracy counts.
3. Initial welding completed. It went toghether very well.
4. Clean up those welds. If you were careful at the earlier steps, clean up should be minimized. Note the cast on the arm, I was hobbled thru most of the build.

As much as I would like to credit for a job well done, it was sportscarpat that did the bulk of the work. I designed the tank, did the initial paper mock up. But Pat laser cut the stainless pieces and tig welded it toghether.

Now all it needs is paint.

Rich
 

Attachments

  • and the welding begins.jpg
    and the welding begins.jpg
    124.4 KB · Views: 290
  • all tacked up.jpg
    all tacked up.jpg
    139.5 KB · Views: 296
  • initial welding complete.jpg
    initial welding complete.jpg
    131.3 KB · Views: 298
  • clean up those welds.jpg
    clean up those welds.jpg
    135.6 KB · Views: 328
Good write-up on gas tank fabrication. I personally like the shot with the cold beer in the picture. Shows what really goes into these tanks.
 
Yes this is the way to fabricate. I'm starting with a different shape of lower bar it may be a first day Jan22 1934 schwinn frame its Old thats all I know. My tankk will be similar or maybe just a one qt cylinder behind the seat
 
Racer 5 welding flux?

Look this site up. Bung King They have weld in threaded bungs for gas tank mounts and Harley oil tank kits that would work for gas tanks on mb,s.
Worth the look.

Steve.
 
Back
Top