Painting a headbadge...

silverbear

The Boy Who Never Grew Up
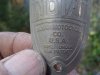
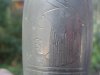
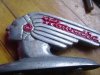
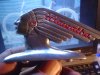
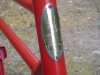
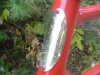
A year ago a forum member named (something like) Jesus Jonz made this head badge for me. I really like it and will use it on my Indian Hiawatha build. The problem is that from a a foot or two away you just don't see the details or even that it says Indian. The design is pressed into the badge so some is recessed. I'd like to get paint into the recess and leave the high areas alone.

Does anyone have an idea how best to do this? What would you do?
SB
 

Attachments

  • DSC04647.JPG
    DSC04647.JPG
    233.2 KB · Views: 253
  • DSC04646.JPG
    DSC04646.JPG
    210 KB · Views: 237
  • DSC04648.JPG
    DSC04648.JPG
    285.9 KB · Views: 226
they should have the info @ rotrodbikes.com
they have someone one that makes the badges there.
all i remember is that white takes more coats.
 
SB, try riogrande.com for enamel and baking type stuff for jewelry. Also pwder paint... It's not too difficult. I powder coat small parts and bake them in a toaster oven. Not sure abt the fine-line details, though.
rc
 
I'm hoping there is a simple way to do this. I'm not looking to paint the whole badge, just the recessed areas. I was thinking of something like Fingernail polish in either red or black, doing as well as I can to stay in the recessed portion and then after it is dry to clean off any paint in the non recessed area with metal polish orlacquer thinner... something or other. Then if all is well spray it with clear coat after it has set up for a time. Would that work, do you think?
SB
 
SB,
I've done some of what you're trying to accomplish and it is time consuming and tedious.
I paint the whole piece the color I want in the background then when the paint is dry use very fine sandpaper on a hard surface like a wood block to take the paint off the raised surfaces. If the part needs multiple coats to get the final result you want, then sand between coats so you don't have so much paint to remove in the end. If you want the raised lettering a different color, that's where the fun begins.
I've used a liquid masking with good results. Carefully painted on, it will peel off after the paint has set. Good luck. Let us know how it turns out.
I'll try to get a good photo of a Ford logo that I did for my car. I'll post later if my old camera hasn't died.
Tom
 
Thanks, Tom.
I'lkl just go for one color and leave most of the head bade in plain metalI want some contrast so the design and lettering can more easily be seen. As I was reading your post I wondered how a dremel buffing pad would work with a little mag polish on it for removing unwanted paint.
SB
 
See if you can find a magnifying glass (larger than the part) on a goose neck stand. Paint it like Tom said. When its time to sand just stick it under the mag. glass so you can better see the fine detail. If you lived around here I would loan you my glass. The more time you take in sanding the better it will turn out. Go SLOW!

Terry

Check this one out: Goose Neck Magnifier VTMG5
 
Thanks, Tom.
I'lkl just go for one color and leave most of the head bade in plain metalI want some contrast so the design and lettering can more easily be seen. As I was reading your post I wondered how a dremel buffing pad would work with a little mag polish on it for removing unwanted paint.
SB
SB,
A Dremel will work great. That's exactly what I did with this little pewter key chain Ford logo. It was all silver. I painted in the blue then sanded the raised lettering then used a Dremel buffing wheel and compound. I shot a couple of coats of clear over it when it was done. It's been on the front of the car for a long time and starting to show some age now but still looks okay.
Tom
 

Attachments

  • Hot Rod, Ford Logo.jpg
    Hot Rod, Ford Logo.jpg
    167 KB · Views: 1,072
A dremel tool with a fine (soft) wire wheel might be able to remove the paint from the raised surfaces & still leave the paint in the lines.
 
Thanks for posting the photo... wow, does that look nice! The paint job on your Ford is wonderful... it reminds me of some of the opalescent stained glass I used to work with.
I think I'm going to do the lettering on my Hiawatha fender ornament first and get a feel for doing this. I'm going to paint a washer the same color as the frame of the bike and then take it in to a local store to find some fingernail polish close to it in color. It will even have its own little brush. May as well minimize what I have to remove by being careful applying the paint. That's what fingernail polish is, lacquer paint. I've bought black before to use as touch up paint on my Panther. Works fine.
SB
 
I got some fingernail polish yesterday, matching the color pretty closely to the frame color... took a painted part with me for comparison.

I decided to do the Hiawatha fender ornament first. Interesting that the wee bit of old paint remaining in it was red, a bit at the feather headdress fastening hardware and in the recessed lettering. Once dry I light sanded with super fine sandpaper and followed up with the rotary tool with a small buffing pad loaded with Mother's Mag wheel polish. Wooho!

Not so woohoo was the head badge which was a mess painting within the lines and then trying to clean up what went beyond the lines. There is too little difference from what is recessed and raised for me to do it well. So I stripped it down with gasoline and buffed it out with the above mentioned rotary tool. Looks almost like chrome now and I can live with that.

Thanks to all for the suggestions.
SB
 

Attachments

  • DSC04653.JPG
    DSC04653.JPG
    254.2 KB · Views: 177
  • DSC04652.JPG
    DSC04652.JPG
    269.5 KB · Views: 167
  • DSC04656.JPG
    DSC04656.JPG
    234.3 KB · Views: 181
  • DSC04659.JPG
    DSC04659.JPG
    226.9 KB · Views: 189
  • DSC04660.JPG
    DSC04660.JPG
    245.2 KB · Views: 196
Back
Top