
You are using an out of date browser. It may not display this or other websites correctly.
You should upgrade or use an alternative browser.
You should upgrade or use an alternative browser.
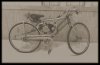
Vintage flair, my first build.
- Thread starter K.i.p
- Start date
wheelbender6
Well-Known Member
The unusual fuel tank mount really compliments the exhaust and other parts. It all works together to create a unique, catchy style.
the paper boy
New Member
looks good but how does it run.
K.i.p
New Member
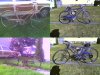
Thanks you for the kind words. The ride itself is really nice, the springer front end and sprung seat give nicely over bumps. The power plant is a 48cc and is scarcely broken in. I have only run literally about 1/4 cup of fuel in it.
It is not particularly torq-y at this point but when pedaled up to speed I estimate I'm probably reaching 25mph or so and discovered only today I can do a little better if I continue to pedal and really get it rolling. I think with a careful fuel mix and some work with the clip on the needle there is more power to be had.
The motor is very new, and I simply used some crappy old weed-whacker oil/gas I had on hand to see if it would fire. I'll focus on performance after I get it painted, reassembled, and broken in with a properly regulated gas/oil mixture.
*also mounted my kill switch today, a nice big horn button on the top tube, in the event of an "oh sh*t" momment. It can't be missed.
Last edited:
wheelbender6
Well-Known Member
Take your time and break it in by the book. The engine will get torquier as you add those gentle, break in miles.
K.i.p
New Member
It's going to sound kind of funny but the primer gray is starting to grow on me. I'm leaning towards a light gray with a very light dusting of silver to boost it a little bit and then some clear coat. I would like to accent the lines with some carefully placed red pin stripes. I won't know for sure until the primer is on and has dried. I'm not familiar with the sea-doo kill switch, it sounds like that would have been a great option!
jimrandolph
New Member
Sea Doo switch is like the key in a tread mill,it pops on the switch w/a lanyard that clips th the life vest and if you leave the seat the key goes with you disabeling the ignition system
Where can I get one of those Sea Doo switches? I'm gonna build my new Harley Davidson Velo Glide, and that switch sounds like the Cats Meow!!!
Thanks, Jim

K.i.p
New Member
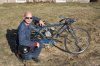
Painted, reassembled, and road tested. Thank you to all the contributors here who have inspired me and taught me to construct a successful build through all their posts and advice.
This reflects six months of work and the incorporation of a lot of very good suggestions found here. The motor retains all stock fasteners. No broken studs or screws, or striped threads.
Goodies include custom air filter, bushed and greased springer fork, custom hub adapter, custom offset intake manifold, custom dual muffler exhaust system, custom rear brake arm, custom stainless gas tank and cap, bobbed rear fender, reinforced drive chain guard, and custom chain guide pulley.
The carb has been modified with an Egor-idle circuit and all gaskets replaced with hand cut heavy foil. The exhaust gasket is stock for now. Everything runs well and all hardware holding solid and sound. I think I will get rid of the mirrors as they become too blurry to be affective and serve only as a distraction to me and take away from the clean lines.
Attachments


Last edited: