Very satisfied with my first build!

GoldenMotor.com

a_dam

New Member
Feb 21, 2009
351
0
0
Momence, IL
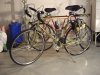
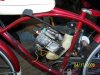
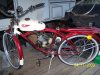
I put a 25cc two-stroke friction-drive on my 1973 27-inch Continental. (old skinny tire bike). It has worked out better than I expected. I put well over 2000 miles on it last year.
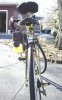
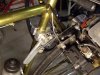
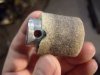
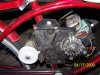
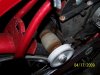
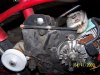
I'm glad I went with the friction drive. It's simple, light, inconspicuous, and completely disengages with the flip of a lever. Tire wear is not an issue at all anymore. I rode almost all of last year on one rear tire. That's about the same wear I got without a motor. My friction drive wheel (scrubber) is made from a hockey puck and steel spacer from Lowes. The "wet weather" scrubber in the photo is made from skateboard wheel with abrasive grit glued to it. Springs pull the unit down onto the tire. It'll bump start at 5mph, no problem. The throttle lever is an old brake lever. I added some extra homemade cable bosses to the frame so the cable runs nice and neat. It's all homemade with hand tools, a bench drill press and disk sander.

It rides like a Schwinn 10-speed, which I like. I don't go trailblazing with it; mostly ride the country roads within 30 miles or so from home. About 200 mpg - 25 mph top speed. A good pedaling pace in 10th gear... that's about the top speed and I don't want to go any faster!

Paid $10 for the Homelite leaf blower at a garage sale. Got the '73 Continental and a chromoly Univega at a yard sale, $20 for the pair.
 

Attachments

happyvalley

New Member
Jul 24, 2008
784
1
0
upper Pioneer Valley
Hey, have I seen you somewhere before? hehe

So what ya got into the whole rig, 30 bucks?

Here beats the heart of the the whole motorized bicycle thing: DIY, low cost and effective. Good on ya!
 

a_dam

New Member
Feb 21, 2009
351
0
0
Momence, IL
"So what ya got into the whole rig, 30 bucks?"

I can feel the sarcasm there. Actually, it was $10 for the motor and $10 for the bike (2 bikes for $20).
Then throw in a few extras. I relaced the wheels myself with stainless spokes - about $40. Foam handlebar grips - $10. Gel seat pad - $10. Cables - $10. I got the tires super cheap at K-mart $6 each on "clearance" ?, they had three and they are not bad - wish they had more. Krylon X-metals paint, clear coat, sandpaper, etc..- let's say $20.
I already had most of the material to craft the drivetrain; a small collection of steel plate, angle iron, aluminum stock, high-grade nuts and bolts, etc. My tool collection is pretty small too. My cheapass harbor freight tap & die set sure earned its $20. The little country True Value near me has a great variety of springs (push and pull), so that was only about $6. Add $10 for the bearing and pillow block. Spacers, hockey puck, and skateboard wheel gives me replaceable "scrubbers" for about $10.

You get the idea. So in my case it's at least $200 for material costs. Not counting MANY hours of my labor.
But DIY is crucial! Since I built it, I know it is solid and I love my ride that much more. And it inspires new/improved ideas.
Anybody that installs a pre-built kit on a bike has my respect too.

I wonder. If motorized bikes were widely sold and ridden everywhere, would there be this "enthusiastic" following?
 

a_dam

New Member
Feb 21, 2009
351
0
0
Momence, IL
Thanks for the compliments, guys. Hey, Happy Valley; nice to see a familiar name. Don't let anyone know if I recycle some of my posts with copy/paste.

The friction wheel I prefer to use (on the bike now) was made from a hockey puck. A hockey puck is 3" diameter and 1" thick. With hole cutters, I cut out a disk 1 1/4" inches diameter and drill a 7/8" hole in the center. I can get 3 drive wheels out of one puck, but my first one has lasted a year with little wear.
So then I epoxied (clear 5-minute epoxy) it onto a steel spacer. I bought the spacer (that's the actual name of the item) from Lowes hardware section. It's 1 1/2" long, 7/8" O.D., 5/8" I.D. and fits over my 5/8" motor shaft. I drilled and tapped two holes for set screws.

The one that I am holding in the picture (grit wheel) is basically made the same way except the material is a urethane skateboard wheel. Urethane (Gorilla) glue is used to glue the wheel to the spacer and the grit on the wheel. Epoxy don't stick to the urethane good at all, but Gorilla Glue sure does. The grit is from some weird old grinding wheel I got somewhere about 20 years ago. It is "friable"; the grit breaks off of the grinding wheel easily. It is white and rather sharp and glass-like.
The grit wheel works well in wet weather, but I can notice more tire wear than the dry-weather, hockey puck wheel.

The skate wheel was my first drive wheel attempt. Before I got the proper spring tension figured out, the scrubber slipped too much and really wore down the tire. Plus, urethane is kinda slippery anyway, so I coated it with grit for wet road use.
 

a_dam

New Member
Feb 21, 2009
351
0
0
Momence, IL
Bikeguy Joe, just noticed your location. Didn't they used to make a lot of bikes in Ashtabula? I remember having some Ashtabula cranks & stuff on my Schwinn BMX as a teen.
 

happyvalley

New Member
Jul 24, 2008
784
1
0
upper Pioneer Valley
No, no, friend....no sarcasm here intended. Sorry if it seemed that way but I was more making the point that for not a lot of money but a good amount of ingenuity you put together a sweet little ride.
Kudos and enjoy!
 

Bikeguy Joe

Godfather of Motorized Bicycles
Jan 8, 2008
11,837
252
63
up north now
Bikeguy Joe, just noticed your location. Didn't they used to make a lot of bikes in Ashtabula? I remember having some Ashtabula cranks & stuff on my Schwinn BMX as a teen.
Yes, the Ashtabula bike factory made cranks, forks and the very first BMX "conversion kits". Before that, they were a foundry that made huge parts for the Great Lakes ore shipping industry, including anchors.

I have gone to the old location, but it had a fire a long time ago, and is now just another plastics factory, not even sure if it was open....lots of crack pipes in the parking lot though.

Time marches on...
 

a_dam

New Member
Feb 21, 2009
351
0
0
Momence, IL
Thanks again for the good words, Happy Valley. I didn't mean sarcasm in a negative way. Whenever I tell people that I bought the motor for $10 and the bike for $10, although it's true, I am being a bit of a wiseguy. Still, $200 total is a small price for something so fun.

ZnsaneRyder - another familiar name. Wish I was in Florida now. Last October I flew to Florida with my sister. They got a house in Brooksville, about 40 miles north of Tampa. While driving north from the airport on 589, I noticed a bike trail along the west side of the road the whole way. I wish Illinois had more trails. Someone on TV was talking about wasteful items in the "stimulus package", and they mentioned a million dollars for bike paths. With a trillion dollars at stake, I don't know why they single out bike paths as wasteful. I think a lot of people don't have much respect for bike riders. Resisting urge to rant.

"It's nice to see a lightweight and fast bike with an engine!" I guess you can call it lightweight. It's 55 lbs. fully loaded with water bottle, tool bag and everything. Faster than a mountain bike though, for sure. The most lightweight bike I ever had was a Super Le Tour, about 1980. I was a stupid teenager, and I bought it knowing it was "hot". I had it about a week before it got stolen from me! Karma is a *****. Wish I had one of those motorized, but these old steel Schwinns are pretty indestructable. And people throw them away, so I have lots of extra parts from garbage pickin'.
 

ZnsaneRyder

New Member
Nov 21, 2008
163
0
0
FLORIDA
Wow, I may check out that Brooksville bike trail!

I've got a LOT of stuff lately from garbage pickin' too! My new #2 trailer in the works, the whole frame was free fence post metal and huge bolts I found on the side of the road!
 

NEAT TIMES

New Member
May 28, 2008
1,964
1
0
PENSACOLA, FL
A-dam, Took A While To Find Your Thread And Build. I Want To Post Pics Here. Will Go Out Side Now And Take Some Pics Of The Zipcycle. Did You Get A Chance To See Their Website? I Promised Another Member I Would Post Zip Pics Last Fall And Forgot. I Will Edit Pics In Here Shortley.i Had To Replace The Whole Jackshaft, Bearings, 2" Leather Drive Roller ( 2" Was The Largest I Could Find For 1/2" Shaft) And The 3" White Nylon Cog Pulley. Those Parts Came To $105.. I Need To Get It Going. I Tried Starting It With Electric Drill, About Wore It Out Turning It The Wrong Direction. Lol And Lol.. The Happy Time Looking Gas Tank Is Plastic, Its A Glove Box. The Gas Cap Is The Cover Nut. Ron Ok, got 2 pics and dead camera bat. its on charger so will post more in a few minutes. I HAVE THE COG OFF THE MOTOR FROM TRYING TO START IT WITH DRILL. A cogged belt runs from motor to white pulley. It has nice fiber glass motor covers. will charge camera overnite and take more pics in daylite. ron
 

Attachments

Last edited:

a_dam

New Member
Feb 21, 2009
351
0
0
Momence, IL
Hey Ron. I see a lot of familiar parts there. A Homelite motor bolted to a steel plate. Pull-start pawls ground off. Did you have any problem grinding those studs off? They are some hard metal. I messed up a hacksaw blade before I reached for the angle grinder. I also cut down the cooling fins on the flywheel so they wouldn't get close to my tire, since my roller is on the shaft.

The throttle linkage on my motor's carb ended up being hard to run a cable to after being bolted to the steel plate. Maybe weedwackers are set up different than leafblowers.

I can't tell from the pics how the brake pedal engages/disengages your drive.

I like how you have it positioned in the frame. Easy access to the spark plug and all the parts. You can fill that tank all the way up and use every drop. Hopefully your fuel lines won't drip.

Never heard of a leather roller before. Sounds interesting. Like wood but more stable.
You planning to do anything with the exhaust?

When I was working on mine, I tried starting it with a drill as well. Once the pull-start is removed, you don't have much choice. I had a strong 1/2 inch drill and it still didn't spin it very well. If you have the 3-position choke, don't leave it on full-choke or it'll flood out almost immediately (fuel will come out of the air cleaner). As soon as it pops, put it in half-choke position.

Looks good. Keep the pics coming as you finish her up.
 

a_dam

New Member
Feb 21, 2009
351
0
0
Momence, IL
OK.
I never knew about Zipcycles. So that's where those white cogs came from.

I did a search for "zipcycle" in Google Images, and this image showed up....
 

Attachments

Last edited:

NEAT TIMES

New Member
May 28, 2008
1,964
1
0
PENSACOLA, FL
Morning Adam, You Clicked On The Second Choice Under "zipcycle", Their Site Is Your First Choice, I Just Now Checked It Out Again. When You Came Up With My Avatar=must Be When I Was Looking For Parts Last Summer. I Guess The Internet Never Forgets. I Did Not Build It. It Is A Complete Setup From The Factory, Bike And All. I Bought It Used Last Summer For $250., It Listed New For $1100. Then Spent $105. On The Jackshaft Parts. The Drive Roller (2" Dia, I/2" Bore) Came From "mcmaster-carr". I Have Them On My Favorites List. Shipping Is Usually Less Than $5. The White Pulley Came From Them, Etc. They Have A Lot Of Stuff. Also "vxb Ball Bearings" For The Shaft Bearings, Good Prices. It Had A Rubber Like Drive Roller, Approx 2 1/2" Dia. It Was Wore Out To Almost A Square. The Brake Like Lever Is For Pushing Down With Your Hand For Extra Starting Power (friction). The Leather Roller Is A Flat Belt Pulley. Your Build Looks Very Good, Would Like To See Better Closeups. When You Try Starting A Motor With A Electric Drill From The Flywheel Side You Have To Turn It Counter Clock Wise (to The Left).. Remember, Your Rear Wheel Motor Is Running Backwards To Turn The Tire Foreward. When You Try Running The Motor Counter Clock Wise With The Drill The Nuts Keep Screwing Off. The Jerking From The Compression Is Like A Air Gun (impact Wrench) Banging Them Loose. A-dam, Thanks To Your Interest, I Just Figured Out How To Make A Tool For Starting The Wacker Motor On The Zipcycle. The Two Bolt Bosses On The Flywheel, One On Each Side Center. I Will Take A Piece Of Flat Stock, Drill A Hole In The Center To Fit Over The Crankshaft Threads, Then A Hole On Each End, To Bolt It To Flywheel. I Have A Couple Options For The Center "thing A Ma Jig". Pedal Starting Is Ok For A Good Running Engine. Not So For A Troublesome One. Imho.If you like, i will take more and beter pics. Ron
 
Last edited:

a_dam

New Member
Feb 21, 2009
351
0
0
Momence, IL
You can tell that I didn't read your previous posts well, Ron. You said it was a Zipcycle, listed new for $1100. I thought it was all homebuilt. Gotta read better before I post.
That setup is so much like I was thinking about maybe doing for my next build. Frame mount, bigger drive roller, etc. I guess someone thought of it first.
A thousand dollars sounds like a lot for a 25cc friction drive bike. But I do like their simple design.

Yeah, McMaster-Carr. I used to have a big old catalog from them way back when. Forgot all about them; need to get another.

Thanks for explaining things well. Sometimes pictures can't show it all. I know some of my pics don't show the detail I would like. If there's any part of my bike you have questions about, just ask. I'll gladly try to give a better pic/description.

Let us know how that thing ends up running. I still wonder about the choke. I don't see one in the pics and the website doesn't mention a choke. That is a different carb than mine, though.