Start of the 28" Board Tracker project

My thought on the motor .

It actually looks allright with the fake cylinder . ( only problem ... its fake )
But it sure will look good
I know you are going for a certian look . My personal taste .. don,t really like the look of a leaning back single cylinder . For a single cylinder I like vertical . But thats me .

I had to chuckle when you said about it not being a crowd pleaser .
crowd thinks its gonna go ( BOOM potatoe pop pop bang pop pop bang )
and then all they get is a ( Ring ding ding ding ding ding ding ding ding )
 
If there's anything that's associated with the look of a v-twin, it's the sound. I'm afraid it just wouldn't seem right with a faux cylinder for the v-twin "look".
 
thanks for your thoughts, but...

I DID IT.....

took the hacksaw yesterday evening and went for the low loop, was **** of a job cause I had to bent the tubes while already being mounted to the overall frame, but got it right.
This faux V2 concept now makes some things easier, and others more difficult... but the look!!!!!

That was the missing link... it looks awesome, will post pics later
 
The "twingle", for better sound ;-)
 

Attachments

  • split-single_cut-away.jpg
    split-single_cut-away.jpg
    505.9 KB · Views: 354
I am loving this build. I have been lurking on it since your first post. What you did with the engine looks really good, such a neat Idea. However I have to say it I HATE 2 stroke. If you are still debating about what engine to use I highly recommend the 200cc clone. But that's just my opinion, keep up the good work with whatever you choose to do.
I will return to lurking now.
 
the V-twin

here it is , guys, a sneak preview out of my shop. I can't stop looking at it, that is a good sign, telling me I did the right thing...
 

Attachments

  • _MG_7375.jpg
    _MG_7375.jpg
    572 KB · Views: 400
  • _MG_7377.jpg
    _MG_7377.jpg
    583.2 KB · Views: 379
  • _MG_7379.jpg
    _MG_7379.jpg
    611.5 KB · Views: 441
  • IMG_7365.jpg
    IMG_7365.jpg
    436.1 KB · Views: 466
  • IMG_7366.jpg
    IMG_7366.jpg
    373.9 KB · Views: 407
Last edited:
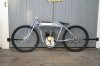
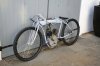
I know this is a very DIY type bike you are making and the drop out tube method of bending it to shape is really approximating a curve through short cut and weld pieces. Quite short pieces if as you said when you can look at zoom level. Very very nice!

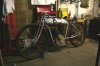
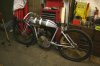
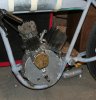
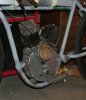
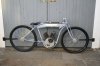
I have a problem that I need to fix. I think it really is not OK to leave as is on my bike build where the rear fork on one side needs to spread enough to allow the pulley drive attached to the spokes, to clear the rear fork tube on the left side.

I have used a spacer on the left side of the rear wheel hub threads to spread it over on just that side to make clearance. It is about ¼ inch but the tubes really have a lot of stress to widen it just that little bit.

I have heard of bending further that what you need and then the metal will not return back fully to the dimensions and there you have it. Hopefully just spread enough. I have not anything that can hold it and get that amount of leverage though.

I have also heard people have said to flame heat and make the bending easier on the metal and welds when you are bending. I have small propane or map gas torch that I have a wide tip to spread out heat, but I’m not sure that enough heating can be attained to a large enough area in a given time to be able to make the bending go easier.

I have also heard that the tube may collapse in the hollow area inside, and maybe that is why you chose the cut and weld many pieces. I could go for slightly longer pieces, more like a rise time of an oscilloscope waveform.

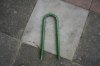
Cutting and welding as you do looks really good. I have a MIG 125 amp welder with ARCO2 or use flux core and should see if I can practice on some old steel bike tube parts to see if I can do as you have done. It has been mentioned that if I widen one side the rear fork can still be parallel, by use of an “S” shape bend.

Any tips on this,

Thanks Measure Twice
 
Last edited:
I have heard of bending further that what you need and then the metal will not return back fully to the dimensions and there you have it. Hopefully just spread enough. I have not anything that can hold it and get that amount of leverage though.


Any tips on this,

Thanks Measure Twice

Guess you need a hydraulic tube bending thing, my cutting/welding method only works with thick material, too thin material makes it edgy, and it is a lot of welding and grinding which needs thick material. Or try it with partial heating.
With my first bike I cut the rear fork in the middle where it is attached to the pedals/sprocket and made it wider with fitting and welding a piece of metal inbetween. Also a lot of work. Good luck
 
Not to go too far off topic, but I’ve had good success spreading rear stays by “gently” pounding them apart with a 2 X 4 & rubber mallet and then drawing the drop outs together with a clamps.

But yes you do have to be very careful not to create crimps, dents or uneven spread.

And realigning the drop outs may also be necessary (easily done in a vise).

-Kirk
 

Attachments

  • Stay spread.jpg
    Stay spread.jpg
    91.1 KB · Views: 269
Not to go too far off topic, but I’ve had good success spreading rear stays by “gently” pounding them apart with a 2 X 4 & rubber mallet and then drawing the drop outs together with a clamps.

But yes you do have to be very careful not to create crimps, dents or uneven spread.

And realigning the drop outs may also be necessary (easily done in a vise).

-Kirk
Holey crap I've nver thought of that!!! Thank you mr.b! Belt drive here I come!
 
better pics, and you can see what you can do with my magic tube bending method ;-)
 

Attachments

  • _MG_7380.jpg
    _MG_7380.jpg
    441.6 KB · Views: 322
  • _MG_7383.jpg
    _MG_7383.jpg
    452.7 KB · Views: 336
  • _MG_7384.jpg
    _MG_7384.jpg
    514 KB · Views: 321
  • _MG_7386.jpg
    _MG_7386.jpg
    466.9 KB · Views: 367
  • _MG_7393.jpg
    _MG_7393.jpg
    743.5 KB · Views: 333
Back
Top