Just to add my experiences:
I've had some serious problems after installing the shift kit, but the problems were not related to the shift kit.
In truth, the shift kit is a lovely piece of engineering and after you've ridden with gears, you'll never be able to go back - JUST GET THE ""DELUX"" KIT with the heavy duty freewheel bearing, big air filter, high grade bolts and engine cylinder stud kit bolts and high grade fuel cutoff valve.
Ok,
Only going from my experiences, you only have to do two (ok maybe 4) very low cost or even zero cost modifications to make the final drive chain (your bicycle chain that operates the rear cassette or cluster absolutely reliable and it's far better explained in pictures than words.
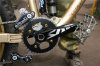
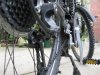
In the initial stages, i had no end of problems stabilising the final drive pushbike chain from the 36 tooth sprocket to the rear cassette on the rear wheel.
It resulted in 3 broken rear derailleurs, 5 or 6 damaged rear wheels and a few broken rear derailleur cables.
The diagnosis was that even with a jump guard or suicide guard, the chain was somehow; unbelievabley still jumping off the 36 tooth chainwheel and mostly pulling it's way through the jump guard, destroying the chain on the bottom bracket or to a lesser extent, jumping inbetween the 36 tooth and 44 tooth chainwheel and catching on the spacer nuts.
The solution to perfect reliability was initially costly because nescessity is the mother of all invention.
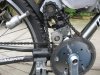
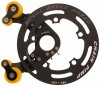
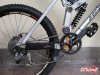
Just take your large and small chain tensioner idler wheels from the Chinese Bicycle kit and set them up as i have done and you will have no problems at all with the chain jumping off the 36 tooth chainwheel and even if it does, it will be a harmless situation where you only have to reattach the chain onto the 36 tooth chainwheel - a 2 second job if it even happens.
The other modifications are (photos attached):
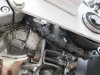
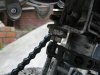
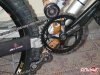
taking a damaged rear derailleur (the one that smashed it's way into your rear wheel) and hacksaw off a derailleur leg; attaching it to a piece of 3mm aluminium to prop up the slack side of the primary drive chain that is powered by the 10 tooth engine sprocket.
This will stop the chain cutting into the aluminium of the engine casting at low engine rpm's.
This modification is not nescessary if you constantly keep an eye on the chain stretch and replace chain at the 0.5% wear rate.
I find it's just peace of mind.
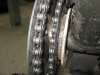
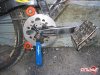
The other mod is to take one of the thick rubber rings that sandwich onto the rear spokes in the original Chinese engine kit and sand it down smooth so it can be attached/glued with silicon onto the bottom bracket side of the 36 tooth chainwheel.
Now you take any piece of thin plate (in my case 2mm MDF/plywood) and cut out a ring that can be glued onto the rubber drive washer you've glued to the chainwheel.
If the chain does throw onto the bottom bracket side, it harmlessly slips on the rubber drive washer and you not only get to ride home under engine power but you also have a perfectly usable and undamaged chain.
If wanting to spend the money on a proper professionally designed system there are a few good options such as the ROOX Rollercoaster or Chain Pimp device.
Personally, i like the spring loaded Roox Rollercoaster modified with a set of encaptulating top rollers from the Chain Pimp - the most perfect solution.
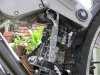
One other thing and it's another low to zero cost option:
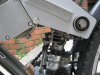
Replace the chain tensioning pushrod with a high tensile rod (standard rod bends when engine load pulls downward on the pushrod); replace one of the upper 1/4 inch nuts on the pushrod and find or buy a single 5/8 bolt.
Cut the head off and drill the appropriate sized hole so it can be tapped with a 1/4 inch tap.
Take this newly created wide headed nut and use it to push directly on the bent lower metal tab of the shift kit mounting plate.
The wider nut will not allow the bent metal tab to bend as the engine forces down on it.
You can only do up the jackshaft mounting U-bolts to a limited pressure before they start to crush the thin walled tubing of aluminium bicycle frames.
The engine will always want to try and slide down the seat post tube - this is a saftey issue and i will cover my modification to the U-bolts to prevent a much more secure mounting face with less pressure and more adhesion and easier adjustability.
These modifications are actually quite easy and simple taking no more than about an hour of your time and potentially will save you quite a bit of money that you can invest in the Delux Shift Kit and optional accessories.
Fabian