dumpydoodoo
Member
Good looking machine.

kOOL, should last a long time..........CurtThe only purchase on this build so far has been a one dollar stainless steel water bottle from a thrift store to carry reserve fuel.
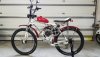
Aluminum mountain bike frame with double-walled aluminum wheels with disc brakes and Magic Mary tires. 10 year old Huasheng 142F powerplant was sitting on a shelf collecting dust. It still runs great after several years of use on another build. It's rocking the Keihin carb from my Honda GHX50 that now powers the Way Back Machine. The seat, gooseneck, and handlebars are spares from the parts bin.
View attachment 117156
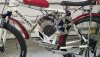
Heavy angle iron from an old Sears Rototiller was used to fabricate the engine rack. Pivot points were welded to a four-stroke kit engine mounting plate which swings away from the tire to disengage the friction roller which was made from the core of a Shimano gear cassette. The stock fuel tank from my Honda GHX50 water pump fits perfectly on the Huasheng making it a completely self-contained unit. I fitted the cap with a vent tube and routed the hose thru the engine mount to channel spilled fuel away from the exhaust.
View attachment 117157
Two views of the roller in the engaged position. To disengage, the engine pivots forward creating 1/2" of space between the roller and the tire.
View attachment 117160View attachment 117159
The engagement/disengagement arm is a section of handle from the Sears tiller. The pivot point is spring loaded so it can swing away from the keeper that holds it in place when the roller is disengaged. The mount is another section of angle iron screwed to anchor points for a water bottle holder. The keeper is held to the top tube with a 1 1/2" diameter forward footpeg clamp from my old Harley Road King. The linkage is made from threaded rods and a small diameter steel rod connected to an fulcrum made from aluminum plate.
View attachment 117161
View attachment 117162
Throttle linkage isolates the cable from the mount so the throttle position is not effected by the engagement arm. Coming up with this work-around literally made my brain hurt, but it works great!
View attachment 117163View attachment 117164
Final steps before testing includes installing a set of square-holed pedal shafts, installing a pedal chain, connecting the rear brake caliper and cable, wring the kill switch, and fabricating a drop-down kick stand to handle the offset weight of the engine.
I built one of these 12 years ago using a 96 cc snow blower engine mounted to a Huffy that had been rode hard and put up wet! It was a lot of fun, but turned out to be a death trap with a worn coaster brake and ratty tires. The frame self destructed due to vibration and stress from the powerful little Tecumseh 2 stroke.
It's a old Briggs washing machine motor with a old car generator with the side cut out for frictiond drive, should be fun......CurtVintage bikes are fun to work on. Are you going with a China Doll? I gave my trusty 66cc to my nephew, so I only have 4 strokes except for a 80cc Sachs 2-speed moped engine.
No it is not, but the replacement if this one don't workout has a kick start, this one is wind the rope and pull. I have a few old engines in my stach, soon to be sold, my sons don't have much interest in this stuff............CurtIs the Briggs a cast iron kick start version?
For sure, that would do it....LOL........CurtGot in trouble as a kid for cutting off the end of mom's broom handle to make rope starters! Rope starts are a good incentive to keep your engine tuned.