Rutledge A50 and Rutledge Super Six

davidberg

New Member
Hi folks!

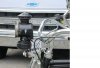
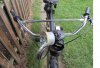
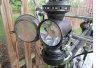
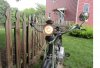
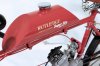
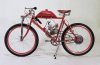
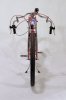
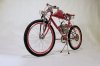
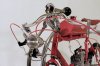
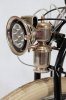
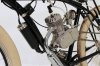
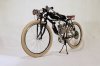
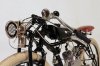
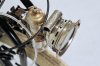
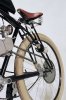
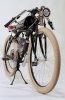
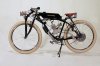
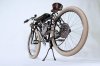
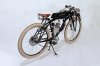
I've came a long way since I started tinkering with 50ccm engines last year. Now I'm proudly present my bikes in eventual form: the Rutledge A50 (the black one) and the Rutledge Super Six racer (the red one).

Also big thanks to all you folks for your help and and constant cheer!
Any comments are more than welcome!
 

Attachments

  • IMG_7205-ok-small.jpg
    IMG_7205-ok-small.jpg
    240 KB · Views: 245
  • IMG_7208-ok-small.jpg
    IMG_7208-ok-small.jpg
    288.3 KB · Views: 517
  • IMG_7209-ok-small.jpg
    IMG_7209-ok-small.jpg
    127.3 KB · Views: 239
  • IMG_7204-ok-small.jpg
    IMG_7204-ok-small.jpg
    259.8 KB · Views: 315
  • IMG_7206-ok-small.jpg
    IMG_7206-ok-small.jpg
    266.1 KB · Views: 256
More photos on the Super Six racer...
 

Attachments

  • IMG_7210-ok-small.jpg
    IMG_7210-ok-small.jpg
    148.9 KB · Views: 165
  • IMG_7214-ok-small.jpg
    IMG_7214-ok-small.jpg
    269.5 KB · Views: 208
  • IMG_7212-ok-small.jpg
    IMG_7212-ok-small.jpg
    131.1 KB · Views: 188
  • IMG_7216-ok-small.jpg
    IMG_7216-ok-small.jpg
    272.9 KB · Views: 220
And the black one... (the A50 is the "executive" model, the Super Six is a sporty one)laff
 

Attachments

  • IMG_7221-ok-small.jpg
    IMG_7221-ok-small.jpg
    157.7 KB · Views: 213
  • IMG_7223-ok-small.jpg
    IMG_7223-ok-small.jpg
    291.6 KB · Views: 272
  • IMG_7218-ok-small.jpg
    IMG_7218-ok-small.jpg
    255.4 KB · Views: 243
  • IMG_7219-ok-small.jpg
    IMG_7219-ok-small.jpg
    287.1 KB · Views: 268
  • IMG_7222-ok-small.jpg
    IMG_7222-ok-small.jpg
    243.5 KB · Views: 229
And the last ones!
 

Attachments

  • IMG_7224-ok-small.jpg
    IMG_7224-ok-small.jpg
    180.7 KB · Views: 228
  • IMG_7229-ok-small.jpg
    IMG_7229-ok-small.jpg
    179.4 KB · Views: 217
  • IMG_7226-ok-small.jpg
    IMG_7226-ok-small.jpg
    287 KB · Views: 218
  • IMG_7232-ok-small.jpg
    IMG_7232-ok-small.jpg
    256.5 KB · Views: 183
  • IMG_7237-ok-small.jpg
    IMG_7237-ok-small.jpg
    258.6 KB · Views: 194
Last edited:
I like the way you put together the forks. What is the cylinder behind the seat tube on the super six? Is it functional?
 
David!! Thats exceptional work! Fantastic! May I ask particulars of how you modified and power the carbide lamp on the black bike?
 
For what it's worth, I think I did about the same with this headlight. Picked it up at auction for $30. Cleaned it up and took out the innards. Found a flashlight with a lense that would fit. Cut the top off a spraycan lid so I had a cylinder and glued the reflector to it. Ran the wire out the back, drilled a hole in the rear of the lantern and ran it to a 6 volt rechargable battery under the seat.

I soldered a battery box together with a hinged lid, mounted a toggle off/on switch to the box and bolted it under the seat. Works great. Hope it might be of some help.
Dan
 

Attachments

  • IMG_0636.JPG
    IMG_0636.JPG
    262.5 KB · Views: 226
  • IMG_0639.JPG
    IMG_0639.JPG
    551 KB · Views: 227
  • IMG_0641.JPG
    IMG_0641.JPG
    617.3 KB · Views: 189
  • IMG_0642.JPG
    IMG_0642.JPG
    404.3 KB · Views: 196
  • IMG_0640.JPG
    IMG_0640.JPG
    492.8 KB · Views: 244
I like the way you put together the forks. What is the cylinder behind the seat tube on the super six? Is it functional?

Hehe, it's disfunctional... It's an old beer warmer (in England and other beer-drinking countries warm ale was a popular winter drink when heated on its own or mulled with spice and sugar) like this: http://www.oldandinteresting.com/ale-warmers.aspx
I've found it at a flea market and it was in such a great condition and looked like a vintage oil pump I decided to find a place for it on the bike -- just for the looks ;)
 
For what it's worth, I think I did about the same with this headlight. Picked it up at auction for $30. Cleaned it up and took out the innards. Found a flashlight with a lense that would fit. Cut the top off a spraycan lid so I had a cylinder and glued the reflector to it. Ran the wire out the back, drilled a hole in the rear of the lantern and ran it to a 6 volt rechargable battery under the seat.

I soldered a battery box together with a hinged lid, mounted a toggle off/on switch to the box and bolted it under the seat. Works great. Hope it might be of some help.
Dan

Tinsmith, that's a great work and a beautiful bike!
 
Thanks David, these things sure are a lot of fun and thanks for taking the time to show what you have been up to.

Dan
 
Watch that springer front end on the red one. The bolt can't take the angular forces and will break, as I found out. Your front end will collapse catastrophically(sp?)
 
Wow! What a beautiful pair!
I really like the nostalgic look that they have. You sir have done awesome!
 
Watch that springer front end on the red one. The bolt can't take the angular forces and will break, as I found out. Your front end will collapse catastrophically(sp?)

Thanks for warning, but belive me or not, the springer doesn't funtion!
I quickly found out that cheap China springer forks are simply garbage... had a test ride, and it wobbled and stretched soooo much that almost cracked apart when I pedalled moderately - without engine!

So I took it to pieces and connected its main tubes flipped inside out to the springer mechanism. It looked so bold I decided to leave it as is (you can see the brake pins on the flipped forks). So it's basically just sits on the bicycle fork and does no damping. In the future I think I'll make a leafspring fork out of scratch, but now it's adequate for street use
 
Just noticed the bar clamps on the red one. Whered you find those??? Looks neat!

They are the upper parts of standard motorbike handlebar risers. I need 4 of them for a side, two set of them clamp the handlebars and they are bolted together. They are a quick 'n dirty fix for a classic Indian racing handlebar configuration...
 
Back
Top