Roadside breakdown troubleshooting technique

nimblebee

Member
You're traveling along, everything's fine, and suddenly ..."kaput" ... motor stops.

Now you could call roadside assistance or your person to come and help pick you up; but maybe you don't have cell service, and no way to call?

This is a good reason to let someone reliable know about your trip plans, in case you're overdue, someone will know your route and can come looking, if needs be.

Don't leave your "safety person" hanging: make sure and let them know you've completed your trip safely. Otherwise, your discourteous actions could result in no future cooperation.

Conundrum: no means of communication, no one is coming, you have to rely upon and help yourself. What to do, where to start troubleshooting?

Supposing you've tools and spare parts: start with easiest things to check, imho: "suck, squeeze, bang, blow"

a) Out of gas? This does happen sometimes (don't ask me how I know lol)

b) Fuel shut-off open and gas flowing to carburetor?

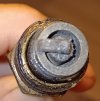
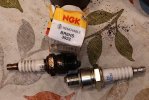
c) Do you have spark? Hopefully, you have spare spark plug or else "spark tool" to check for spark.

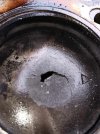
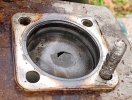
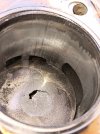
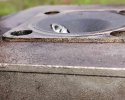
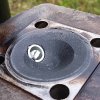
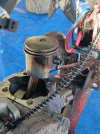
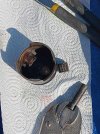
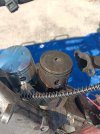
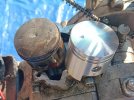
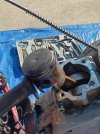
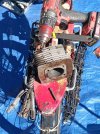
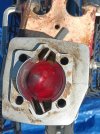
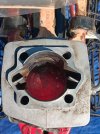
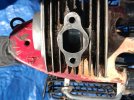
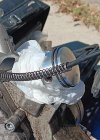
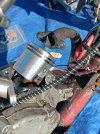
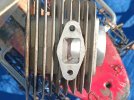
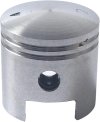
d) What about compression? If a gasket is blown, there's majorly air leaks, may not be sufficient compression for combustion.

Loose head bolts can cause loss of compression, loose carburetor = no fuel input.

Avoid trouble, do yourself a favor: No duh! check and tighten everyhing before beginning trip.

Beyond these fairly quick and easy-to-check items, it's possible having engine damage beyond quick/provisional repair on roadside.

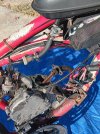
In scenario can't fix problem on roadside via swapping out CDI, or whatever else, with spare parts and tools on hand?

Without "motor" part of "motorized bicycle" you're left with only "bicycle part."

Hopefully, you're in good enough shape and close enough to destination, where you're able to finish trip using pedal power.

Having spare parts and tools to affect common repairs on the road is good, but even better is pre-trip inspection, fixing problems found, before heading out on the road.
 
Last edited:
FLAT TIRE is #1 reason for breakdown, your not going anywhere with a flat tire
Carry tools, at least 1 tube, patch kit and a small hand pump

Changing a flat on the road SUCKS
Best flat protection I've found is Tannus Armour
Since I installed Tannus Armour 3 years ago I haven't had a flat since
I also put Tannus Armour on my Fat Tire E bike

DSCF5992.JPG

BTW the best deal is on AMAZON - Bundle deal tubes included

DSCF2934.JPG
DSCF2932.JPG

DSCF2881.JPG


If ya do get a flat, having a center stand makes taking a wheel off easy

Before I got Tannus Armour I used to get flats a few times a year
I ride alot
DSCF1673.JPG

DSCF1681.JPG


I used to use Slime
If ya get a small puncture Slime will get you home on a low tire but it's not a fix
The tube should still be patched or changed when ya get home
 
Last edited:
If I run out of gas there's no excuse; since I have a see through gas tank.
20250714_184347.jpg


I carry tools and a spare carburetor in an ammo box. Since my engine is a rear rack mount I also carry a Huffy Quick change tube. This way I don't have to remove the rear wheel on the roadside.
 
Here's something interesting: went out at night with spark plug to test/check spark on motorized bicycle.

During daylight, couldn't see any spark.

In nightime darkness, could tell spark was present.

Question, is that normal, HT CG kits having spark so weak, that it's not visible during daylight?

Forums say should see spark in daytime. YMMV? idk

Forums mention HT CG magneto & CDI combos being weak/subject to failure.

Some forums mention using resistor wire or resistor plugs a "deal kill" for weak magneto/CDIs used with CG HT kit engines, some say killing spark outright or decreasing service life.

Idk? Convinced enough by other's woes to carry spare ignition parts.

Nowhere mentioned: kits having a typicaly "weak spark" which couldn't easily be seen in daylight? Imho, some "lack of spark visibility" could be down to age & less-than-stellar eyesight?

Troubleshooting by way of substitution with ignition components, was glad seeing had spark, just uncertain if spark seen was sufficient enough to support combustion? idk

Having spark verified being present, troubleshooting next leaning towards compression test, with possible engine disassembly.

Perhaps troubleshooting will reveal something simple, like a blown gasket causing loss of compression?
 
Last edited:
Testing the compression on the 2-strokes is pretty easy... Just spin the rear wheel to feel the compression.
It's possible that it might have good compression when the engine is cold & it loses it after it warms up, (head gasket issue); but that's also real easy to figure out.
 
True, right you are, feeling loss of compression when turning wheel.

Took head off & piston had hole in top. Metal looks pretty darn thin in this area, right underneath spark plug hole. Unsure, maybe could have been a clearancing issue?

Another piston ordered, showing up in a couple of days, so can install and continue troubleshooting.

Want to get bugs out of MB, before beginning 313 mile cross-state motorized bicycle camping trip. If piston did have to blow a hole in it, fortunate damage occurred locally, where repairs are simpler, rather than on planned travel trip.

Plan is repairing everything as rightly as can with MB, then shorter, localized trips, seeing if anything else fails, before considering cross-state trip.
 

Attachments

  • Replacement piston reusing rings.jpg
    Replacement piston reusing rings.jpg
    85.6 KB · Views: 7
Last edited:
I also carry a Huffy Quick change tube. This way I don't have to remove the rear wheel on the roadside.

Huffy posted video of their quick change tube.


I've started thread on "poor boy" flat protector, DIY via pool noodle being cut down to fit inside tire between tire and tube. Few but die-hard experimenter-tinkers like myself, would go this route: most would purchase commercial products :D

In a similar way to Huffy product, pool noodle hack, it's ends are separated and can be installed without removing tire. A small bonus, as DIY pool noodle trick prevents flats, it doesn't actually fix them :) Time will tell how DIY experiment works out (see thread).

 
True, right you are, feeling loss of compression when turning wheel.

Took head off & piston had hole in top. Metal looks pretty darn thin in this area, right underneath spark plug hole. Unsure, maybe could have been a clearancing issue?
The only way to burn a hole in the top of the piston is by running it too lean!!
Either you jetted it too lean, or you had a bad air leak somewhere in the intake. :(
 
The only way to burn a hole in the top of the piston is by running it too lean!!
Either you jetted it too lean, or you had a bad air leak somewhere in the intake. :(

My vote is for an air leak. Leak coincides with other symptoms previously noted.

Not discounting possibility impact of spark plug hitting top of piston. The damage doesn't look like a burn on the top of the piston, looks more like either thin metal or break from Impact? idk

Break/hole (whatever it is) is right underneath spark plug. Suspicious? Soon as can get enough memory cleared up in phone to use camera, will upload photo of piston top & spark plug.

Glance at spark plug chart showing what lean setting results, is opposite of plug condition, which indicates running rich, having lots of carbon buildup.

That's why it's called troubleshooting. Onward and upward: "Failure is the pathway of least persistence". With my level of knowledge, it's a process of cut and try, trial and error troubleshooting. I don't call it "knowing" :) , no more than calling fishing "catching" :D

I've been chasing air leak symptoms for a while (IE: no idle, hard starting & etc), so leak makes sense as a place to continue investigating.

Happily, forums are full of good information and direction in this regard, most every question possible has been asked and answered, available with a bit of searching and digging :D

Great resource, as symptoms can be quite confusing, contrary/contradictory/paradoxical.

Too lean mixture causes high temperature and metal transfer, causing scoring in cylinder/piston.

Where scoring absent, plug shows rich, truly conundrum when 2 internal motor findings point away from lean mixture, contradictorily, symptoms indicated typically are caused from having too lean a mixture?

Considering cause is more likely an air leak at this juncture, although a conundrum, when typically an air leak means lean, but finding no lean indications inside motor (if you don't count hole in piston lol)?

Confusing for me, when no one is ever going to mistake me for one of the sharpest tools in the shed. :D
 
Last edited:
Tomorrow will post picture of hole in top piston, finally got enough room in memory to use camera :)
 

Attachments

  • Spark plug color chart.jpg
    Spark plug color chart.jpg
    53.9 KB · Views: 10
  • Too much oil in gas, too rich or lean.jpg
    Too much oil in gas, too rich or lean.jpg
    106.1 KB · Views: 10
Pictures as promised, once camera functioning.

You can push on the top of piston and little tongue of metal seems like it wants to bend in, where metal is very thin.

Can't feel anything with fingernails inside cylinder, so there's no scoring, indicating "not a lean mixture".

Didn't do a squish, so really don't know if spark plug protruding can actually impact piston top, but replacement spark plug seems to be same length thread wise as original plug coming with motor, so maybe plug length is okay?

Can see quite a difference in carbon build up on plug indicating rich mixture, versus clean new plug.

I ordered non resistor plug, but seller sent resistor plug to me anyway. Did spark plug return, but seller sent me another resistor plug irregardless. Not using that seller again.

Didn't really want to use a resistor plug, because forums indicate resistance products reduces spark and is hard on weak HT CG magneto/CDI and causes premature destruction and failure. YMMV, because opposite opinions are being expressed on forums: Some say had no trouble using resistor wire/resistor plugs.

Replacement piston arrives tomorrow and we'll learn more once everything is repaired and back together.

For sure, wish to get rid of any leaks, because if it was lean-burned hole in top piston, definitely don't want have to tear motor down and go through repair again.

Have 313 mile cross-state trip planned, needing to make sure everything is working, using "shake-down" cruise in several extended local area trips, resolving problems before going for extended motorized bicycle camping trip.
 

Attachments

  • No signs of impact damage to head.jpg
    No signs of impact damage to head.jpg
    189.9 KB · Views: 11
  • Possible plug impact interference with piston.jpg
    Possible plug impact interference with piston.jpg
    118.5 KB · Views: 11
  • No scoring on cylinder wall.jpg
    No scoring on cylinder wall.jpg
    142.9 KB · Views: 13
  • Length of spark plug in head looks same.jpg
    Length of spark plug in head looks same.jpg
    142.7 KB · Views: 11
  • Uncertain if lean burned hole or impact.jpg
    Uncertain if lean burned hole or impact.jpg
    158.3 KB · Views: 11
  • Metal thin, possibly impact damage.jpg
    Metal thin, possibly impact damage.jpg
    127.4 KB · Views: 11
Last edited:
Obvious head gasket leak
Retorque head bolts after every ride, Retorque when engine is cold
500 miles or so aluminum head shrinkage and bolt stretch will minimize

Use a straight edge to check S/P length, But it looks fine to me
BTW nothing wrong with using a resistor plug

Tune your Carb to S/P color - light brown
 
Last edited:
After Pool Noodle try Spray Foam LOL...

Since ya like DIY experiments, Make a tire liner out of a fire hose
 
Last edited:
Glad this repair didn't happen on the road.

Would not have all necessary parts and tools to affect these repairs.

Replacement piston showed up today, was exactly right, when compared to original piston.

Definitely going to spend the time and deburr sharp edges off piston where could cause excessive cylinder wear.

Additional necessity: vacuuming out/blowing out case, removing any debris from failed piston/manufacturing process.

Comprehend notion: "We" are the quality control :)

Piston rings are notoriously brittle, made out of cast iron or similar, with very little give, before "snap" it's broke. Avoiding issue, special tool made for removing piston rings; sure wished I'd had tool today, because removing 2nd ring, it snapped. :(

Tidied and waterproofed everything, ordered new set of rings. 5 sets of rings comes in a pack, so I'll definitely have plenty of chances to get it right :D

Purchased necessary "ring spreading" installation tool to make the job easier.

Since I'm putting in new rings, and motor has already been worn in, it looks like I'll have to be honing the cylinder, and afterwards going through another break-in period, while new rings get set-in.

Awaiting parts. Will be applying "forum recommended" deburring technique to sharp surfaces of rings, when they arrive.


Using 2-stroke oil to lube everything up good, while it's being reassembled.
 

Attachments

  • Does not want to come apart.jpg
    Does not want to come apart.jpg
    125.1 KB · Views: 9
  • Bearing looks okay, disassembly difficult.jpg
    Bearing looks okay, disassembly difficult.jpg
    174.7 KB · Views: 7
  • Pistons are exactly the same.jpg
    Pistons are exactly the same.jpg
    119.7 KB · Views: 7
  • New piston needs deburred.jpg
    New piston needs deburred.jpg
    106 KB · Views: 7
  • Was able to get by with just removing jug.jpg
    Was able to get by with just removing jug.jpg
    194.3 KB · Views: 8
  • Tried both sides to see which was the easiest.jpg
    Tried both sides to see which was the easiest.jpg
    130.9 KB · Views: 8
  • New piston looks stronger built (1).jpg
    New piston looks stronger built (1).jpg
    60 KB · Views: 7
  • Waterproofed everything exposed on motor.jpg
    Waterproofed everything exposed on motor.jpg
    194.3 KB · Views: 8
  • 5 sets of rings, giving me plenty of chances.jpg
    5 sets of rings, giving me plenty of chances.jpg
    36.8 KB · Views: 7
  • Changing out rings, need hone cylinder.jpg
    Changing out rings, need hone cylinder.jpg
    50.6 KB · Views: 3
Last edited:
Back
Top