Project Ghostrider

djnutz

Member
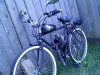
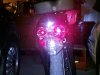
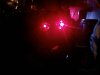
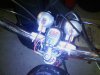
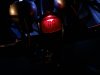
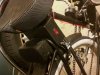
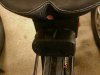
About a month ago, I saw a small group on motorized bicycles. After a few hours scouring the internet, I found the info I was looking for. I bought an engine and got a bike frame for free. While waiting for the motor to arrive, I tore the bike down, stripped it to the bare metal, prepped, primed, and painted it. In between coats, I repacked all the bearings and polished the few chromed pieces I was keeping. At walmart, I grabbed a set of white walls, tubes, new chain, rear rack, led fog lights, led chromed skull hitch cover, and a new saddle. At the local bike shop, I had the rims trued and picked up new brakes for the front and rear. The motor arrived and I got everything installed and the bike runs great! I have added mirrors and I hacked my bike speedo so it's back lit when the lights are on. I also put together a battery setup using a project box from Radio Shack. Now the wiring is cleaned up and I have a nice place for the switch for the lights and I have rewired things so instead of a cut off switch, I used an automotive keyed switch as an on/off switch.
 

Attachments

  • 0521001902a.jpg
    0521001902a.jpg
    1.5 MB · Views: 290
  • 0526000225a.jpg
    0526000225a.jpg
    991.2 KB · Views: 181
  • 0526000225.jpg
    0526000225.jpg
    458.7 KB · Views: 148
  • 0526000226b.jpg
    0526000226b.jpg
    1 MB · Views: 216
  • 0526000224.jpg
    0526000224.jpg
    384.4 KB · Views: 163
and the rest of the pics
 

Attachments

  • 0526000228a.jpg
    0526000228a.jpg
    598.6 KB · Views: 165
  • 0526000228b.jpg
    0526000228b.jpg
    1.1 MB · Views: 205
  • 0526000228c.jpg
    0526000228c.jpg
    1,008.2 KB · Views: 182
Very cool! I like the skull hitch, but I am very impressed with backlit speedo! At night I have been using a 99 cent booklight which clamps to the handlebars, I take it of during the day because it looks like crap. Was backlighting the speedo hard? Any suggestions would be great. CoooL Bike!
 
Backlighting was not a difficult process, but it is time consuming. The LCD is constructed as follows:

two glass plates fused together with the liquid crystals sandwiched in between
Then there is a polarizing film with a reflective surface.

You have to peel off the reflective surface without damaging the polarizing film layer. I took my time and worked in towards the center from the corners.

The next step is to find materials that will allow the back lighting to work and will fit the housing. The new layers are as follows:

Glass plates
polarizing layer
then a thin translucent layer
Then a frosted layer that will disperse light evenly across the display
then a new reflective layer

For my unit, I used a piece of a walmart bag as the translucent layer
then I used a divider from one of those screw and small part tupperware type storage thingys as my light layer.
then I used a piece of tinfoil as the new reflective layer. I covered the dull side of the foil with a piece of tape because the pc board would end up touching it and I didn't want to short anything out.

Before assembly, I glued a very thin strip of foil all the way around the glass plates. You will want the led light to light up the frosted layer, not the glass on the front. I drilled a hole for the led so it shines on the edge of the frosted layer. Since this layer is frosted, It lights up across it's whole face, thereby lighting the entire display. I used a red led and I sanded the tip of it to further disperse the light. The red color is a little easier on the eyes when driving at night.
 
Last edited:
That is an amazing build. I am also fascinated by the speedo. I can see a market for some custom backlit speedos. It seems as if you are familiar with the work involved and if the price was reasonable I would certainly buy one, at least.
 
I agree. I think you could definitly sell alot of those if you wanted. I know I would rather pay you then go through the whole process myself. Thanks for the info, very cool!
 
Back
Top