Piston crown mod!

GoldenMotor.com

Pedrito0906

New Member
Jun 12, 2013
23
0
0
Puerto Rico
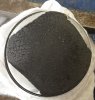
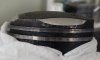
Hey guys, greetings from Puerto Rico, I'm new to this forum so I will begin. I have a 66cc motorized bike, I have done the mods on the motor, including: port match, a little of cylinder sand, NT speed carburetror, removed piston skirt. I wanted to share with you this two pics, I just did that to the piston crown, I have read that those crown mods give to the bike more top end xct2 :D. What you guys think? Right now I have a broken tire:-|| sooo as soon as I fix it I will post the results.
PS: I'm thinking of buying a 39T sporcket.... any advice will be greatly appreciated.
Thank You!!! dance1
 

Attachments

bairdco

a guy who makes cool bikes
Aug 18, 2009
6,537
264
63
living the dream in southern california
Piston crown mods can be sketchy. take off too much or in the wrong place and all you get is a slow bike and a ruined piston.

you won't know til you ride it if it works.

And clean all that carbon off before you put it back together. same goes for the head and plug.
 

mew905

New Member
Sep 24, 2012
647
9
0
Moose Jaw
it gives you top end by modifying port timing (more port time brings the power band up, and allows greater times to get the transfer/exhaust work done. However there's not much to gain from it, the motor's ports are pretty bad already and short circuit like crazy. If you have alumaweld or JB Weld (alumaweld I think would be the better choice but it is pricier), you can fix the transfers to get better power. The part of the transfer nearest to the exhaust port aims... toward the exhaust, firing fresh mix straight out and losing power, decreasing fuel milage and making emissions worse. Even high peak power bands dont aim toward the exhaust (they aim straight across). so you want to aim the transfer toward the intake side. that way when they fire it'll more effectively blow the exhaust gases out (especially when you have a reed boost valve), rather than just mixing with them and getting blown out and leaving a bunch at the top.

Aim those transfers toward the intake, a good angle is about 40% of the bore away from the intake (so around 18mm away from the intake, going straight across toward the exhaust) and you should see good gains. I'm currently designing a base gasket that will do this for the average user

HOWEVER if you make piston ramps similar to the image below (courtesy Gordon Jennings 2-stroke handbook) then you may see similar gains.
 
Last edited:

Pedrito0906

New Member
Jun 12, 2013
23
0
0
Puerto Rico
Thanks to all of you for the tips. @Huffydavidson, I'm using Amsoil synthetic oil 50:1, I dont know why my piston is so black. The final result is: I think I lost a little of compression, I bought a 39T sprocket and with the stock muffler w/o the bafle my top speed is 35 mph drn2. Later I'll buy a new piston and gonna test it to see if what I did is a placebo XD. I'm thinking of buying a cheap expansion like this one, any suggestions? Thanks http://www.pocketbikeparts.com/Exhaust_Stock_Quattro_47_49cc_p/qtex303243.htm.
 

2door

Moderator
Staff member
Sep 15, 2008
16,302
175
63
Littleton, Colorado
Regarding post #4 above:

I have a real problem with the advice to use JB WELD, or any epoxy based product on the inside of the crankcase. The reason is that those who give it never mention the potential for adhesion failure and the resultant destruction of an engine because of that metallic material being loosened and falling off inside the engine.

The most common reason for adhesion failure is because the aluminum casting wasn't properly cleaned or prepped before the glue was applied.
Telling the inexperienced to 'pack a crankcase' or contour the ports with JB Weld, Liquid Aluminum or any other epoxy based material without stressing proper material preparation is a disservice that can cause damage to the engine.

If one is considering this questionable practice I highly recommend you read the label of the product you plan to use and adhere to the warnings about proper surface preparation before you apply the glue.

Tom
 
Last edited:

mew905

New Member
Sep 24, 2012
647
9
0
Moose Jaw
Regarding post #4 above:

I have a real problem with the advice to use JB WELD, or any epoxy based product on the inside of the crankcase. The reason is that those who give it never mention the potential for adhesion failure and the resultant destruction of an engine because of that metallic material being loosened and falling off inside the engine.

The most common reason for adhesion failure is because the aluminum casting wasn't properly cleaned or prepped before the glue was applied.
Telling the inexperienced to 'pack a crankcase' or contour the ports with JB Weld, Liquid Aluminum or any other epoxy based material without stressing proper material preparation is a disservice that can cause damage to the engine.

If one is considering this questionable practice I highly recommend you read the label of the product you plan to use and adhere to the warnings about proper surface preparation before you apply the glue.

Tom
I've generally had good luck with it but the casting is so poor I would think the adhesion of a liquid epoxy would be great. It wasnt until I drilled the crank and lost crank case compression that I had issues, and that was because the hot exhaust gases overpowered the transfer pressures, fired down into the case and melted the JB weld. Other than that, it ran for months just fine. I didnt even clean the ports. But you're right, better to be safe than sorry, clean the ports first, maybe even rough em up using a file. This is why I plan on creating an alternative base gasket that will correct the port angles without having to epoxy anything, and any novice could do within a minute or two. My only problem is choosing a material, SS is rather pricey, alumide is rather brittle, but I might be able to do plastic, but I dont know what kind of temperatures the transfers endure.
 

maniac57

Old, Fat, and still faster than you
Oct 8, 2011
4,484
22
0
memphis Tn
I agree with Bairdco, I have never had much luck with epoxy based fillers in engine applications.
Welding is more costly but a MUCH more secure way to change transfer port shapes. option.
 

mew905

New Member
Sep 24, 2012
647
9
0
Moose Jaw
what do you think of a base gasket that features arms that reach in and correct the transfer angles? I may make it out of SS or hard plastic (non flexible, but I'm not sure if it'll survive the temperatures...) If it's only doable with SS, it'll be quite expensive, but plastic it'll only be a couple bucks
 

Pedrito0906

New Member
Jun 12, 2013
23
0
0
Puerto Rico
Hello riders. I bought a new piston a tested it, and my top speed was 32 mph... it appears that what I did to the piston actually worked. The only thing I need is clean the transfer ports with a dremel, tool that I dont have :(
 

mew905

New Member
Sep 24, 2012
647
9
0
Moose Jaw
yep, as I said it put your power a bit higher, however I imagine you lost a bit of low end as well (probably not much though, it just moved the power band a bit higher, with how little these motors make as is, it wouldnt make a noticable difference, especially on the stock sprocket). unless the transfer ports are really bad, I wouldnt worry about it, angle of flow in these motors is more important than smoothness (but only because the angles are so bad)
 

Pedrito0906

New Member
Jun 12, 2013
23
0
0
Puerto Rico
Good evening riders... I borrowed a dremel from my friend and I cleaned the transfer ports, all I have to say is... OMG!! what a difference!! now at high RPM I get like zero vibration!!!!!!! dance1, I love my bike!!! vibration was the only thing I couldn't deal with , along with my modded piston my top speed now is 37 mph xct2 in a flat surface BUT I still get 4 stroking with a 66 jet,. Should I try a 64 jet, isn't too small???
PS: I have an air filter in the carb, I dont know if this info matters, anyways thanks to you all :-D usflg
 

Nate&Brandi

New Member
Aug 24, 2018
3
1
1
36
If your getting four stroking then go down. That's your problem with all the carbon build up more than likely your running to rich. When I had my stock carb I ran anywhere from 6-6.5 jet depending on the weather. I now run an oko 21mm carb in which you have 4 adjustments, you have the idle jet, the Mai jet, the slide needle, and the air/fuel mixing screw. Fun times tuning one of those for the first time, but after changing jets 200 times and doing research for a week I finally got the method down and my engine screams. I have a pk80 race engine from Fred at CR machine with a expansion chamber, reed valve and 21mm oko with a 30 tooth sprocket I I'm in the mid to upper 40's mph and I have so much more I'm putting a 26 tooth sprocket on next week to see what happens. Good luck aND keep experimenting you will only gain knowledge and feel more comfortable and excited about your next oNE. The bike I have now is my third build and I have come so far and I get more excited with each one. I build one every winter and ride and test in the summer and I take those results into my next build. I'M predicting 50 mph by time this coming summer I hit 44 already and haven't even begun testing yet. I'm still breaking in the rings running 16:1 happy building
 

MacZulu

Member
Jul 3, 2015
171
12
18
Vancouver
Interesting stuff though, I hadn't read before about the the transfers directing flow to the exhaust. I wonder whatever happened to buddies gasket fix idea.
 

LuciferJesusRides

New Member
Aug 17, 2019
6
4
3
37
Minnesota
Interesting stuff though, I hadn't read before about the the transfers directing flow to the exhaust. I wonder whatever happened to buddies gasket fix idea.
Transfers actually direct flow toward the intake so that when it hits the squish and combusts, it flows toward exhaust. To be more precise