You are using an out of date browser. It may not display this or other websites correctly.
You should upgrade or use an alternative browser.
You should upgrade or use an alternative browser.
New full suspension build
- Thread starter old motorbike
- Start date

old motorbike
New Member
Thanks Bikedad, The bike runs smoothly, but haven't gone for more than a few blocks when the hub fails. Have a new hub and axle coming, but have been sidelined with health issues this week. Soon....
Tried to use an improved bearing under the outside freewheel, but failed. Going to try to use 2 bearings there for more stability.
Tried to use an improved bearing under the outside freewheel, but failed. Going to try to use 2 bearings there for more stability.
NEAT TIMES
New Member
omb, i have posts of all the parts you need for the 2 r h freewheels, rear rack. some of the info may be on the other forum. i used my old user name there (treewk). my second cvt build is working great also. it has the titan 4 stroke. it takes off with ease, no pedal assist needed, i am over 300 lbs (sad to say). it peaks at 25 mph (could be geared much higher by changing the chain sprockets). my soninlaw told me the throttle is not opening fully. it is very smooth and quiet. ron
NEAT TIMES
New Member
omb, i posted from the page 1, did not read all your posts at first. nice build. i bought support bearings to slide on axle, but noticed the axle was bent a bit, so bearing would do more harm than good. i have my motor driven sprocket on the rear wheel hub threads and the pedal sprocket on the outside, no support bearing on the axle, no problems so far. using the common rear wheel, just screw the cassette off and screw on my freewheel sprocket adapter, then use the left side threaded piece from the $4. botton bracket kit. you also need the neat spacers from mc master carr. ron
old motorbike
New Member
Thanks neat times. I haven't been able to look at your posts much this week. My plate's been full with work and health issues. I'll try to get at this more after tonight. I saw pics of yours with 2 right freewheels and haven't had time to study much. Sure looks good.
I'd like to get mine working and get back to have some fun.
I'd like to get mine working and get back to have some fun.
old motorbike
New Member
Still haven't been able to get back to it. Got another junk wheel to get another thread from. It seems that I need to weld the two together somehow to hold them from getting out of line.
BarelyAWake
New Member
Hey there old motorbike, I just wanted to say yer doin a epic job!
I hadn't perused this thread as I'm obsessed w/the china girl inframe design - but I tell ya what, you get serious points for this do-it-yerselfer")
hmm... temptations... there's this "abandoned" pocketbike where I work....
damn yer eyes
I hadn't perused this thread as I'm obsessed w/the china girl inframe design - but I tell ya what, you get serious points for this do-it-yerselfer
hmm... temptations... there's this "abandoned" pocketbike where I work....
damn yer eyes
Last edited:
NEAT TIMES
New Member
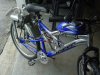
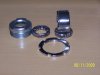
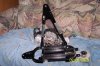
Here Are Some Pics Of My Double Free Wheel Set Up. Right Hand Drive. I Have 3 Peddle Speeds Using The Front Derailer. RON . I hope this helps
I hope this helpsAttachments
NEAT TIMES
New Member
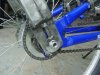
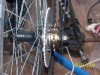
Using A Regular Generic Rear Wheel. Special Cassette Socket Needed To Remove Multi Sprocket Cassette. Do Not Disassemble It. Install .062 = 1/16" Special Shim Spacer On Wheel. Then The Free Wheel Adapter (with Sprocket). Then Screw In Fullly Threaded Sleeve From Bottom Bracket Kit (bb Kit). Next The 1/8" Thick Locking Nut From Bb Kit (used As Spacer To Keep Rear Derailer Arm From Hitting Lg Sprocket). Now Add The Free Wheel Pedal Sprocket. It Has To Be 3/16" Wide Teeth, For The Narrow Chain. This Set Up Has Been Trouble Free For Me. I Have Not Put A Lot Of Miles On It Yet Though. Ron.
NEAT TIMES
New Member
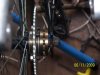
Lol. Looking At My Pics Of The Free Wheel Adapter And Lg Sprocket. I Checked The Titan Build, Sure Enough. The Lg Sprocket Could Be Turned Over, Putting The Lg Sprocket Closer To The Spokes. Then It May Be Ok To Leave Out The 1/8" Spacer. Could Then Leave Out Extra Spacer On The Axle, It Keeps The Rear Axle Pedal Sprocket From Rubbing The Stays. This Whole Sprocket Setup Is Easy And Clean Once You Have The Parts Figured Out And Have Done It Once. The Whole Change Over Would Take About 1/2 Hr. I Bought A Used Socket At A Bike Shop For $4. They Will Remove Your Cassette For Free, Usually!! Oh, The Motor Chain Will Still Clear The Tire With Plenty Of Clearance. Thats With The Current Size Tire. Ron .
Last edited:
NEAT TIMES
New Member
Part #`s On Line = "mcmaster Carr" 1/16" Spacer Shims 3088a475 $9.26 For 10 Shims. 1/8" Spacer Shims 3088a519 $9.94 For Ten Shims. The Order With S/h Less Than $25. Where here The Next Day. Cheapest Shipping Rate. Bottom Bracket Kits = "bike Parts Usa" On Line. Pyramid Bb Cup Set 1.37x24 $3.66 Per Kit. I Just Bought 2 Rear Rack Mounts From "bicycle-engines.com" $49.99 Ea. What A Bargain. They Are For Left Hand Drive. Just Turn Them Around, Front To Back. Then For Dual Suspension Make A Flat Strap Bracket. Use Rear Caliber Brake Hole For Bottom Of Of Bracket And Bend Top Of Strap To Bolt To Rack. These Racks Are A Bargain. They Have Many Applications. Ron
old motorbike
New Member
Thanks Buddy,
I was wondering where you got those rack mounts. I used a trailer fender. Finding all your other tricks are priceless. I'm still waiting for the freewheel adapters and other stuff. I've been busy with a bunch of other work at the shop. Also my bars on the new bike, swung around and took a big gouge outta the fresh paint I did on the tank. I knew I shouldn't have painted it.
I was wondering where you got those rack mounts. I used a trailer fender. Finding all your other tricks are priceless. I'm still waiting for the freewheel adapters and other stuff. I've been busy with a bunch of other work at the shop. Also my bars on the new bike, swung around and took a big gouge outta the fresh paint I did on the tank. I knew I shouldn't have painted it.
NEAT TIMES
New Member
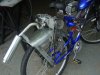
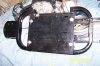
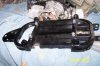
Hey Jack, Sorry To Hear About Gas Tank Damage. That Bike Looks Super. Yeah, Posted Pics Of The Black Rear Rack Mounts Yesterday On A Thread. So Many Threads = Its Hard To Keep Them Straight. I Don`t Think Mt Pics Are Here, So I Will Post Them For The Members. Lots Of Extra Length Adjusters. Are You Having Any Carb Problems =at That Carb Angle?? Ron .
Attachments
NEAT TIMES
New Member
The Mount Plate Has Holes For The Titan. Slotted For 3/4" Adjustment R & L And Fwd & Bk. Would Work Good For Pocket Bike Engines. People Talk About The Weight Up High As A Problem, I Sure Don`t Notice It, In Normal Riding. Ron
old motorbike
New Member
NEAT TIMES
New Member
E R R O R ! ! ! A Few Post Back, You Can Not Flip The Large Sprocket And Adapter Over To Get More Clearance For The Derailer Arm!! The Free Wheel Will Be Working In The Wrong Direction. It Will Screw On, But Will Not Hook Up. The Lg Sprocket Has To Be Unbolted And Moved To Other Side. Ron
NEAT TIMES
New Member
Jack, Your Build And Bike Look Great. I See You Added The Support Tabs For The Tranny. I Have Planned That Later Also. A Lot Of Support , And Easy To Accomplish. Hopefully, You Will Be Riding By Noon Or Sooner. Thanks For Keeping Us Posted. Ron
old motorbike
New Member
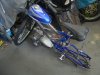
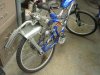
That was an old first build. No pics today as I forgot the camera at the shop. Today, I made the wheel new axle both freewheels and bearings fit and mounted on bike. The pedal is only 1 speed so no de-railer. The motor and trans was moved over 1/2" left so the sprocket will better line up with the one on wheel. All the braces were re- made for better fit and easier service. Nuts welded inside for easy bolt together. Rear adj. braces were made 2 sections for easier wheel service. Slots on rear were re designed for better adjustment and closed welded not to stretch. Also nuts welded inside for assembly. Front braces new for better alignment and slotted for adjustment. Installed 10 tooth drive sprocket. Chain re-cut and adjusted.
Now after a VA visit tomorrow I need to re-install the exhaust and see if it works. Pics coming.
Now after a VA visit tomorrow I need to re-install the exhaust and see if it works. Pics coming.
old motorbike
New Member
Finally after a whole weekend of thrashing, it's functional. Getting the engine to line-up with the sprocket was a challenge as the chain broke 3 times.
After that was solved then the engine refused to start for 2 days. It apparently was the cylinder bolts cam a little loose. I had to hire a young man to pull the starter rope for me as my arm and shoulder were shot from pulling for a day.
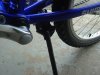
Needed to fab and weld a tube over the kickstand and reinforce the bracket cause it wouldn't hold the extra weight.
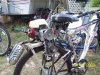
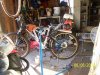
The bike runs smooth and with easy fast starts. The top end is a little lacking especially with a 52cc big bore with a racing carb and manifold. But my un-tuned, cobbled exhaust and the cvt takes a little hp to operate. I believe it'll still go about 30 mph though.
Also my butt gets numb from seat vibrations.
I'll see if it starts today and take another ride. It's more like a manufactured bike compared to the old china girl. It doesn't run as good as my other in-frame stock engined bike.
After that was solved then the engine refused to start for 2 days. It apparently was the cylinder bolts cam a little loose. I had to hire a young man to pull the starter rope for me as my arm and shoulder were shot from pulling for a day.
Needed to fab and weld a tube over the kickstand and reinforce the bracket cause it wouldn't hold the extra weight.
The bike runs smooth and with easy fast starts. The top end is a little lacking especially with a 52cc big bore with a racing carb and manifold. But my un-tuned, cobbled exhaust and the cvt takes a little hp to operate. I believe it'll still go about 30 mph though.
Also my butt gets numb from seat vibrations.
I'll see if it starts today and take another ride. It's more like a manufactured bike compared to the old china girl. It doesn't run as good as my other in-frame stock engined bike.