
lostinidaho
New Member
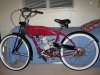
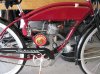
Just finished my bike this past weekend. I have ridden it a bit but I found a pinhole leak in the corner of the tank. So I have to rework the tank. I have been viewing the forum since Jan, but this is my first post. I appreciate this forum with all the helpful comments to search and read. I think I will repaint the tank and put white letters saying "Mususabi" (Japanese for Flying Squirrel). I thought about calling it the "The Naked Mole Rat" to keep my daughter from borrowing it too much.
Attachments
Last edited:
")