Ok
I have a Jackshaft kit installed on my bike - i love it; it works great and after having gears to play with, i'll never go back to a fixed drive system.
There is only one small problem to be addressed in the attachment of the Jackshaft kit to a bicycle frame and it's a saftey related issue.
Basically you can end up with very serious injuries if your down tube cracks and breaks open due to metal fatigue from a crush point/pinch point or just plain cracks from excessive pressure being applied on the U-bolt clamp.
When purchasing my 2-stroke engine kit, the manager advised that i use thick rubber under the U-bolts to prevent the frame cracking, particularly thin walled aluminium frames.
One of his customers over tightened the down tube U-bolt, cracking the frame and then rode the bike down the road.
A short time later the downtube seperated in half and the bike opened up beneath him, throwing him, head first into the bitumen.
He doesn't have a face left or any front teeth and is missing a good portion of his nose.
After hearing that story, i decided to create a simple fix for the problem so that scenario would not happen to me from a metal fatigue issue.
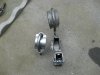
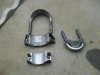
In the photos attached you will see that i have used 1mm sheet steel, formed around the lower downtube U-bolt and the face of the smaller seat tube U-bolt carrier.
The seat tube U-bolts can have the original plate steel Chinese engine mount modified so as to be a backing plate for the U-bolt, doing a similar job to forming sheet steel around the curved section of the U-bolt; saving you time.
For 1 & 7/8 U-bolt clamps, i used a sectional size of 60mm x 25mm on both the U-bolt and the backing plate.
You can't go all the way around and cover 180 degrees on both sides as the straight part of the U-bolt will then crush the plate steel into the frame tube on the sides.
For the smaller seat tube clamp i used a sectional size of 40mm x 25mm for the backing plate.
Once sheet steel is formed to the curvature off the U-bolts and backing plates, you need to secure them so they sit flat and square and evenly spaced along the radius.
I don't have a welder so i just used superglue to initally hold the plates in place (the surfaces being glued must be absolutely clean, spotlessly clean for the glue to hold).
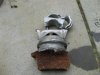
Then i placed the clamps on the frame and tightened them up, so forcing the plates to make a firm connection with the U-bolts and backing plates.
Once the superglue dried (that stuff is incredibly stong) i removed the plates & U-bolts and applied 4 layers of gaffa tape to provide a level of smoothing for any subtle differences in the curvature and also to increase the friction level between frame surface and u-bolt assembly.
The glue is only holding the plates in place, it adds no structural integrity.
This method has big advantages as the chain tension clamps can easily be adjusted as the clamps don't dig into any tape wrapped around the frame tubes.
I found that prior to making the backing plate modification, the two sections of the plate simply forced their way through the gaffa tape wrapped around the frame and started cutting into the aluminium.
When trying to adjust the motor to get correct chain tension, the plates wanted to remain stuck in the groves they cut into the gaffa tape.
Someone with good welding skills should make up a batch of these U-bolts and approach manufacturers of Jackshaft kits to have them included in the package, on the basis of saftey.
Hope this post provides someone with (at very least) peace of mind when installing a jackshaft kit.
Fabian
I have a Jackshaft kit installed on my bike - i love it; it works great and after having gears to play with, i'll never go back to a fixed drive system.
There is only one small problem to be addressed in the attachment of the Jackshaft kit to a bicycle frame and it's a saftey related issue.
Basically you can end up with very serious injuries if your down tube cracks and breaks open due to metal fatigue from a crush point/pinch point or just plain cracks from excessive pressure being applied on the U-bolt clamp.
When purchasing my 2-stroke engine kit, the manager advised that i use thick rubber under the U-bolts to prevent the frame cracking, particularly thin walled aluminium frames.
One of his customers over tightened the down tube U-bolt, cracking the frame and then rode the bike down the road.
A short time later the downtube seperated in half and the bike opened up beneath him, throwing him, head first into the bitumen.
He doesn't have a face left or any front teeth and is missing a good portion of his nose.
After hearing that story, i decided to create a simple fix for the problem so that scenario would not happen to me from a metal fatigue issue.
In the photos attached you will see that i have used 1mm sheet steel, formed around the lower downtube U-bolt and the face of the smaller seat tube U-bolt carrier.
The seat tube U-bolts can have the original plate steel Chinese engine mount modified so as to be a backing plate for the U-bolt, doing a similar job to forming sheet steel around the curved section of the U-bolt; saving you time.
For 1 & 7/8 U-bolt clamps, i used a sectional size of 60mm x 25mm on both the U-bolt and the backing plate.
You can't go all the way around and cover 180 degrees on both sides as the straight part of the U-bolt will then crush the plate steel into the frame tube on the sides.
For the smaller seat tube clamp i used a sectional size of 40mm x 25mm for the backing plate.
Once sheet steel is formed to the curvature off the U-bolts and backing plates, you need to secure them so they sit flat and square and evenly spaced along the radius.
I don't have a welder so i just used superglue to initally hold the plates in place (the surfaces being glued must be absolutely clean, spotlessly clean for the glue to hold).
Then i placed the clamps on the frame and tightened them up, so forcing the plates to make a firm connection with the U-bolts and backing plates.
Once the superglue dried (that stuff is incredibly stong) i removed the plates & U-bolts and applied 4 layers of gaffa tape to provide a level of smoothing for any subtle differences in the curvature and also to increase the friction level between frame surface and u-bolt assembly.
The glue is only holding the plates in place, it adds no structural integrity.
This method has big advantages as the chain tension clamps can easily be adjusted as the clamps don't dig into any tape wrapped around the frame tubes.
I found that prior to making the backing plate modification, the two sections of the plate simply forced their way through the gaffa tape wrapped around the frame and started cutting into the aluminium.
When trying to adjust the motor to get correct chain tension, the plates wanted to remain stuck in the groves they cut into the gaffa tape.
Someone with good welding skills should make up a batch of these U-bolts and approach manufacturers of Jackshaft kits to have them included in the package, on the basis of saftey.
Hope this post provides someone with (at very least) peace of mind when installing a jackshaft kit.
Fabian