You are using an out of date browser. It may not display this or other websites correctly.
You should upgrade or use an alternative browser.
You should upgrade or use an alternative browser.
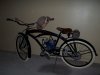
I finished my board track racer
- Thread starter Ron344
- Start date
truckd
Well-Known Member
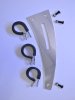
Here is a chain tensioner I made and had a friend do some machine turned pattern on it for me works good, nice and strong!
you can make this for the cost of a sheet of aluminum 12"x6"x3/16" and clamps found at the hardware store (about $20.oo tops)
you can make this for the cost of a sheet of aluminum 12"x6"x3/16" and clamps found at the hardware store (about $20.oo tops)
Attachments

Here is the finished product
Thanks Truckd, That's a nice set-up but I spent the day working on something that I think will work. I just need to get a 8mm tap tomorrow to finish it. I will have some pictures tomorrow.
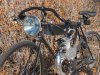
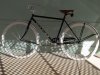
I worked on the chain tensioner yesterday and to day finished it works great. It was made from some bike parts my son had. also I put some better picture of the bike and head light. Next I will start work on the front end to make it look like the 1907 Reading Standard I showed the picture of on a previous post. I might even change the handle bars to look more period.
Attachments


Think carefully before you change anything. What you have there, and I choose my words carefully, is beautifully archaic, old fashioned. Don't try too hard and lose the charm in the process.
Thanks Ludwig for the kind words, I'm not going to change anything that can't put back the way it was. I do like it the was it is. I plain on taking the whole bike apart and paint it before Bonneville next year.
truckd
Well-Known Member
I agree with Ludwig, and I'm digging on the Chain tensioner can you get us some close ups and explanation of process? you may have just started something with that set up.
I don't know what your budget is? but you may want to check with Dan at Taylar Motor Bikes and see if he'd build an authentic style'd truss rod fork for that style and period. or even simpler yet get a pair off ebay.
It is a very Handsome bike, I like it!
I don't know what your budget is? but you may want to check with Dan at Taylar Motor Bikes and see if he'd build an authentic style'd truss rod fork for that style and period. or even simpler yet get a pair off ebay.
It is a very Handsome bike, I like it!
Ditto:Think carefully before you change anything. What you have there, and I choose my words carefully, is beautifully archaic, old fashioned. Don't try too hard and lose the charm in the process.
Ron, as a long time member here I've seen a lot of motorized bicycles over the years. Yours jumps out and looks as if it just came from a museum. It has such a classic look and the appeal of the roots of our hobby. I wouldn't change anything on the bike but you might want to think about growing a handlebar mustache and getting a bowler hat for when you ride it.
Well done, sir. You've built a piece of history.
Tom
The bike is a Arnold Schwinn New World. I will try to explain how I made the tensioner soon I'll take it off the bike and take pictures of it.
Tom, I use to have a handle bar mustache for many years. I drove historic trolleys for 10 years in San Jose,California. I might have to grow it back.
Tom, I use to have a handle bar mustache for many years. I drove historic trolleys for 10 years in San Jose,California. I might have to grow it back.
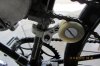
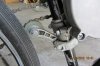
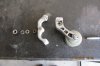
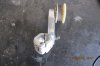
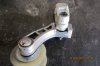
The tensioner is made from clamp that goes around the down tube, I don't know who makes it. The lever that holds the roller is a center of a brake for bmx bike. half of it was cut off. The arm was drilled and tapped to 8mm for the roller. The arm was also die grounded to match the contour of the clamp. There is a nut and two washers between the clamp and the arm to fill in the were a nut went, the nut was drilled out so the bolt could go Thur. I hope this helps. It looks like a good clean set-up.
Attachments
truckd
Well-Known Member
That is a nice! little set up you have. don't mean to bug, but the down tube runs from the bottom of the head tube (where the forks and goose neck marry) to the front top side of the crank tube (bottom bracket tube for crank arms to peddles) the seat post tube then runs up from the crank tube to the seat, could the part you are reffering to (the clamp) that goes on the down tube be a clamp for the seat post used for tightening the seat?, Sorry! for the lenghty edumication but I really like this and would like to use your design on an up comming build, it is a bike similar to yours but a 1917 Shaw Moto Bike.
Last edited:
diceman2004
New Member
Cool .. looks old .. that headlight really fits the look for that bike frame .
I'm diggin' the pinstriping . Are you planning to stripe the tank as well ?
I like the bars that you have on there . I would keep those on , as long as they are comfortable .
I'm diggin' the pinstriping . Are you planning to stripe the tank as well ?
I like the bars that you have on there . I would keep those on , as long as they are comfortable .
That is a nice! little set up you have. don't mean to bug, but the down tube runs from the from the bottom of the head tube (where the forks and goose neck marry) to the front top side of the crank tube (bottom bracket tube for crank arms to peddles) the seat post tube then runs up from the crank tube to the seat, could the part you are reffering to (the clamp) that goes on the down tube be a clamp for the seat post used for tightening the seat?, Sorry! for the lenghty edumication but I really like this and would like to use your design on an up comming build, it is a bike similar to yours but a 1917 Shaw Moto Bike.
Your right Truckd, I should have known that, but I was talking in generic terms. I'm glad you you like it. I have noticed the bike is a lot quieter since I put this tensioner on.
truckd
Well-Known Member
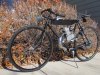
You'll probably get a little better perfomance as well since the chain covers more of the drive cog (sprocket) insted of just catching a couple of teeth, I like the fact that it is also semi adjustable, I'd like to know what the clamp was used for in it's former life. here is a pic of my next build and what I'm trying to achieve with it, I will add a bent back bone (top bar) center bar with an in frame tank
Attachments
Last edited:
Mr.B.
Well-Known Member
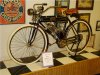
The Shaw in post #36 is displayed at the National Motorcycle Museum
http://www.nationalmcmuseum.org/
-Kirk
http://www.nationalmcmuseum.org/
-Kirk
Last edited:
You'll probably get a little better performance as well since the chain covers more of the drive cog (sprocket) insted of just catching a couple of teeth, I like the fact that it is also semi adjustable, I'd like to know what the clamp was used for in it's former life. here is a pic of my next build and what I'm trying to achieve with it, I will add a bent back bone (top bar) center bar with an in frame tank
Truckd I really like that bike, I'm sure your project will look nice when it's done. Are you going use two stroke motor on this bike? The clamp came from a box of stuff my son had from his BMX days I don't what it came off of, I'll ask him. I'm sure it could be made pretty easyily with the right tools.