GeneFiorot
Member
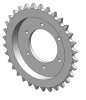
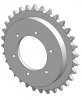
The sprocket and the rotor are mounted to the same 6 hole pattern disc mounting holes of the hub. the disc rotor is not missing !!!?"??

The sprocket and the rotor are mounted to the same 6 hole pattern disc mounting holes of the hub. the disc rotor is not missing !!!?"??
The untold story was the abandoning late in development stage of the rear belt drive.

where did you or where could i get 1 of those jackshaft'sThis Morini powered Schwinn Spoiler was custom built for forum member GeneFiorot.
After many months of literally looking at this bike and trying to figure out how to "Morini" motorize it, without hacking the original bike, it is 95% complete.
There were a lot of hurdles to overcome in order to pull it off. It is not easy to motorize what was not meant to be motorized and create a finished product that is reliable, safe, and appears "production".
The drive set-up solves two problems:
1) Chain alignment from the engine to the rear wheel.
2) How to retain the original rear disc brake and arrive at a final drive ratio that is not too tall.
The engine mounts needed to be placed so that the engine would sit in the frame naturally yet still provide the neccessary unitization that makes the engine "one with the frame", and not a hap-hazard mounted stress monster that promotes future frame cracks.
The tuned pipe: how to route it, how to make it fit the bike, (look good), how to retain the dimensional data provided by Morini, was also a bit of work.
The additional details of the design process will be added with the pics that follow.
Jim
I am sure this thing cost thousands to produce.. Truly fine craftsmanship and dedication to say the least..
NOW that the R&D is DONE, maybe plans and jigs are made, do you have any plans on making a kit or bolt on setup for the spoilers using the same engine, etc? I am certain the costs would be up there, but, for something as unique as this, it would be worth it.
I would love to scrounge up the money to do this exact same build to my spoiler (of course having JIM do it), just don't have the funds or time.. but seeing that it has been done, maybe it could be produced as a kit.
I guess I am up to 3 full size choppers at the moment,, a Stiletto, and XL, and, the spoiler.. All are in like new condition.. Want to motorize one of them, just not sure which to do..
People will continue to praise your outstanding workmanship... truly a legend!
The untold story was the abandoning late in development stage of the rear belt drive.