First build in the works by Taylar "The Flying Scotsman"

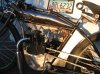
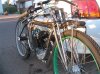
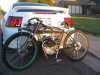
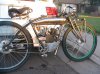
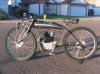
Hey Tom ! Is that your bike behind mine? The very cool one with the aged looking tank and girder fork with the tank held on by leather belts?? Heh. I saw those belts and thought to myself: DANG! thats briliant!

hey man,

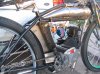
sorry so slow on the response life has been crazy here. not mine though that bike is sweet. it has the higgins forks, mine are the tripple trees like yours without the leaf. what kind of engine is that, did you get a look at it? i think the tank and straps are a nice touch. looking forward to seeingnyours all painted up. gonna hit up dan and get some more pics, it has been a while since i have updated my thread

tom
 
Ya. That bike with the straps was gone by the time I got there and picked up mine. never found out if they were even functional of just for show; Beverly Hilbillys styleie :) Yours is looking HOT! I sent you a email the other day. I remembered my camera about half way there or I would have sent you some pics. Dan is a very streightforward dude and VERY capable fabricator. Their are some amazing bits in his shop and the quality of my fork ( and yours ) is amazing.
 
Heh!! I could'nt resist these on ebay the other day :) Kinda matches my tank...
 

Attachments

  • teardrop peddles.jpg
    teardrop peddles.jpg
    15.6 KB · Views: 145
Worked on the bike assembly for a day and a half. ( with lots of help ) Its running and riding and I think I was right to be so excited about this build. Its a GAS to ride and draws attention like I cant beleive ! Pics soon.
 
Worked on the bike assembly for a day and a half. ( with lots of help ) Its running and riding and I think I was right to be so excited about this build. Its a GAS to ride and draws attention like I cant beleive ! Pics soon.

Yes...pics please!
 
Not ready for prime time or even paint yet but here are the latest pic's just got back from a short shake down ride and tightened up some bits.
 

Attachments

  • Scotsman3.jpg
    Scotsman3.jpg
    189 KB · Views: 261
  • Scottsman5.jpg
    Scottsman5.jpg
    208.5 KB · Views: 243
  • Scotsman2.jpg
    Scotsman2.jpg
    181.9 KB · Views: 305
No. Thats my Drunken Hillbilly attempt at painting them :) They will be taken apart at teardown time and either powdercoated or painted to match.
 
Im thinking about my rims, if I paint the bike black they can stay black, but if I go with a vintage red colour, then I dunno whether I can just get away with painting them, or whether I would be better to get them powdercoated. I guess when fitting the tyre it would be quite easy to scrape bits of a normal paintjob off?
 
Thats why I attempted to paint mine. I taped off a "ring" around the rim to preserve the powdercoat wherever a tire lever might come in contact. But I fookd it up and it came out all wavy ( you should see it while riding at 20 mph. could almost hipnotize ya) so I had a media blaster dude blow off the paint with walnut husk but that was enough to disturb the powdercoat underneath and it started flaking. I will deff be powdercoating the rims green and matching paint from their if it comes to that.
 
Im thinking about my rims, if I paint the bike black they can stay black, but if I go with a vintage red colour, then I dunno whether I can just get away with painting them, or whether I would be better to get them powdercoated. I guess when fitting the tyre it would be quite easy to scrape bits of a normal paintjob off?

I saw a video on YouTube of a guy with a Simplex Servicycle putting a tire on a painted rim. He wrapped the rim in clear plastic kitchen food wrap and installed the tire and pulled off the wrap. It protects the paint. You can also get motorcycle rim protectors at a motorcycle accessory shop. They snap over the rim bead and keep the tire irons from marring the finish of the rim. Then you pull off the protectors and you are good to go.
 
I saw a video on YouTube of a guy with a Simplex Servicycle putting a tire on a painted rim. He wrapped the rim in clear plastic kitchen food wrap and installed the tire and pulled off the wrap. It protects the paint. You can also get motorcycle rim protectors at a motorcycle accessory shop. They snap over the rim bead and keep the tire irons from marring the finish of the rim. Then you pull off the protectors and you are good to go.

Thanks. I just asked about it in your 1911 Indian thread before I read this here. Very helpful thanks CF.
 
Update time! Not much really, just bits and bobs. I replaced the Worksman headstock with a much nicer aluminum one and painted it black. I also got a stand thnigy off ebay so I wouldnt have to constantly lean it against something. It was SO wobbley I had braces welded in at the bottem. I just knew the bike would fall as wiggely as it came and I DONT want that tank dented...
 

Attachments

  • L stand 10--2.jpg
    L stand 10--2.jpg
    308.5 KB · Views: 219
  • Resized headstock 10-2.jpg
    Resized headstock 10-2.jpg
    145.2 KB · Views: 175
I also had the seat post modified so the seat sits a bit flatter and lower Chopped a biit off the frame wher the seatpost goes in ( bout 1/2 inch ) and had metal ground off the front of the seat post and the lower gusset. The way it sits now is much more comfortable for the "boys" :)
 

Attachments

  • Seatpost mod.jpg
    Seatpost mod.jpg
    149.9 KB · Views: 217
  • l side scotsman 10-2.jpg
    l side scotsman 10-2.jpg
    227.7 KB · Views: 267
Last edited:
Heres the bit you fellas might laugh at ( and I wouldnt blame you ) I love engine turning AKA Jeweling on metal, Dont know how to do it and probably dont have the patience for it. BUT!! I found this decal stuff online and it friggen great! I bought some guessing I was throwing my cash away and it would show up all goofy lookin with excessive rainbow effect; but was a bit shocked how very real it looks! Well... In person anywaysl. I primer coated the inside of my fake motor cases that cover the mounts and cleaned the outside surface with brake cleaner. Laid it out and stuck it on. Trimed off the excess with a rasor knife and its done!
 

Attachments

  • L side jeweled 10-2.jpg
    L side jeweled 10-2.jpg
    191.9 KB · Views: 230
  • R Jeweled.jpg
    R Jeweled.jpg
    175.6 KB · Views: 206
Last edited:
Ive also had a time getting the correct size pedal crank size for me and the bike. the 7" jobs that came with the bike were a no go. Almost imposable to peddle the thing without hitting myself in the chin with my knee. SOOO I got a really nice lowrider crank in a brass color in 4" well that didnt work out because I effectivly raised the gearing by having such a short stroke. and it looked like I was riding a circus clown bike with the tiny peddles. A 32 tooth front sproket painted black helped but the 4 inchers had to go. I found what I hope is the answer today in the form of a 5 1/2 inch crank... Well see.
 

Attachments

  • r side Scotsman 10-2.jpg
    r side Scotsman 10-2.jpg
    233.5 KB · Views: 241
I have seen this bike in the flesh :)
what a sweet looking machine
the saying, 'over-engineered' does not do the forks justice !

thanks for bringing her by Dan, I enjoyed meeting you and 'The Flying Scotsman' (^)
 
Back
Top