finally building my rat

converted the bottom bracket today modded the chaingaurd an bolted the tank on , I ended up with more room for the motor than expected , but the area behind the seat tube is gonna get cramped the jackshaft is goin to sit down low in behind the chaingaurd as well as the battery box an anything else I can hide in there .when I get that far pics will follow .
Gary
 

Attachments

  • tank an chain 004 (600x450).jpg
    tank an chain 004 (600x450).jpg
    243.8 KB · Views: 261
  • tank an chain 005 (600x450).jpg
    tank an chain 005 (600x450).jpg
    234.8 KB · Views: 251
  • tank an chain 008 (600x450).jpg
    tank an chain 008 (600x450).jpg
    259.6 KB · Views: 310
  • tank an chain 006 (600x450).jpg
    tank an chain 006 (600x450).jpg
    247.4 KB · Views: 250
  • tank an chain 007 (600x450).jpg
    tank an chain 007 (600x450).jpg
    286 KB · Views: 297
love the tank, beautiful work

It sure is beautiful and Gary makes everything look easy. Maybe for him it is. I'd still be trying to figure out how to do that tank. So, Gary, is that the original fake tank, no longer fake? How'd you do that? Magic dust?
SB
 
LOL no pixie dust , but as the marines would say "adapt an overcome ". doing a tank that way is simple tho , an yes it was the original tank light for that bike .
at the point where the tank would fit around the steer tube you just fan it open 3 inches an tack weld in a small peice of steel rod to hold it open ,(make sure you prefit your filler bung at this point as some bungs may need more room to fit on top of the tank) make paper templates of the gaps with a 1/8 inch overlap on all sides ,an use 18 gauge steel to cut your peices from ,tack weld those in place an do a pre fit , more than likely you will have to tweak the tanks fit a bit at that point the heat from welding will want to make it warp , so check its fit often durring welding (take your time good beads of weld will be important to keep it from leaking )weld ALL SEAMS SHUT , cut your bung openings last after fitting the tank an motor in place. (incorrect placing of the petcock bung can make your life **** )
finally fit the tank one lat time to align it on center line mark that the full length of your tank an weld 3 bolts on center line . or adapt to fit your needs here, this bike has dual top tubes paralle to eachother making hanging it easy , a diff method for a single tube would be more difficult but not that much more troublesome . getting it this far should take about 4 hours
easy peasy, seal it do your finish work an paint it . an in my opinion you will have a "bangin " fuel tank that after this conversion will hold exactly a 1/2 gallon of fuel . .shft.
Gary
 
Last edited:
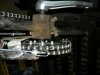
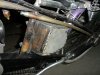
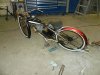
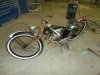
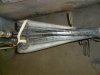
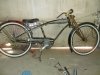
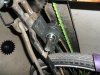
I was kind of hoping you'd have a good source for pixie dust. Easy peasy, eh? I imagine so as long as you're an ace welder, and fabricator in general. I suspect I would burn some holes in that tank if I tried it. I'm better with solder than welding steel, but doubt that soldering would go easy with that tank.

I'm guessing, too, that one of your hours would equal a good day for me. So your four hours would stretch out to a week anyway, and that's if things went well. One day for each or your hours (my day has a nap in the middle with no quick moves). Just picking up a tool from the floor may take awhile. Then allow a couple days worth of staring & swearing and another one to recover from the exhausting pace and stress of the project.

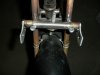
But with enough tank liner it would hold gas and eventually I could say, "oh yeah, I made that tank. It was pretty easy." (Easy peasy, actually. Ha!)
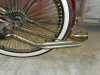
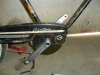
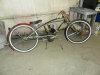
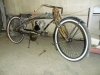
Thanks for the how-to, Gary. Nice tank for sure.
SB
 
hung the motor still got a pile of work to do for the rear mount there , but I had seen a really easy mount someone else had built here so when I get to it he gets all the credit (cant remember who ). thought yall might like a peek .
Gary
 

Attachments

  • motor 1st set 002 (600x450).jpg
    motor 1st set 002 (600x450).jpg
    259.6 KB · Views: 303
  • motor 1st set 001 (600x450).jpg
    motor 1st set 001 (600x450).jpg
    272.5 KB · Views: 273
  • motor 1st set 003 (600x450).jpg
    motor 1st set 003 (600x450).jpg
    262.2 KB · Views: 300
  • motor 1st set 004 (450x600).jpg
    motor 1st set 004 (450x600).jpg
    260.2 KB · Views: 282
Okay, you know I've been lurking but keeping quiet. Finally the internal combustion thing is in place so I know it's a real motorbike.

It's down and dirty and looking' so fine. But, we expect nothing less from you. Carry on.

Tom
 
Thank you " lurking" Tom. (hehehe) I was lookin at it this morn while cleaning up the mess I left out last night an thought about doing paint on it flat black over all an flat white or red oxide as a 2 tone doing big scalops on the fenders an such, an that really got me thinking . part of me says leave it an the other part says YES ! any opinions from yall ?
Gary
 
Here's where ya gotta ask yourself, "How Rat do I want to go?"
I've seen rat rods with little to no paint, mostly rust, that looked cool and I've seen them in red, black and grey suede. The beauty of a rat is that you can change your mind and not get into a big investment of time or money to totally change the look.
Let us know what you decide.

Currently I'm diggin' the different color fenders. :)

Tom
 
Last edited:
ether way you go its a sweet ride i like the slammed low look of it flat black would be nice i think it needs pin striping ether way if you keep the fenders the way they are or paint them if you keep them in there paint pin stripes will pull it together and give you a over the top result making it truly amazing
 
Thanks Tom an Jonnyr , I like those really rusty dangerous lookin rats , but preety sure I made up my mind while building the jackshaft assembly tonight , you will just see it after its done . heres some mock up shots of the jackshaft assembly, an to follow the finish shots in another post.
Gary
 

Attachments

  • jack shaft build 002 (600x450).jpg
    jack shaft build 002 (600x450).jpg
    255.1 KB · Views: 276
  • jack shaft build 001 (600x450).jpg
    jack shaft build 001 (600x450).jpg
    264.8 KB · Views: 282
  • jack shaft build 003 (600x450).jpg
    jack shaft build 003 (600x450).jpg
    173 KB · Views: 266
  • jack shaft build 004 (600x450).jpg
    jack shaft build 004 (600x450).jpg
    236.9 KB · Views: 266
  • jack shaft build 005 (600x450).jpg
    jack shaft build 005 (600x450).jpg
    290.6 KB · Views: 248
an the finish work on the j-shaft.
 

Attachments

  • jack shaft build 006 (600x450).jpg
    jack shaft build 006 (600x450).jpg
    240 KB · Views: 246
  • jack shaft build 008 (600x450).jpg
    jack shaft build 008 (600x450).jpg
    224.9 KB · Views: 233
  • jack shaft build 009 (600x450).jpg
    jack shaft build 009 (600x450).jpg
    255.7 KB · Views: 249
  • jack shaft build 007 (600x450).jpg
    jack shaft build 007 (600x450).jpg
    240.5 KB · Views: 245
Last edited:
heres todays progress made the exhaust an dualied it down lowww even opend the top pipe so it works ,,,, gonna be smokin dualies !.
an quite possibly the easiest hdlmp mount I ever built.
Gary
 

Attachments

  • hdlmp pipe horn 001 (600x450).jpg
    hdlmp pipe horn 001 (600x450).jpg
    214 KB · Views: 275
  • hdlmp pipe horn 004 (600x450).jpg
    hdlmp pipe horn 004 (600x450).jpg
    277 KB · Views: 250
  • hdlmp pipe horn 006 (600x450).jpg
    hdlmp pipe horn 006 (600x450).jpg
    261 KB · Views: 299
  • hdlmp pipe horn 009 (600x450).jpg
    hdlmp pipe horn 009 (600x450).jpg
    269.3 KB · Views: 257
for sure LK , built the fau oiltank ,which is now the battery box an dug out this old speedo took it from a old jcpenny roadbike out in the pile , lubed it an it works !
Gary
 

Attachments

  • fau oiltank 001 (600x450).jpg
    fau oiltank 001 (600x450).jpg
    282.3 KB · Views: 268
  • fau oiltank 002 (600x450).jpg
    fau oiltank 002 (600x450).jpg
    263.2 KB · Views: 259
  • fau oiltank 003 (600x450).jpg
    fau oiltank 003 (600x450).jpg
    201.1 KB · Views: 240
I did it ! successful transplant of a 5 speed onto a coaster hub .total cost 4.00 , an 5 hours first pic , the micargi hub as it was after removing everything coaster brake related, I got real into it so not many pics , but 2nd is the cog side of the 5 spd hub mocked into place once attached an it runs true hardest thing was figuring out how to center it up to within a thousandth or 2 that took 2 hours ya gotta love jbweld an 5/16 capscrews. now just to do some minor mods on the rear an the rat has 5 gears ! Gary
 

Attachments

  • 001 (600x450).jpg
    001 (600x450).jpg
    280.1 KB · Views: 203
  • 002 (600x450).jpg
    002 (600x450).jpg
    249.5 KB · Views: 233
  • 003 (600x450).jpg
    003 (600x450).jpg
    224.3 KB · Views: 212
Last edited:
heres the "cleaned up " an "painted " end finish , just have to cable it up finish the wiring , an figure out where in the heck to mount the shifter , part of me screams jockey shift the other says naaaahhhh. opinions anyone.
Gary
 

Attachments

  • rebuilt 001 (600x450).jpg
    rebuilt 001 (600x450).jpg
    274.6 KB · Views: 256
  • rebuilt 002 (600x450).jpg
    rebuilt 002 (600x450).jpg
    266.5 KB · Views: 258
  • rebuilt 003 (600x450).jpg
    rebuilt 003 (600x450).jpg
    268 KB · Views: 247
Back
Top