Brass Mann
New Member
Howdy folks,
Using the following kit from Amazon, I was unsatisfied with the kit-supplied connectors and decided it would be best to solder the electrical wires together; I however want some input on which wires go where, since all the kits use differently colored insulation.
The kit features the following wires:
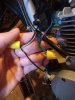
From the magneto, a black wire and a blue wire
From the CDI, a black wire and a blue wire
From the killswitch, a green wire, as well as a black and white wire (which I call the zebra wire).
While I'm writing this, the logistics of wiring three wires together in a single circuit begins to puzzle me. If anyone has photo examples of how one does this, it could help me greatly as well.
Now, for some context on the build itself (only somewhat related to the question, TL;DR it's a no-spark). I bought the kit as a fun project to work on during the semester and ran into numerous alignments problems between the sprocket, engine and idler, which I was eventually capable of overcoming with a lot of fiddling and some frame modifications (which I plan to reinforce using brackets, since I did a sketchy deletion). Before installing the fuel system, I decided to test for a spark, and got nothing. I was able to eliminate some potential causes (tightened the clutch down, re&re'd the magneto), but still have nothing, and want to tackle the wiring next.
So far, I've installed the sprocket gear, engine (mounted with the supplied brackets, I used some old inner tubes to damper vibrations), idler, chain, spark plug, CDI, killswitch, clutch and throttle grips, and the carburetor. I have yet to mount the fuel tank, fuel lines, fuel valve, muffler or chain guard.
I've been testing for a spark by propping up the bike on a jackstand, spinning the pedals while the clutch is engaged and holding the spark plug (inside the CDI) up to the head, but no luck, hence why I want to get the wiring right.
Thanks in advance.
Using the following kit from Amazon, I was unsatisfied with the kit-supplied connectors and decided it would be best to solder the electrical wires together; I however want some input on which wires go where, since all the kits use differently colored insulation.
The kit features the following wires:
From the magneto, a black wire and a blue wire
From the CDI, a black wire and a blue wire
From the killswitch, a green wire, as well as a black and white wire (which I call the zebra wire).
While I'm writing this, the logistics of wiring three wires together in a single circuit begins to puzzle me. If anyone has photo examples of how one does this, it could help me greatly as well.
Now, for some context on the build itself (only somewhat related to the question, TL;DR it's a no-spark). I bought the kit as a fun project to work on during the semester and ran into numerous alignments problems between the sprocket, engine and idler, which I was eventually capable of overcoming with a lot of fiddling and some frame modifications (which I plan to reinforce using brackets, since I did a sketchy deletion). Before installing the fuel system, I decided to test for a spark, and got nothing. I was able to eliminate some potential causes (tightened the clutch down, re&re'd the magneto), but still have nothing, and want to tackle the wiring next.
So far, I've installed the sprocket gear, engine (mounted with the supplied brackets, I used some old inner tubes to damper vibrations), idler, chain, spark plug, CDI, killswitch, clutch and throttle grips, and the carburetor. I have yet to mount the fuel tank, fuel lines, fuel valve, muffler or chain guard.
I've been testing for a spark by propping up the bike on a jackstand, spinning the pedals while the clutch is engaged and holding the spark plug (inside the CDI) up to the head, but no luck, hence why I want to get the wiring right.
Thanks in advance.
")