
You are using an out of date browser. It may not display this or other websites correctly.
You should upgrade or use an alternative browser.
You should upgrade or use an alternative browser.
Chrome Worksman Build Up
- Thread starter DasKapitan
- Start date
DasKapitan
New Member
Thanks Clotho - The Worksman came with adjusters I'll have to bore one out to clear the 1/2" spindle on the right of the NuVinci hub.. I had to modify the Wald rear fender and basket for the same reason. Did that yesterday
Echotraveler
New Member
wald rear fender?
i had to cut my rear fender a bit too....also had to modify the length it covers, cause its not covering the water from coming to my back......have that in mind
i had to cut my rear fender a bit too....also had to modify the length it covers, cause its not covering the water from coming to my back......have that in mind
Crazy Horse
Dealer
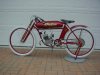
!HOW! Beautiful bike i have the worksman industrial newspaperboy as well thinking on naming my bike black beauty like the the one in the kiddie book, + i like giving my bike a name like this since we native people call motorized bikes & motorcycles ironhorses. Haven't made up my mind yet on motor yet or drive train yet. Still thinking about modifying the downtube removing it at the head tube and at the bottom bracket the same way George Whitney, (of Deuce custom motor bicycles the bicycle board track racer builder in Burien, Washington), does it with his worksman board track racer tribute bikes and then welds in a looped down tube for that traditional BTR looped frame style look. He appears to leave about 1-1/2 inchs at both ends then welds in his looped downtube in place.
Du motorad ist zair gute, sie verstehe Deutsch? Das Kapitan.
Couple of pics are of my worksman & Georges Bicycle board track racer tribute bikes.
If you look closely at the Deuce Board Track racer pics you can see in last pic especially on his Harley tribute where he cuts frame just in front of bottom bracket and welds new on a looped downtube.
Please take care of yourself that is most important, I can relate my wife has a tumor inside her spinal cord she's already had 2 surgery's to remove as much of tumor as possible. If they remove more of it she will surely face paralysis from waist down so far is non cancerous and shes still able to walk.
Let me know how you worksman build progresses. Thanks Joe
Peace Crazy Horse!!!
Attachments

DasKapitan
New Member
Crazy Horse - Those are some gorgeous machines. Elaborate on the twin please. I noticed your fabricating a fuel tank for your Worksman. Let me know how it works out. Save your templates. Some Choctaw in me. Ich habe Verständnis für einige der deutschen Sprache. DasKapitan ist mein Gaming Griff für Medal of Honor.
Clotho - Yes SBP's Customer support is A-1
Ghost 0 - You've got a sharp eye to pick that out of that picture. Thank you, I feel SOoo dumb. The manual is quite explanatory and it even has pictures. DOH! This will definitely help my obvious clearance issue.
Echotraveler - Wald makes a lot of stuff used on bicycles Wald Bicycle Baskets, Training Wheels, Fenders, Racks, and Accessories - Home
Attachments
Crazy Horse
Dealer
!HOW! Das Kapitan: Well I will definitely share my patterns with all interested for the gas tank torpedo design, and the box style gas tank used on the Harley tribute style board track racers.
My goal is to make both these style tanks, with my brother at his body shop on the eastern shore of Maryland.
Only thing is he's 100 miles away and I only get down there every other wkend. And all the welding & other equipment is there!
I want to make & sell these tanks and the modified worskman frame with looped downtubes for forum Mb'ers & others.
We also know most guys here on the forum can't afford expensive builds so I want to make these affordable to all I am still negotiating with him for prices which will be very reasonable with myself assisting my brother in all the fabrication work.
He suggested using the Husky $74.00 frames which are almost identical to worksman INB frames, as a way to save money on these board track racer looped downtube frames.
There are many people out here that have magnificent builds and are selling those at prices that most of us cannot afford I say great for them. But if we can I'd like to offer an alternative so more of us can afford & enjoy The Board Track Racer style of motorized bicycle.
The Cyclone has a faux motor this bike now has a home in Michigan.
I wished you could of made The Chrome Build with the looped downtube, all the same it is a work of art as so many of our fellow Mb'ers builds are.
Keep us informed as to the progress that continues for The Chrome Build nears completion!
Bis spater Tschau!
Thanks Joe. my e-mail: [email protected]
Peace Crazy Horse!!! aka Crazy Indian Joe The Tower Crane Operator!!!
Echotraveler
New Member
hey crazy.....getting that tube out would give you plenty of space for a 4 stroke easy, it would be bad ass!
.....you can fit a 2 stroke as is with help of custom motor mounts....
i cant do such thing as alter my 900$ bike frame! if it was cheaper i would alter the heck out of it....i think custom mounting without altering ones frame is sort of an ART
.....you can fit a 2 stroke as is with help of custom motor mounts....
i cant do such thing as alter my 900$ bike frame! if it was cheaper i would alter the heck out of it....i think custom mounting without altering ones frame is sort of an ART
DasKapitan
New Member
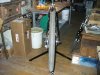
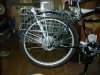
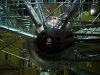
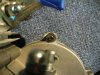
Rode the bike via human power today. Reworked the chainrings (Thanks again Ghost 0) Had to lose the chain adjusters. My slots are just too short with the NuVinci "No Turn" washers taking up real estate.
Rear roller brake installed now on the dual pull lever. Note the functional rear brake light switch.
Rear roller brake installed now on the dual pull lever. Note the functional rear brake light switch.
Attachments

DasKapitan
New Member
More progress today -
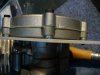
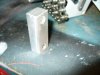
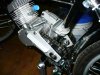
The OD of the Worksman tubing is 1". The muffler clamps provided by Sick Bike Parts are 1 1/8". I used 1" electrical conduit to make up the difference. Split the conduit with a portable bandsaw marked the pieces for matched pairs & orientation, due to imperfect cuts. I then used rubber cement and glued bicycle inner tube on the inside of these spacers the fit is perfect.
Milled two of the muffler clamp channels to accommodate the 7 degree tilt I put on the engine with the .600 spacer, made before. Now all will grip flush & snug.
I painted the whole pile Machine Grey to try & match the SBP powder coat their components
Attachments
Last edited:
DasKapitan
New Member
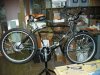
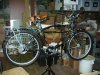
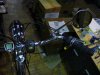
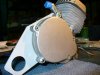
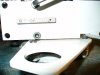
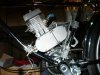
Now ready for the engine -
The NuVinci shifter is fully installed. Handle bars are all set. Hole drilled for the throttle. I copied Clotho's design in my handle bar layout. His was the most logical & functional.
The NuVinci shifter is fully installed. Handle bars are all set. Hole drilled for the throttle. I copied Clotho's design in my handle bar layout. His was the most logical & functional.
Attachments
DasKapitan
New Member
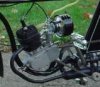
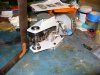
Spent all of today messing with Shift Kit installation, engine mounting & clutch cable installation.
These pics are of the casting work. The Dax 80 engine was relatively clean with very few flaws.
These pics are of the casting work. The Dax 80 engine was relatively clean with very few flaws.
Attachments

DasKapitan
New Member
DasKapitan
New Member
DasKapitan
New Member
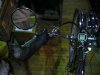
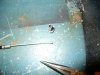
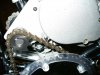
DOH! Forget all this crap This was the Throttle Cable. I wish these kits had a parts list & description
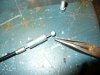
The next steps required hooking the clutch up. The kit supplied clutch cable was incompatible with my HT 80 and the clutch lever. The bung that locks into the clutch actuation lever was too large to make it through the engine side cable adjuster. I had to drill the barrel out to 9/64" to get this end to fit. The lever side had an adjuster that I had to destroy to get it off. It all worked out in the end though.
The next steps required hooking the clutch up. The kit supplied clutch cable was incompatible with my HT 80 and the clutch lever. The bung that locks into the clutch actuation lever was too large to make it through the engine side cable adjuster. I had to drill the barrel out to 9/64" to get this end to fit. The lever side had an adjuster that I had to destroy to get it off. It all worked out in the end though.
Attachments
Last edited:
DasKapitan
New Member
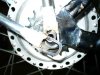
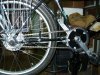
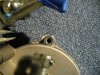
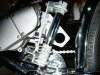
Lastly final install of the jack shaft & drive chain. Thank God I ordered the 1/2 link from SBP. My fit is just sooooo tight.
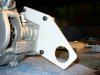
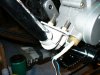
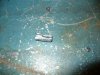
Ghost0 - As you can see I have a contact/clearance issue with the bottom rear clutch cover bolt. Any input at all is appreciated.
Ghost0 - As you can see I have a contact/clearance issue with the bottom rear clutch cover bolt. Any input at all is appreciated.
Attachments

Last edited:
Ghost0
New Member
I would try moving your jackshaft sprocket out about 1/8 inch. I run mine about an 1/8 off center anyway. You do have an advantage in that you don't have a derailleur so your chain line to your rear hub will remain constant. I offset mine to get more clearance between the chains but you won't have that problem because you don't have a derailleur.