Building a Ht Motorized Bicycle or Three.

I hope my experience's help,
Thank's I.W. , moral of the story is if you spend a bit more/know what your looking for, Probably no need to do too much with the Dremel,
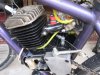
But I've tried 'playing' with 'inferior' motors, If you want a motor that 'Haul's', The place to start is with a good 40mm stroke motor, and a decent barrel, And even if you do find a 'cheap one' with the 40mm crank, ect., pull it apart, go right over it, change the main bearings, true up the clutch, reset the seals if there crooked, adjust your inlet timing, clean everything and polish a few bits, Lapp the head and barrel, Look for any 'dodgy' stuff.
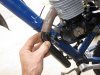
Match all your gaskets, and give the head a shave, Lubricate everything prpoperly, all straight forward stuff really. But you'll have a quick motor that you 'know inside out'.
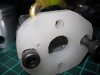
The Transfer Port Works, take a bit of time and practice as well as the right tools, but I plan to go over that at a later date.
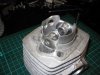
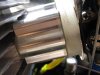
The ports are so much better on the better barrels, requiring little work, as opposed to the 38mm stroke barrels which are 'all over the place'.
 
Last edited:
Back to the Bikes.

The Softail.

Engine No1. is awaiting barrel and should be here today.
The remaining bits are neatly layed out.
A couple of bits awaiting paint.
And the bike 'stashed' in the corner.
Yet to make a pipe for her, and she'll be run in with a standard pipe.
The whole Bike needs a 'Final coat', But will be a 'Rat' for now.
IMG_4175_zps1e424dab.jpg
IMG_4174_zps11760fb7.jpg
IMG_4176_zpsdaee7afe.jpg
 

Attachments

  • IMG_4175_zps1e424dab.jpg
    IMG_4175_zps1e424dab.jpg
    167 KB · Views: 133
  • IMG_4174_zps11760fb7.jpg
    IMG_4174_zps11760fb7.jpg
    130.7 KB · Views: 135
  • IMG_4176_zpsdaee7afe.jpg
    IMG_4176_zpsdaee7afe.jpg
    116.7 KB · Views: 153
The Goat.

Been getting the bike ready for the motor,
Need to,
Modify and install piston.
Final assembly of engine(clutch, ect.)
Relace the rear wheel and fit 39t sprocket with a new Rag Joint.
Finish mounting the rack.
Make a carb spacer.
Adjust the engine 'cradles' a little, to suit the angle of the frame.
Instal engine and TEST!
She'll also be getting a standard pipe for 'run in'.
IMG_4165_zps20ac1069.jpg
IMG_4169_zpsd1d262f8.jpg
IMG_4168_zps42bb74e6.jpg
IMG_4167_zpsb8574331.jpg
IMG_4166_zpsb095a387.jpg
 

Attachments

  • IMG_4165_zps20ac1069.jpg
    IMG_4165_zps20ac1069.jpg
    156.5 KB · Views: 144
  • IMG_4169_zpsd1d262f8.jpg
    IMG_4169_zpsd1d262f8.jpg
    152.2 KB · Views: 136
  • IMG_4168_zps42bb74e6.jpg
    IMG_4168_zps42bb74e6.jpg
    174.7 KB · Views: 145
  • IMG_4167_zpsb8574331.jpg
    IMG_4167_zpsb8574331.jpg
    139.8 KB · Views: 121
  • IMG_4166_zpsb095a387.jpg
    IMG_4166_zpsb095a387.jpg
    166.1 KB · Views: 119
Last edited:
Retiring the Raleigh.

All the 'Leftovers' are going in the Raliegh.
However she may get a 'final outing', When I'm ready to test engine no 4.
She handles really nice at speed, but has very little Brakes!
When I'm ready to hang the old girl on the wall of my new 'Shed', she'll have to give up her wheels for a different set, but plan to keep her 'rideable'.
IMG_4170_zps1b317128.jpg
IMG_4171_zps33353fc5.jpg
IMG_4173_zpsf0906af1.jpg

IMG_4172_zps636258f7.jpg
 

Attachments

  • IMG_4170_zps1b317128.jpg
    IMG_4170_zps1b317128.jpg
    161.7 KB · Views: 143
  • IMG_4171_zps33353fc5.jpg
    IMG_4171_zps33353fc5.jpg
    159.8 KB · Views: 147
  • IMG_4173_zpsf0906af1.jpg
    IMG_4173_zpsf0906af1.jpg
    161.3 KB · Views: 126
  • IMG_4172_zps636258f7.jpg
    IMG_4172_zps636258f7.jpg
    146.7 KB · Views: 128
Engine No 4.

Has no home as yet,
but I have a few ideas.
I want to try the 'Tilly' on this one, make my own manifold.
It has the 'Hybrid' Crank. 40mm stroke, with the 'high wrist pin' rod.
It requires 'Case Stuffing' next.
This will stay piston port for now, but I have a plan to give it some Reeds one day.
For now it will be my 'Reference' motor.
As in using it to compare with my reed motors.
IMG_4177_zps421d5702.jpg
 

Attachments

  • IMG_4177_zps421d5702.jpg
    IMG_4177_zps421d5702.jpg
    122.2 KB · Views: 150
Everything is so clean and beautifully laid out. I won't show you what my workbench looks like at the moment.

Mind you if I was building up an engine it would be a different story :)
 
The Phantom.

I've been offered the opportunity to do a little product testing,
On a new reed valve.
I hope to squezze the reed and a barrel carb, and some air filter, in there somewhere.
Keep you posted.
IMG_4177_zps421d5702.jpg
IMG_4183_zps6b5b58d8.jpg
IMG_4180_zps85345006.jpg
 

Attachments

  • IMG_4183_zps6b5b58d8.jpg
    IMG_4183_zps6b5b58d8.jpg
    117.9 KB · Views: 161
  • IMG_4180_zps85345006.jpg
    IMG_4180_zps85345006.jpg
    175.7 KB · Views: 133
It don't always be this tidy,
I did not receive my new barrel today, but have plenty to go on with,
I'm going to take advantage of what looks to be a sunny afternoon, and paint the shift kit parts.
And hopefully make a carb spacer for the Goat.
 
The Goat.

I got up early this morning,
And have the top end assembled!
I took some photos along the way,
But lets go over the process.

First set up the timing wheel.
Test fit piston with wrist pin and bearing,
Choose a base gasket and install.
I'm expecting that everything is spotlessly clean at this point!
lower barrel on to the studs, which have been set.
tighten down head, with moderate tension and no head gasket.
Do a Squish Test, and find TDC.
Remove head.
Double check all port timings, writing them down ain't a bad Idea.
Disassemble piston and wrist pin.
Check ring gaps, check for sharp edges on ring ends and file if necessary.
Test fit the piston 'dry' in the barrel and slide it up and down a bit feeling for 'burrs', you made need to Rechamfer a Port?
Fit the rings to the piston, carefully winding them on,
and test that they slide freely in there groove,
Oil the bore, wrist pin, wristpin bearing, rings and big end bearing.
Instal piston to barrel, and slide up and down a few times checking for 'ring snag',
All good?
install one G Clip.
Instal Bearing.
Lower barrel/piston to rod and install pin and clip!
lower the barrel, and rotate the motor, she still spins freely?
Good, Headgasket, Head, Washers, Oil your head studs!
Throw away those crappy nuts they gave you, find some better ones.
And Torque the head down progressively.
Redo your Squish test,
I got 0.8mm.
 
IMG_4191_zpsfc2b40df.jpg
IMG_4190_zps8daae38d.jpg
IMG_4196_zps69e5b0bc.jpg
 

Attachments

  • IMG_4191_zpsfc2b40df.jpg
    IMG_4191_zpsfc2b40df.jpg
    81.7 KB · Views: 162
  • IMG_4190_zps8daae38d.jpg
    IMG_4190_zps8daae38d.jpg
    50.9 KB · Views: 133
  • IMG_4196_zps69e5b0bc.jpg
    IMG_4196_zps69e5b0bc.jpg
    97.8 KB · Views: 128
Big Bore Pipe,

I was going to run this motor in with a standard pipe, but the exhaust port is way to big.
I've been saving a few scraps for the exhaust I was to build for the Softtail, but it can have the standard exhaust (for now),
This motor needs a pipe to suit, and the header pipe starts at 25mm I.D. and flares to 30mm I.D.
The previous pipes I've built could have done with a longer header pipe, but it's not always about formula, You got to make it fit, and look right.
This one is getting 12" of header pipe, maybe to much?, It fits. and looks good.
She then has a primary taper below the cranks, going to a 42mm I.D. 'Belly', then onto the main expansion chamber.
I'm tempted to try her as a straight thru race pipe first though.
IMG_4197_zps523d0098.jpg
IMG_4199_zpsd6c5f4d5.jpg
IMG_4200_zps703cae98.jpg
 

Attachments

  • IMG_4197_zps523d0098.jpg
    IMG_4197_zps523d0098.jpg
    94.9 KB · Views: 160
  • IMG_4198_zpsa6ed76c8.jpg
    IMG_4198_zpsa6ed76c8.jpg
    172.3 KB · Views: 169
  • IMG_4199_zpsd6c5f4d5.jpg
    IMG_4199_zpsd6c5f4d5.jpg
    155.4 KB · Views: 124
  • IMG_4200_zps703cae98.jpg
    IMG_4200_zps703cae98.jpg
    148.5 KB · Views: 128
Last edited:
Intake and Carb.

I have been building my own reed valve, it consists of two sets of carbon pocket bike reeds,
A hand made and filled, brass cage with a stainless steel housing, it's not quite ready, and I was in at RSE to get my crank checked, when I walked out of there with a second crank and reed valve.
Plus a few freebies, Cheers Tony.
It's going to leave me with a spare motor, No4. so very good.
The RSE reed is designed to take a 40 mm inlet barrel, Tony does make a reed to suit the narrow barrel, but would not sell me one cause they were all going to the States!
So I bought the 40mm reed that was in his cabinet,
It's designed to run a 19mm slide on carb (NT or Delorto).
I wanted to run a 15mm Barrel carb, As I had it on the Raleigh, And it worked well.
In a previous post I mentioned installing a 'Pulse' Barb.
What I needed was a way to get this to the carb,
So from an old nylon breadboard, and something harder would be better (I do have some 'mahogany' scraps.), I made a spacer with pulse 'Pick up'.
I then needed an alloy spacer, between this and the carb, to give the throttle arm room and to help 'sandwich' the soft nylon.
Between all of these pieces, went handmade gaskets. (worthy of a thread!).
A little fiddly, but I'm happy with the result.
IMG_4187_zps036c0b0e.jpg
IMG_4188_zps05309786.jpg
IMG_4195_zps805f5a9d.jpg
IMG_4196_zps69e5b0bc.jpg
 

Attachments

  • IMG_4187_zps036c0b0e.jpg
    IMG_4187_zps036c0b0e.jpg
    52.3 KB · Views: 135
  • IMG_4188_zps05309786.jpg
    IMG_4188_zps05309786.jpg
    90.5 KB · Views: 174
  • IMG_4195_zps805f5a9d.jpg
    IMG_4195_zps805f5a9d.jpg
    78.1 KB · Views: 121
Still no jug for the 'Soft tail'.
But I spent a bit of time cleaning up sprocket teeth, and getting the primary chain on the shift kit rolling smoothly today.
Also getting some exhaust ideas for the Soft tail.
So just need to get the motor in final resting place so I can start lining up the pipe.
 
I test fit the new motor and shift kit to the Soft Tail.
I get good secondary chain 'tension', but it's going to require some new shims for the rear mounts.
The old barrel had a funny tilt to its inlet port, and the Twin pocket bike cab manifold that I put so much work into making is useless.
I'll have to see if I can salvage it, maybe a good excuse to reed valve this bike?
May have to squeeze the Del' Rep' in there for now.
IMG_4201_zpsc9ce6de6.jpg
IMG_4203_zps3841e91a.jpg
IMG_4202_zpsd01bcbe4.jpg
 

Attachments

  • IMG_4201_zpsc9ce6de6.jpg
    IMG_4201_zpsc9ce6de6.jpg
    86.6 KB · Views: 134
  • IMG_4203_zps3841e91a.jpg
    IMG_4203_zps3841e91a.jpg
    88.2 KB · Views: 118
  • IMG_4202_zpsd01bcbe4.jpg
    IMG_4202_zpsd01bcbe4.jpg
    114 KB · Views: 143
nice expansion chamber yea.
im happy my reed kits need no stuffing crankcases and fits a walbro and filter in a 16 inch dirtjumper. if that rse could do that then i wouldnt have made my own.

if my bikes catch more air than others/ i win. its that simple to me. its not a race all the time when im doing self shots on the camera 10 feet above others right?
try outjumping a 16 inch frame. you cant/ its that simple. my bike is fitted to catch air and corner. if i outride u backwards and forwards on a dirt jumper i win. go karts and ovals and speed freaks check this out > dirt jumping is real.
 
We're all waiting to see SunB.
I got no one to race, but I'll have a spare bike!

The Softail.
This wasn't going to be a race motor, still not. For now the Del' fits nicely, the standard exhaust, with a tweek, fits good, I'm even thinking about running an angle fire head!
My angle fire has a decomp' valve, and allows me to run good compression without damaging the pull start and or bending these cheap cranks arms.
She's getting close to done, will try and finish her today?
IMG_4205_zps6b037c5f.jpg
IMG_4204_zps3670f1da.jpg
 

Attachments

  • IMG_4205_zps6b037c5f.jpg
    IMG_4205_zps6b037c5f.jpg
    125.9 KB · Views: 133
  • IMG_4204_zps3670f1da.jpg
    IMG_4204_zps3670f1da.jpg
    118.6 KB · Views: 131
I have received my new barrel,
And as expected, I received a '38mm stroke' style barrel. With the narrow inlet stud spacing.
A little disappointed!
So will not be buying anymore of them, I was very specific.
It is however of reasonable quality, and I will use it for the 'Soft tail', as it's all I need for her, and will get a basic time and port job.
No need to go over board on this one.
I will be match porting the transfers to the ported cases,
'Deburring' all ports,
Widening inlet and exhaust a little.
Match porting exh and inlet ports to the ported manifolds.
Adjusting the port timing as necessary.
Polishing the exhaust port.
Will also deburr the fins.
 
Your angle fire head with the decomp valve, - where did you get that Theon?

Bad luck with that cylinder barrel. It's really annoying when you go to the trouble of clearly defining what you want and they still send the wrong part.
 
Theon, you should PM MotorBicycleRacing. He sells the good 40mm stroke engines and may know a source for the jugs you seek.
He is very knowledgeable and a a great guy to do business with as well!
The ''GenV'' jugs look great compared to the run of the mill stuff. He might be able to point you right even if he does not sell the barrel you seek.
 
Last edited:
Back
Top