Blackhawk GTA

Dogtown Burner

New Member
For simplicity sake I'm skipping the numbers and letters and all the confusong nomenclature. theres 2 skyhawks. stub and no stub. i am going to be calling the stub GTA, and the no-stub GTS for "straight" downtube.
Here we go on an adventuresome endeavor. a dual disc brake daily driver with a few small power modifications. This bike was a fun build, and I love the flat black color. it came out real nice from the powdercoater in Gardena. You'll see our new chief mechanic as well...
 

Attachments

  • IMG_8049.jpg
    IMG_8049.jpg
    60.1 KB · Views: 310
  • IMG_7806.jpg
    IMG_7806.jpg
    65.4 KB · Views: 298
  • IMG_7807.jpg
    IMG_7807.jpg
    59.8 KB · Views: 252
  • IMG_7940.jpg
    IMG_7940.jpg
    23.1 KB · Views: 227
  • IMG_7943.jpg
    IMG_7943.jpg
    22.6 KB · Views: 235
After realizing that the GT has a 1-1/8 steerer tube and the monark II forks are 1", we went with the Felt Abraham Linkage front end. Part laziness, part wanting to try something new. Unfortunately for us, the Felt product is a classic themed product. No disc brake mount exists, so I employed Ken Warren of KW machine to manufacture a new line of felt springer disc brake mounts. we will be selling them on our websites exclusively. (shop.jakebike.com) and KWmachineworks.com. Also, the rear disc is a tad hassle. We use a kings top hat and offset sprocket with many spacers and hoo haws to get the caliper and the chain to agree on space management. We also made a rear bracket for disc caliper mounting. So for those millios of dudes wanting Skyhawk GT's with dual discs, we have your solution. Also a universal motorized bicycle rear hub is in the works. stay tuned for a dual disc mount single speed right freewheel , left solid sprocket mount rear hub this spring. heres some sneak photos
 

Attachments

  • IMG_7993.jpg
    IMG_7993.jpg
    57.4 KB · Views: 246
  • IMG_8042.jpg
    IMG_8042.jpg
    67.1 KB · Views: 218
  • IMG_8050.jpg
    IMG_8050.jpg
    73.1 KB · Views: 263
  • IMG_7992.jpg
    IMG_7992.jpg
    64.4 KB · Views: 261
  • IMG_8052.jpg
    IMG_8052.jpg
    63 KB · Views: 258
the rear brake was really a bear of a thing. We blew head gaskets in the design room. and not the engine head gaskets...
 

Attachments

  • IMG_8139.jpg
    IMG_8139.jpg
    59 KB · Views: 196
  • IMG_8145.jpg
    IMG_8145.jpg
    47.2 KB · Views: 221
  • IMG_8146.jpg
    IMG_8146.jpg
    52.2 KB · Views: 256
  • IMG_8159.jpg
    IMG_8159.jpg
    63.9 KB · Views: 224
  • IMG_8095.jpg
    IMG_8095.jpg
    67.4 KB · Views: 219
Last edited:
Here's an almost final rear caliper mount, and it works aamazing. 3 different thickness steps, and it had to be mounted so the axle had minimal space used in order to have threads to grab with the axle nut
 

Attachments

  • IMG_8325.jpg
    IMG_8325.jpg
    47.4 KB · Views: 201
  • IMG_8191.jpg
    IMG_8191.jpg
    60.1 KB · Views: 205
  • IMG_8324.jpg
    IMG_8324.jpg
    50.4 KB · Views: 206
  • IMG_8322.jpg
    IMG_8322.jpg
    59.3 KB · Views: 206
  • IMG_8189.jpg
    IMG_8189.jpg
    50.5 KB · Views: 219
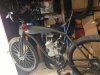
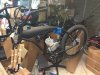
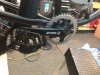
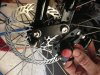
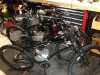
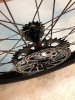
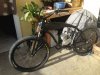
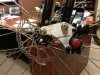
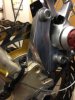
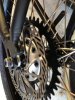
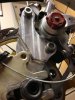
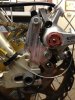
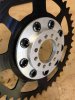
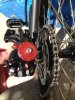
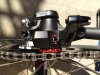
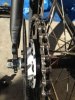
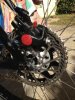
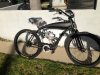
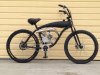
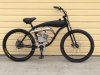
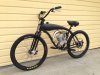
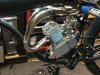
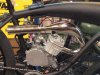
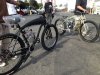
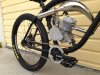
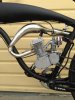
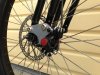
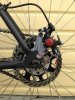
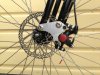
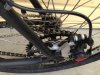
Here we have some assembly shots. the tricky thing about the rear brake is SPACE. theres a finite amount of it back there. as you can see in this picture, a kings offset sprocket with a large (1/4" ) offset top-hat, and the disc rotor is spaced away from the tophat with those 5mm kit washers. The problems that arise are 1) CHAINLINE- with so much offset, the sprocket is kissing the spokes. so 2.5" tires make chain alignment tough. thin chain helps this, you'll notice. 2) CALIPER CLEARANCE: the fatness of the caliper puts the adjuster nut (featured center frame 2nd photo) right against the sprocket. with a 40t sprocket and 160mm rotor, the orientation of those sizes is key, as the adjuster nut would hit the chain if the sprocket was any smaller. the adjust nut rides just under the chain. 2thou clearance!!! (photo 3) [recall the gold "SKYHAWK GT BUILD" Where we mentioned "aircraft tolerances, gentlemen" ?]. This bike is a replica in different skin. The solution to all this- make a better bracket; one with an offset to kick the caliper out to the left and allow for the caliper hangers' thickness to not rub the rotor. the design i came up with is like a 3 layer design platform made from one solid piece of 7075 aluminum. the key is keeping the axle mounting portion just under 1/8" so the dropouts and frame dont get stretched too far out and hide the axle threads.
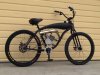
Then, the caliper mount gets wide and protrudes outside the frame dimension width. the brake mount portion of it is cut away for the cal. hanger.

fairly intricate piece. if you need mounts to do this type of thing, we will be making a production run this week, and they'll be for sale on shop.jakebike.com, and KWmachine
 

Attachments

  • IMG_8197.jpg
    IMG_8197.jpg
    68.9 KB · Views: 210
  • IMG_8202.jpg
    IMG_8202.jpg
    56 KB · Views: 198
  • IMG_8196.jpg
    IMG_8196.jpg
    57.4 KB · Views: 201
  • IMG_8203.jpg
    IMG_8203.jpg
    64.2 KB · Views: 194
  • IMG_8330.jpg
    IMG_8330.jpg
    76.2 KB · Views: 263
Last edited:
Chain clearance and caliper were rough, but do-able. here is the rolling chassis---
 

Attachments

  • IMG_8405.jpg
    IMG_8405.jpg
    54.4 KB · Views: 190
  • IMG_8407.jpg
    IMG_8407.jpg
    52.2 KB · Views: 206
  • IMG_8402.jpg
    IMG_8402.jpg
    53.3 KB · Views: 190
  • IMG_8404.jpg
    IMG_8404.jpg
    54.6 KB · Views: 176
  • IMG_8413.jpg
    IMG_8413.jpg
    55.4 KB · Views: 318
some engine closeups. this pipe just came out of thin air. I just started cutting and welding... oh, and see if you can spot the mystery guest in the last shot :-D
 

Attachments

  • IMG_8409.jpg
    IMG_8409.jpg
    64.7 KB · Views: 205
  • IMG_8363.jpg
    IMG_8363.jpg
    65.4 KB · Views: 220
  • IMG_8362.jpg
    IMG_8362.jpg
    65.1 KB · Views: 194
  • IMG_8337.jpg
    IMG_8337.jpg
    80.3 KB · Views: 242
  • IMG_8411.jpg
    IMG_8411.jpg
    67.5 KB · Views: 211
and some final photos of the Blackhawk. Our time together was short lived, but exciting and frustrating, and I made a new friend along the way. I love these damn bikes
 

Attachments

  • IMG_8417.jpg
    IMG_8417.jpg
    57.6 KB · Views: 176
  • IMG_8419.jpg
    IMG_8419.jpg
    64.8 KB · Views: 168
  • IMG_8420.jpg
    IMG_8420.jpg
    65.9 KB · Views: 204
  • IMG_8418.jpg
    IMG_8418.jpg
    69.5 KB · Views: 188
  • IMG_8421.jpg
    IMG_8421.jpg
    62.5 KB · Views: 159
Awesome build, talk about tight fit with the rear setup! While looking at the frame I kept thinking... a vertical 79/99cc Preddy would look nice in there too, then I saw your cameo shot. Definitely makes it easy to picture the Preddy in there now! I wonder how the AL frame would hold up to the bigger motor?

Very cool and inspiring work. One day I hope to progress past the zip ties and dremel stage of customization.
 
Is that the exhaust that you sell on your site, just reconfigured? Im digging it. Im in the process of finding a good exhaust for my Skyhawk frame build.
 
very nice in the future Ill have to contact you guys I know some day I want to use disk breaks the stock ones on my bikes scare me with out a motor sometimes lol
 
Sweet build. I have a GT2A, been thinking about a disc for the rear, for now I just got a coaster brake. But I run a 415 chain, so I doubt the caliper would fit. Any way you could rotate the caliper to hang in between the framerails? I'm sure there would be clearance then without interference from the chain.
 
Sweet build. I have a GT2A, been thinking about a disc for the rear, for now I just got a coaster brake. But I run a 415 chain, so I doubt the caliper would fit. Any way you could rotate the caliper to hang in between the framerails? I'm sure there would be clearance then without interference from the chain.

we have the caliper mounts now, but a 41 chain is needed, as well as thin sprockets with the top hat adapter
 
Back
Top