Anti-Vvvvvibration engine mounts for us?

civlized

New Member
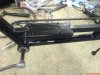
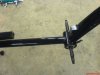
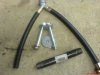
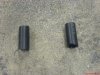
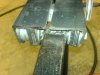
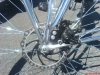
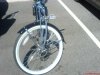
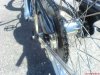
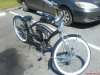
I have searched through some of the mounting technique threads and most seem to be for 2 strokes. I am currently working on an isolating mount for my stretch, which is a 4 stroke. I think I am onto something, but have any of you experimented with this? It's not so bad on the normal bike. The stretch just seems to have more vibration than I want. I would like to see or hear about any of your experiences before I start hacking up my new creation. I really don't want to mount the engine more than 2 or 3 times in the beginning. Thanks for any input.
 
i finnished biology and i have a thick rubber mat i could make rubber feet out of like they do on generators
du u think it would work
 
That definitely couldn't hurt. The only problem I have with that is space, on my particular bike. I can't move up any and I can't move down much. The frame space is a lot tighter on this bike than any other's I've done. I am working on welding a piece of half inch pipe, perpendicular, to the square tubing I had to weld in the bike to mount the motor. Through the pipe will be some tight fitting rubber hose. I will have to modify or completely fabricate another motor mount to bolt up to a bolt through the hose inside the pipe. I have no idea if this will work like I want, but it is all I could come up with, so far. I very much thank you for any help or ideas any of you may have.
 
This is a must. I have had several miscelaneus bolts vibrate out of my bike from the vibration at certain rpms. I'll be keeping an eye on this thread and pondering some ideas that reduce vibration and don't give too much flex in the mounts placement. Locktight everything.
 
Alright, I'm going to go ahead and give this a shot. I'll try to get this done over the weekend and take several pics along the way. Wish me luck.
 
OK. This seems to be the ticket! I haven't ridden the bike yet, should this afternoon or tomorrow, but with the back tire off the ground and the engine running the vibration is GREATLY!!!! reduced.
First, I cut out the original mount that I welded in.
Then I took a 6" long 1/2 in diameter pipe nipple and cut it into 2 1.5" lengths.
I also cut some rubber hose that fits tightly into the pipe about 1.75" lengths.
Welded the pipe pieces to the existing motor mount and inserted the tube into the pipe.
Sorry, I think I have to reply again. Maximum pics.
 

Attachments

  • DSC00354_1024x768.JPG
    DSC00354_1024x768.JPG
    76.7 KB · Views: 661
  • DSC00355_1024x768.JPG
    DSC00355_1024x768.JPG
    55.2 KB · Views: 578
  • DSC00356_1024x768.JPG
    DSC00356_1024x768.JPG
    61.7 KB · Views: 578
  • DSC00357_1024x768.JPG
    DSC00357_1024x768.JPG
    87.6 KB · Views: 511
  • DSC00359_1024x768.JPG
    DSC00359_1024x768.JPG
    92.4 KB · Views: 500
I also fabbed up another motor plate and cut some thick pieces of rubber to fit between the motor plate and the pipe to keep them from touching and allow for alignment. I was amazed at how much difference I could immediately see when I fired up the engine. I still have to paint and tweak a little, but it seems to work well. Hope this helps somebody.
 

Attachments

  • DSC00358_1024x768.JPG
    DSC00358_1024x768.JPG
    69.8 KB · Views: 432
  • DSC00360_1024x768.JPG
    DSC00360_1024x768.JPG
    60.4 KB · Views: 455
  • DSC00362_1024x768.JPG
    DSC00362_1024x768.JPG
    72.2 KB · Views: 479
  • DSC00363_1024x768.JPG
    DSC00363_1024x768.JPG
    73.8 KB · Views: 475
  • DSC00364_1024x768.JPG
    DSC00364_1024x768.JPG
    73.2 KB · Views: 469
Hi Ron. I am going to put a support under that tube. I just couldn't manage to make myselft do it before I tried it also because of the time. I was in the shop 'till about 2am working on this last night. Now it is raining in Alabama, so I don't want to try riding it and I have to take the wife shopping. So, I guess I can tinker later today or tomorrow. I am also changing my wheels. Finally got them finished so that I can freewheel and not coaster brake.
 
Ron,
Your drawing is almost exactly what I wanted to do in the beginning of this. I just couldn't move the engine enough. I would hit the pedal chain if I went down any and I would hit the frame if I moved up. I could move forward to have a little extra room, but then the exhaust would hit the frame. Could modify it I guess. I think I will try something similar to your drawing for my other bike. I finally got my wheels back and installed. Heavy duty hub from bicycle engines with all three sprockets and freewheel on both sides with roller brake. Lots of tinkering ahead! I also made a bracket to install a caliper to the springer front fork for a disk brake and installed the new wheel with rotor. Added the brake levers and cables. Ready for a test run as it has stopped raining for a couple of days. I swear, I don't know how Alabama is not a rain forest.
 
Do you guys mostly get the vibration towards the higher rpm's sort of in a not so sweet spot where it does it more than other times?
 
On my other bike, I would say yes. It is as you describe. On the stretch, it very pronounced from 1/4 throttle and up. The pedals would vibrate enough to make my feet numb after about 10 miles. Could be the difference in engine or frame mount. I don't really know what the difference is, I just needed it to calm down a little.
 
I got my first test ride in yesterday and it is better than I thought it would be. The engine bounces back and forth just a little, not enough for concern. The chain doesn't seem to have any problems with the small movement of the engine. After adding freewheel, brakes, and getting rid of the vibration, this is by far my favorite build so far. I rode it to work this morning to excercise it a little and all went well..rd.
 
CIVLIZED, THIS IS WHAT I TRIED TO POST, I DO NOT KNOW WHY THAT CONFERENCE STUFF LOADED. http://WWW.AVPRODUCTSINC.COM]Rubber anti-vibration mounts for mobile & stationary machines[/url]) THEY HAVE SMALL RUBBER MOTOR MOUNTS. WHEN THAT other stuff CAME UP, I RESTORED MY SYSTEM TO AN EARLIER DATE AND FORGOT IT POSTED!! SORRY ABOUT THAT. LET US KNOW HOW YOUR WORK COMUTE WENT. RON
 
Last edited:
Ron, I thought I was an idiot for about an hour as I searched through that site looking for something that could be used on a bicycle. Cool site, just couldn't find anything I needed! It makes me feel better that you have a different link.
 
I Think The Mount System You Designed Is Better And Keeps The Motor Lower. Your System May Stand Up Under More Chain Pull Also. Those Commercial Mounts "do Not" Have The Studs Going All The Way Thru. They Are Seperated, Insulated From Each Other. If They Were Not, They Would Be Less Effective. The Longer Your Tubes (with The Hose Inserted) Are Made The More Stable It Will Be. Every Time You Build Something You Usually Make Improvements. How Did Todays Commute Go?? Ron
 
Oh, Ps = Now You Know Who The Idiot Is!! I Have No Clue Why It Converted My Key Strokes To That Site, I Do Not Understand It!! Of Course There Is A Lot Of Things I Don`t Understand!! Lol. I Wonder Where "happy" Is This Morning. He May Be Flying By!. Lol Ron
 
As for my commute this morining, I can tell you that I have paid a lot more for a lot less of smile than what was on my face this morning. Nothing better than when an idea becomes a reality and it actually works as intended or better. Any of you interested in some pics of the disc brake on the springer fork? I don't know if that is a rarity or not, I've just not seen it before. I could only find cheesy brake kits for these forks.
 
Last edited:
Here it is. These were taken at work today.
 

Attachments

  • DSC00368_1024x768.JPG
    DSC00368_1024x768.JPG
    105.1 KB · Views: 376
  • DSC00369_1024x768.JPG
    DSC00369_1024x768.JPG
    65.6 KB · Views: 362
  • DSC00370_1024x768.JPG
    DSC00370_1024x768.JPG
    82.9 KB · Views: 373
  • DSC00371_1024x768.JPG
    DSC00371_1024x768.JPG
    106.4 KB · Views: 379
  • DSC00372_1024x768.JPG
    DSC00372_1024x768.JPG
    96.8 KB · Views: 411
Back
Top