acorn nuts on your intake

Don P

Member
HI all
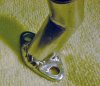
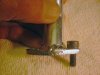
if your engine has acorn nuts on your intake studs to hold it on ether switch to standard nuts or add a flat washer to the stack.

i just sucked in a intake gasket this morning, i was 1 block from my house lucky me.

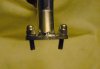
my engine has acorn nuts on the intake studs, look good but will not clamp well enough if it bottoms out on the stud first. so add a flat washer to each side to be sure. i will now

Don P
 
Last edited:
Better to get rid of the studs and nuts and go with allen head cap screws.
Something else to watch for is how the fasteners rest against the intake manifold. Many of the chrome steel intakes have a wide weld bead that will not allow the head of the fastener to rest flush but instead cocks it thereby bending/weakening the shank of the fastener. I posted a thread on this subject some time ago but can't put my finger on it at the moment.
Tom
 
Tnx for the warning!
I was looking at my basket case bike and wondering why someone had stacked some odd washers on the intake manifold where it used acorn nuts...
got acorns on the head, too... guess I better take em off!

Tnx again
rc
 
Sorry to bump this old thread, but did anyone find a solution to the wide weld bead issue? Mine has the same problem - washers not able to rest flush against intake flange.
 
Sorry to bump this old thread, but did anyone find a solution to the wide weld bead issue? Mine has the same problem - washers not able to rest flush against intake flange.
I use a Dremel tool and grind that weld bead so the head of the fastener clears and sets flush with the flange. Don't cut too deep or you'll get into the intake. Just clean up the bead enough to allow the fastener to set flat. You can also do away with the studs and nuts and replace them with Allen head cap screws. Much cleaner look and only one set of threads to worry about.

Tom
 

Attachments

  • Weld, Before Grind.jpg
    Weld, Before Grind.jpg
    352.5 KB · Views: 142
  • Weld, After Grind.jpg
    Weld, After Grind.jpg
    276.4 KB · Views: 155
  • Weld, Allen Head.jpg
    Weld, Allen Head.jpg
    356.2 KB · Views: 146
Last edited:
I did mine just a little different than Tom...
First I cleaned up a little of the weld, then I clamped a couple nice washers in the vice and hit em with a file to to take off part of one side... not really to a half-moon shape, but starting in that direction...
It worked well with another washer stacked on top of the custom ground pair.
rc

.
.cs.

I do the same thing , I feel its better to leave those welds alone .
Gary
 
Just my two cents but my preference is to replace the studs too but instead of bolts I prefer hex socket set screws. The same goes for the exhaust. It seems like those two parts are going on and off the engine fairly frequently and repeated torquing of the st st bolts into the aluminum jug will fatigue the threads in the jug. That and if I bugger up a thread all I need to do is stick an Allen key in and turn it out to replace it. As far as the welds go I replace both the welded parts with billet anyway. I like the look of acorn nuts and use them as jam nuts on top of the nuts that are actually doing the work unless there isn't much of a load then I'll use just an acorn nut.
 
I do the same thing , I feel its better to leave those welds alone .
Gary
Gary,
To each his own but I've never encountered a problem with grinding the weld beads just enough to clear the fastners. I've always replaced the studs with cap screws and what little material I've needed to remove has never compromised the manifold attachment to the flange. Of course I realize there's room for failure if a person gets too carried away with grinding but you have to use some common sense there.
Like every other aspect of this hobby; you have to do what works for you. My suggestion was just based on what has always worked for me.

Tom
 
Back
Top