1937 columbia replica build and question

ZipTie

Active Member
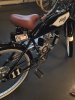
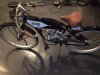
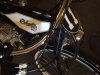
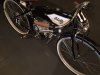
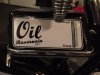
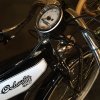
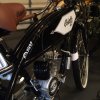
This is the Columbia 1937 replica, I stripped a lot of stuff off it and installed a weed whipper gas tank under the seat and disguised it as an oil tank with a custom clear coated decal/ The new fake tanks are welded together so I didn't try to convert it into a real tank, even though I wanted too. I took the easy way out to conceal my little tank that will still get me 40 miles or so, it has a visual gauge I made on the side of the small tank so should be ok. Yes the gas cap on the big tank is FAKE. It was a fun and challenging build and i like the low slung look of a little light weight motorcycle.
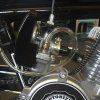
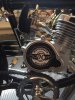
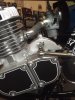
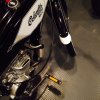
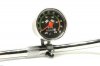
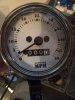
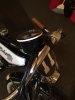
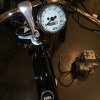
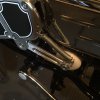
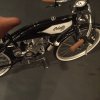
HELP... My question is the off set intake was angled way up and my nephew re welded it and straightened the bolt flange for me but it still is angled enough to make me wonder if the float bowel wont fill and run me lean? What do you guys think? See the first and third pict below. I held the camera level to the horizon.
Thanks ahead of time for any help!
 

Attachments

  • IMG_5245 smaller.jpg
    IMG_5245 smaller.jpg
    393.7 KB · Views: 836
  • IMG_5331.JPG
    IMG_5331.JPG
    151.9 KB · Views: 781
  • IMG_5246n.JPG
    IMG_5246n.JPG
    129.2 KB · Views: 726
  • IMG_5321n.jpg
    IMG_5321n.jpg
    195.6 KB · Views: 1,215
Last edited:
a few more picts.
It also does have 3 brakes front and 2 rear, squeeze and Ill never used coaster brake, so it should stop fast if needed. Has a PK80 engine bolted firmley to the frame with wide 8mm studs, CNC 40T sprocket with hub adapter so it should run be smooth. Just needs a 41 chain I need to get at the hardware store. Plumed, wired and ready to go by Thursday.
 

Attachments

  • IMG_5338n.jpg
    IMG_5338n.jpg
    176.9 KB · Views: 616
  • IMG_5343.JPG
    IMG_5343.JPG
    126.2 KB · Views: 1,365
  • lafaod.JPG
    lafaod.JPG
    168.2 KB · Views: 662
  • IMG_5341.JPG
    IMG_5341.JPG
    114.8 KB · Views: 709
  • IMG_5340.JPG
    IMG_5340.JPG
    107.9 KB · Views: 714
Last edited:
Thanks Velodrome, I couldn't seem to come up with any other ideas besides just paint it plain black, so I made it hide in plain sight.
 

Attachments

  • IMG_5364.JPG
    IMG_5364.JPG
    84.9 KB · Views: 438
Thanks Curtis, Cant go wrong with Black and white. I really want to try a 1952model Columbia tank replica they have out now also, doing the same thing with the oil tank decal on a weed whipper gas tank. It might even look slicker than the black model 1937 replica. Flip the bars remove the rack and chain guard and maybe remove the fenders and add some white slick brick tires.
 

Attachments

  • 1952 columbia tank bike.jpg
    1952 columbia tank bike.jpg
    92.9 KB · Views: 589
I just had my son make me vinyl decals for the cheesy looking analog speedo face to give it a vintage look. Here is the result. I will install it tonight yet. Ill paint the glass edge black also so it matches the Columbia paint scheme

Before and after Picts below mine is the white face
 

Attachments

  • speedo before.jpg
    speedo before.jpg
    131.3 KB · Views: 389
  • IMG_5380.JPG
    IMG_5380.JPG
    50.3 KB · Views: 405
Last edited:
I Installed the speedo late tonight ( my peaceful productive time) painted the sides black gloss and added a 3/32" white pinstripe to the side to tie it to the paint scheme. It can be these small details that are both fun and challenging to do as a hobby vs just making it work, and do give a build a quality factor.

I totally done now* except for a greasy chain install, so guess I'm on to my next Build...? not sure yet what it will be but now I'm kind of hooked on these fake tank bike conversions to a lightweight vintage look motorcycle. Its one great hobby for some that costs plenty, but not really that much when you consider that one should at least be able to recoup all cost plus a small amount for labor if the builds are solid and safe and good looking... That is if I ever sold them. Ill probably have to cull a few in the future at any rate.
 

Attachments

  • AAAA.JPG
    AAAA.JPG
    158.8 KB · Views: 443
  • AAAAAAA.JPG
    AAAAAAA.JPG
    102.3 KB · Views: 444
  • AAAAA.JPG
    AAAAA.JPG
    140.3 KB · Views: 401
  • AAA.JPG
    AAA.JPG
    130.3 KB · Views: 430
  • AA.JPG
    AA.JPG
    160.1 KB · Views: 464
It's the details that matter the most. I always thought that bike would look good in my collection. Unfortunately, I have too many bikes and not enough garage.
 
AG, No excuse/LOL/ Just get two giant wall mount hangers from Menards they are like 3.00 each and find some solid wall studs...wallla, more bikes will fit in your garage, and look good a hanging. Its what I plan on doing.

dance1
 
Its finally totally finished. Added a custom chain tensioner, added a custom vintage looking LED Tail light. Also the #41 roller chain is on and adjusted so it can run without a tensioner, however its amazing how much the urethane wheel goes up and down under spring tension when the back wheel is turning. It does this even with a precision CNC hub adapter and a american made chain. it reinforces the reason one needs something to keep the tension perfect at all times. There are just so many small tolerance problems with the chains, sprockets, slight wheel and engine angle and centering etc....it all adds up. Its as smooth as silk now and dead quite when pedaling now. Anyhow its ready to gas up and sail down the road at 30 mph confidently.
 

Attachments

  • IMG_5466.JPG
    IMG_5466.JPG
    131.1 KB · Views: 493
  • IMG_5464.JPG
    IMG_5464.JPG
    136.8 KB · Views: 491
  • IMG_5470.JPG
    IMG_5470.JPG
    128.5 KB · Views: 513
  • IMG_5469.JPG
    IMG_5469.JPG
    169.1 KB · Views: 603
  • IMG_5474.JPG
    IMG_5474.JPG
    147.5 KB · Views: 815
Sweet build despite your cool chain tensioner is on the drive side of the chain, that's where you don't want it.

Cool stickers and do-dads, it sets it off.
The tank was a nice touch.

When I bought mine I was **** bent on making that fake tank a real one.
$300 later but I pulled it off.

2_1937doneRight-1280.jpg


1937doneLeftRearHigh.jpg


It's time consuming and expensive, but doable, but I won't be doing it again, I am pretty much just building on Skyhawk GT2 gas tank frames these days, they are 1/2 the price I put in to convert that one.

Anyway, nice build bud, a real eye catcher!
 
Thanks KC, Actually the drive chain is pretty slack free and doesn't really need any tensioner on either side,( but the chain side always seem to have a slight tighter and then slightly looser as the wheel rotates, and the spring on that side always keeps it perfect with 0 slack as the spring and 10 bearing urethane wheel spins + rise and falls up to 3/8" up and down. You should try one of these styles as it makes the chain drive super hushed and smooth as silk, without it there is significant more noise if nothing else. The urethane wheel has no groove so there is 0 resistance. It was your Columbia build that made me want to do one, but that tank project you did successfully would of been my demise/LOL I'm just too darn impatient, I'm that dumb guy who touches the paint before it dries.
Another plus is it only cost me 5 bucks for the plastic tank -vs- 300 and way less of my worthless labor. :)
 
Last edited:
while I have your eyes on this KC, can you possibly tell me if the Carb is too slanted with this offset intake? If so what do I do to fix it?
 

Attachments

  • carb IMG_5475level.JPG
    carb IMG_5475level.JPG
    161.9 KB · Views: 348
Thanks KC, Actually the drive chain is pretty slack free and doesn't really need any tensioner on either side,
but the chain side always seem to have a slight tighter and then slightly looser as the wheel rotates,
and the spring on that side always keeps it perfect with 0 slack as the spring and 10 bearing urethane wheel spins + rise and falls up to 3/8" up and down.
That is because your back sprocket is not true.
You fix that by truing your sprocket, not putting a spring tensioner to mask the problem.

You should try one of these styles as it makes the chain drive super hushed and smooth as silk, without it there is significant more noise if nothing else.
The urethane wheel has no groove so there is 0 resistance.
Yep, I use a bearing mounted smooth wheel too, that was not my point, my point is you always put any tensioner on the slack side of the chain and never the drive side.

Your way, where you hit the gas your spring tensioner will flatten out leaving nothing to take up slack on the return side chain.


Save
 
Back
Top