New cylinder type

GoldenMotor.com

lewdog7431

Active Member
Feb 13, 2019
155
96
28
48
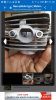
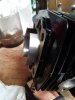
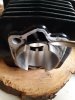
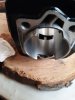
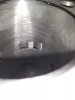
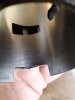
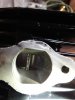
Ola good people, I've been laying low lately more reading than writing so I'll update the new cylinder type and the progress making,so far I've been through 3expansion pipes different confugureations each but now I have one that works well with the set up I'll send picts and so far the performance in this little motor is amazing I've had it hot as **** and still kept pushing the envelope all in all it seems to be working out just fine for the type of loads it goes through so for performance none complaint yet that's for the good and for the bad finding the correct expipe the one I'm using is still not tuned correctly but it runs and for another update last night I got one them steel sleeved lined cylinder from zeda and it is bone stock with a steel sleeve the ports in the cylinder are needing porting and deburring many some cleanup around the everywhere I'll take a couple of snaps I'm not much into conversation rite now so I'll post my questions at a later time but I'll still post the basics for now so far I'm noticing that they didn't do **** to clean the cylinder the sleeve has bigger holes than the actual cylinder so I'll grind off the extra material that's noticeable most definitely its painted black decent job,and it needs dremel work I'm lost for words at the moment pre occupied I'd say so ima take some photos and get my lazy ass to work y'all keep it 100 an I'll do my part the same .....one love motorbikeriders,,,,,,,lewdog
 

Attachments

  • Like
Reactions: indian22 and FOG

lewdog7431

Active Member
Feb 13, 2019
155
96
28
48
Yeah you can definitely see the steel lip inside the exhaust port and the transfers need clearing and the skirt can be picked up some hopefully this is the way to go
 
  • Like
Reactions: indian22 and FOG

kelly dean

Active Member
Oct 3, 2019
139
178
43
64
kentucky
Glad your on the mend Kelly, missed your posts. I'm a fan of showing the ugly up front and during the build. Each stage has these ugly moments and many seem loathe to show the real face of progress and the weeks, months or years it takes to complete some complex builds. The reality is most real builds are ugly most of the way to completion no matter how well designed and innovative they may be and we should encourage others by showing the un-edited photographic reality of our work in progress along the way.

Rick C.
i've got picture's as its come along. This is a project i always wanted to do.. full suspension. I found the frame sometime ago just old junk but when i saw it i thought it just might be doable, and it just barely is with a ton of modifications. I've gathered old parts over time, a really good front end and things i've mostly used what i have and whatever i can find. Aftergetting the geometry right i reinforced the rear suspension refurbed a shock and replaced all the bushings. I used a disk ready front then i adapted a disk to the rear, calipers mounted and all of that functional. yesterday i finalized the engine mounting and today im starting on mounting a jack shaft and get all the chains worked out. Other than the motor kit it's been built out of old junk but that was selective junk lol. it's certainly odd looking but done in my own style and i'm real happy with it .
 

curtisfox

Well-Known Member
Dec 29, 2008
6,048
3,959
113
minesota
Sounds good, always intrigued with full suspension builds. Keep in mind the Jackshaft should be as close to the pivot point to keep chain slack to the rear wheel from a-flopping, may need a tensioner...........Curt
 
  • Like
Reactions: indian22

lewdog7431

Active Member
Feb 13, 2019
155
96
28
48
i've got picture's as its come along. This is a project i always wanted to do.. full suspension. I found the frame sometime ago just old junk but when i saw it i thought it just might be doable, and it just barely is with a ton of modifications. I've gathered old parts over time, a really good front end and things i've mostly used what i have and whatever i can find. Aftergetting the geometry right i reinforced the rear suspension refurbed a shock and replaced all the bushings. I used a disk ready front then i adapted a disk to the rear, calipers mounted and all of that functional. yesterday i finalized the engine mounting and today im starting on mounting a jack shaft and get all the chains worked out. Other than the motor kit it's been built out of old junk but that was selective junk lol. it's certainly odd looking but done in my own style and i'm real happy with it .
Hi K I was wondering if you can post a picture of the fraim your putting the motor on , I've always wanted to do s full suspension but the configurations have all been like no position for the motor not practical anyway so I'm interested to see how your positioning the motor ok thanks kelly
 

lewdog7431

Active Member
Feb 13, 2019
155
96
28
48
Up date: I've noticed a leak from the new cylinder right above the exhaust port it seems that the cylinder has s small tab which has gotten hot enough to open and allow compression to blow through the cooling fins so the other day going through my check list I took a hammer and hammered the open tab back closed ,hear comes the questions now am I losing compression from this pinhole in the cooling fin is this detrimental to the longevity of the little motor and should I jbweld the spot or swap cylinder before it gets worse I half to jbweld cause I'm not skilled in welding aluminum nor brazing I'll try to load some photos anywho y'all got any feedback on this pinhole ima go take some photos I'll be back
 

Attachments

kelly dean

Active Member
Oct 3, 2019
139
178
43
64
kentucky
Hi K I was wondering if you can post a picture of the fraim your putting the motor on , I've always wanted to do s full siuspension but the configurations have all been like no position for the motor not practical anyway so I'm interested to see how your positioning the motor ok thanks kelly
im going to post a series of pics in the fab section of where i started and where i am now