wret
Active Member
While contemplating methods of creating a head tube badge for my bike I came across some instructions for electrolytic etching. The fascinating part was that it could be done from a photographic image. There are several DIY's and youtube videos on the subject so I will only summarize here.
1. Start with or manipulate an image so that it has only two colors (black and white) and is the right size your your project. I worked up my own arrangement of the Indian logo.
2. Once you have everything they way you want it, you will need to create a mirror image and in negative. This can be done with the most basic graphics software, i.e., MS Paint.
3. Using a laser printer, print the image on photograph inkjet paper. Yes it works. I jammed the machine with some heavier stuff but the lighter weight paper works. You need to use glossy inkjet paper or purpose specific etching paper (E3 Etch).
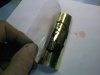
4. Prepare flat metal object (brass in this case) by sanding with 600 grit paper.
5. Iron the image onto the metal with dry iron on high. I left the iron on about 3 minutes. Use a piece of cotton cloth between the work and the iron. Roll / press the work while its hot to make sure there is good contact and adhesion.
6. Let the metal cool completely. No peeking. Then submerge in water for a few minutes. Gently roll/peel the paper away and the toner is left adhered to the metal. If it appears that some of the areas aren't completely covered with toner, you can touch up with a paint pen.
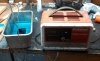
7. Prepare an electrolyte solution. I used a couple tablespoons of copper sulfate (septic system root killer) which is appropriate for copper and brass etching. I read that some use regular table salt and others say this doesn't work well. You can store and re-use your solution indefinitely.
8. Connect a copper wire to the back of the metal piece and cover the whole back side with tape.
9. Use some pieces of tubing or other insulators at the corners to keep it from coming into contact with the metal pan.
10. Connect a DC power supply (charger or battery) negative to the pan and positive to the wire connected to the work piece. Submerge the piece etched face down. I found that with the piece very close to the pan my charger was overloaded and tripped out constantly. About an inch or so from the bottom seemed to work a lot better. Leave it turned on 1-3 hours depending on the etching depth you want.

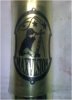
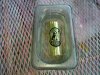
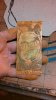
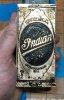
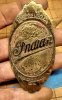
What I intended was to clean it up, then spray paint the whole thing followed by some fine sanding and polishing to highlight the raised areas. Sometime during the polishing, I stripped off most of the paint and ended up with a nice blend of coppery color and an overall antique effect that I rather liked.
Here are the various stages of finishing:


1. Start with or manipulate an image so that it has only two colors (black and white) and is the right size your your project. I worked up my own arrangement of the Indian logo.
2. Once you have everything they way you want it, you will need to create a mirror image and in negative. This can be done with the most basic graphics software, i.e., MS Paint.
3. Using a laser printer, print the image on photograph inkjet paper. Yes it works. I jammed the machine with some heavier stuff but the lighter weight paper works. You need to use glossy inkjet paper or purpose specific etching paper (E3 Etch).
4. Prepare flat metal object (brass in this case) by sanding with 600 grit paper.
5. Iron the image onto the metal with dry iron on high. I left the iron on about 3 minutes. Use a piece of cotton cloth between the work and the iron. Roll / press the work while its hot to make sure there is good contact and adhesion.
6. Let the metal cool completely. No peeking. Then submerge in water for a few minutes. Gently roll/peel the paper away and the toner is left adhered to the metal. If it appears that some of the areas aren't completely covered with toner, you can touch up with a paint pen.
7. Prepare an electrolyte solution. I used a couple tablespoons of copper sulfate (septic system root killer) which is appropriate for copper and brass etching. I read that some use regular table salt and others say this doesn't work well. You can store and re-use your solution indefinitely.
8. Connect a copper wire to the back of the metal piece and cover the whole back side with tape.
9. Use some pieces of tubing or other insulators at the corners to keep it from coming into contact with the metal pan.
10. Connect a DC power supply (charger or battery) negative to the pan and positive to the wire connected to the work piece. Submerge the piece etched face down. I found that with the piece very close to the pan my charger was overloaded and tripped out constantly. About an inch or so from the bottom seemed to work a lot better. Leave it turned on 1-3 hours depending on the etching depth you want.
What I intended was to clean it up, then spray paint the whole thing followed by some fine sanding and polishing to highlight the raised areas. Sometime during the polishing, I stripped off most of the paint and ended up with a nice blend of coppery color and an overall antique effect that I rather liked.
Here are the various stages of finishing:
Attachments
Last edited:
")