Quickie project #1- 1955 Spitfire

Mr.B.

Well-Known Member
With the Big Davenport swap meet starting tomorrow I’ve decided to try to put a couple of quick bike projects together...

I will be attending the show Friday & Saturday and my friend “Bicycle Bill” will join me for most of it.

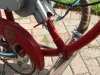
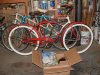
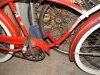
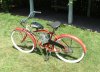
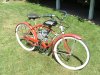
Project #1 is this 1955 Spitfire.

Nothing fancy here, just a “79” cc China Girl and a classic Schwinn. I will spend today putting it together.

I’ve already gone through the bike, straightened the forks, beat the fenders back to a shape that they somewhat first resembled and cleaned & repacked all bearings.

This is my first “kit build” and imagine a lot of trips to the Forum today for reference.

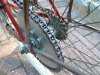
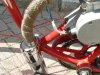
Looking over the parts I’m not crazy about the rag joint and suspect I’ll come up with some quick alternative to it.

I have already made a front mount from the top of an old stem to place the engine above the bird wing chain guard- My favorite of all the Schwinn’s

I’ll post pics of today's progress late tonight or tomorrow morning.

Wish me luck!

-Kirk
 

Attachments

  • 249 .jpg
    249 .jpg
    232.3 KB · Views: 226
  • 250 .jpg
    250 .jpg
    191.3 KB · Views: 229
Didn’t get her done yesterday.

I broke the clutch handle just by gently tapping into place with a rubber mallet, yikes! There was a pretty large void in the casting, apparently don’t use any de-gasser when they pour these things.

It cost me a couple of hours touring the local bicycle shops to find a reasonable replacement.

I arrived at Bill’s well appointed shop kind of late last night with a nice 4” square chunk of billet aluminum and a goodly selection of grade 8 bolts in hand with intentions to mill the new gear clamp.

But then I saw his wheel truing stand setting on the work bench and decided I’d save a lot of time if I just used it to carefully install the rag joint. Yep- I whimpped out, but at least it’s very centered, plumb, and true!

I’ll probably just wait and make photos when finished now, but thank goodness all the hard stuff is done.

The first page of the instruction manual says a experienced assembler can put the kit together in as little as 2 hours- Ha! These kits sure are cheap, so is the humor.
 
Finished late Thursday!

-Kirk
 

Attachments

  • 257 .jpg
    257 .jpg
    247.9 KB · Views: 195
  • 258 .jpg
    258 .jpg
    294.2 KB · Views: 193
I like the way you incorporated the Bear Claw on the tank, the bike looks good with the kit, how was the response to it at the show?
 
Thanks,

It was well received, mostly by older gents who remembered the Whizzer's of their youth. But I didn’t sell it.

I did have one guy bust my chops about motorized bikes and how they should have to be registered & liesenced like all other vehicles.

I gently explained to him that’s one of the reasons I like them, they represent a level of freedom that’s hard to find nowadays.

Unconvinced he left saying as soon as someone hits a grandmother crossing the street they will be, and the sooner the better.

If my grandmothers were still alive I’d tell them not to cross the street, especially around that guy... :)

The tank graphics are just a quick vinyl cut out I made to match the original Schwinn frame deco.

-Kirk
 
When I took My Indian to the car show in Tehachapi Ca. I brought it not to sell but just to see what kind of reaction I'd get ,it was fantastic! a couple of Real older guy's SWORE it was a REAL Indian and why was I saying it was a tribute? was I afraid someone was going to steal it at their show ? then there was that ONE GUY you know the a** hole in every crowd that just feels it's his duty in life to be-little's everything about a great accomplishment and finally there was one guy who grew up down the road from the Indian Plant in Mass. who's Father and Grandfather worked through WWl and the depression until the factory closed down of course they all rode an Indian.
I love the stories these old guys tell about their bicycles and M/B's, what they did on em and where they went all their little buddies they rode with, it's Priceless !
 
I offer a tip,

But with the popularity of these little kits I imagine certain assembly issues become common and it has been discussed here before.

Never the less- One problem I encountered was that when the rag joint was tightened it pressed into dust cover of the coaster brake hub, not allowing the wheel to rotate.

My solution was to simply, but reluctantly leave the dust cover off.

While at Bill’s shop I told him about this problem and his better solution was to lath the outer edge of dust cover down so it would fit just with in the center hole of the rear sprocket.

It just took him a few minutes to chuck it up and shave, now it still acts as a dust cover and looks better too.

Too bad I didn’t do this in the first place, it sure would of made it easy to center the sprocket!

-Kirk
 

Attachments

  • DSCF0160.JPG
    DSCF0160.JPG
    470.1 KB · Views: 154
Last edited:
I would like some details on that too as it looks like a goose neck and if it is how did you ever get it on the frame?
 
Simple, I just cut the end off of a stem (goose neck), spread it enough to fit over the down tube, determined the correct location and tightened it.

I found that a piece of “black gas” pipe fit snugly inside of the cut stem. To avoid damaging the engine and original paint on the bike everything was first just tacked, then removed for the final welding.

Cleaned up the welds, painted, and reinstalled- I expected the paint to crack a little during reassembly and I’d have to touch it up, but fortunately it didn’t

-Kirk
 
No worries, here you go...

I’ve also modified the kit’s muffler strap so it fits the stem bolt.

-Kirk
 

Attachments

  • DSCF0163.JPG
    DSCF0163.JPG
    470.8 KB · Views: 123
  • DSCF0164.JPG
    DSCF0164.JPG
    466.8 KB · Views: 146
Last edited:
It’s just an inexpensive stamped steel one, I’m sure cast steel or aluminum would break right fast!

-Kirk
 
Back
Top