DUAL PURPOSE pusher / rack mount

foundmydog

New Member
Hello all...

In the very early stages of building and designing right now, but it seems very doable with not much cost involved!

What I am in the process of making is a dual purpose power source which would power a small push trailer, and then be easily removed from the trailer and be used as a rack mount poser source.

The trailer, when used, would be attached to the rack mount by a 1/2" bolt serving as the trailer hitch. When the trailer is removed the throttle cable would be carried over with the engine to the rack mount, and the trailer easily removed!


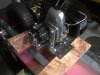
The power source would be the infamous $89 TANAKA PF3300 running either way via a jackshaft and gearbox.


The gearing of the trailer with an 11" tire would be 16.20 to 1 which would top out at 22.2 miles per hour.

The gearing of the rack mount with 26" tire would be 20.00 to 1 which would top out at 42.5 miles per hour.


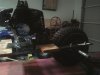
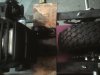
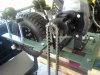
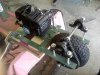
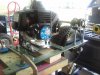
The engine and pillow block bearings for the jackshaft will be attached to a standard horizontal shaft engine mounting plate. This unit itself is what will be easily removed from the trailer and placed into a rack mount when wanted.

I will give detailed info through the course of the build and keep the thread updated.

My approach is to fully build the trailer first and create the "power unit".... then build the rack mount and reverse engineer a way to fit in the "power unit" and have it easily mount to it.

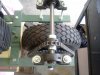
The rack mount will be along the lines of how a friction drive is mounted to a bicycle.

The "power unit" with attached jackshaft with need to be "re geared"... BUT if my math is correct, all would need to be done is reverse the 9 tooth and 15 tooth sprocket on the jackshaft.

All sprockets and chains will be most likely #410 pitch for ease of use...

Waiting for the sprockets and keyed shaft to come from Staton so I can make sure the sprocket fits under the engine before attaching the pillow block bearings

More to come when parts arrive
 
Ahhhh, still waiting on the Staton sprockets and keyed shaft to show up

A few quick pics of the trailer layout so far...
 

Attachments

  • 3.jpg
    3.jpg
    175.4 KB · Views: 237
  • 2.jpg
    2.jpg
    157.7 KB · Views: 226
  • 1.jpg
    1.jpg
    193.5 KB · Views: 237
Made some progress this morning with the trailer build

* cut the metal cross bars to keep the trailer frame squared and to support the removable power unit

* mounted the horizontal engine plate to said cross bars and squared it up to the trailer frame rails

* mounted axle to frame rails with pillow block bearings and lined them up straight to the frame


In a holding pattern right now waiting for the Staton Inc parts to show up to be sure jackshaft sprockets will fit under the engine, and mount those pillow blocks for jackshaft to the engine plate

Rough measurements on the trailer right now are...

24" long x 11"wide x 17" height

Most likely this will be a theme bike and trailer, so thinking of semi enclosing the engine and wheel inside a covering.... need to factor in ventilation for this as engine is air cooled!

More to come when Staton parts finally show up!
 
Well... STATON INC parts showed up yesterday, missing the 15 tooth sprocket I ordered and it was zeroed out on the invoice sooooo guessing it was out of stock???

Would of been nice if he let me know before shipping it was out of stock so I could order the 14 or 16 tooth sprocket! ( thanks dave )

Progress on hold once again as I go back to STATON INC and order another sprocket for the jackshaft
 
Down but not out...

Logged onto the always in stock and reliable McMaster Carr and found a 15 tooth 5/8" bore sprocket for ~$12 or so

Should be here by Wednesday, so hopefully another update by Thursday

15 tooth sprocket is just shy of 3" in height.... this may wreak havoc with the jackshaft under the engine... more to come
 
Worked on her a little more today between football games...

McMaster Carr says the new 15 tooth is almost 3" in diameter... which is way to close to the engine on the jackshaft sitting under it

Moved the jackshaft right above the rear axle and tire and will most likely keep it there

This will allow me to slide the engine back about 2 inches whoch will make the trailer even smaller!

Off tomorrow.... so I should have an almost complete trailer MINUS one of the jackshaft sprockets which should show up here by wednesday
 
Drilled the final holes today in the engine cradle and trailer frame... painted all metal parts and waiting on them to dry to re-assemble everything again

Waiting on the 15 tooth sprocket for the jackshaft before I can line everything up... but will post pics later this evening if paint dries in time!
 
See attached pictures...

MUCH progress the last two days...

Jackshaft sprocket showed up the following day after being ordered from McMaster Carr


Trailer frame, rear axle, and jackshaft all lined up and bolted down into place

Drive chain sized up and installed from wheel to jackshaft sprocket and tightened

Chain sized up from gearbox to jackshaft BUT in need of a #41 master link before I can tighten chain and bolt engine down

Working on the front bracket which will attach to the bicycle... all done, just waiting for the paint to dry


YES... that is olive drab green! Going with an Army theme so main parts got painted!
 

Attachments

  • IMG_20111026_122118.jpg
    IMG_20111026_122118.jpg
    175.9 KB · Views: 190
  • IMG_20111026_122143.jpg
    IMG_20111026_122143.jpg
    191.5 KB · Views: 197
  • IMG_20111026_122108.jpg
    IMG_20111026_122108.jpg
    215.2 KB · Views: 228
  • IMG_20111026_122212.jpg
    IMG_20111026_122212.jpg
    205.8 KB · Views: 185
TRAILER HITCH...

Not going to go with the typical tube running up and connecting onto the seat post as a trailer hitch.... have done that before and it works well.... but I think it ruins the look of what I am going for and not being able to use a rear rack at all


MY IDEA...

Using flat bar stock, 1/4" thick x 2" wide, I am going to bend it into a "U" shape and have the two ends attach to the dropouts of the bicycle... NOT the axle, but drill two holes maybe 3/8" into the back end of the dropouts and use grade 8 bolts and run them thru the dropouts and thru the flat bar and lock it down with nylon locking nuts just a hair loose as to create a pivot point for driveways or steep inclines

The center of the "U" flat bar will connect to angle iron which is run up vertical from the front of the trailer

Working on it right now and should have pictures to show by tomorrow...

More to come
 
See attached pictures...

MUCH progress the last two days...

Jackshaft sprocket showed up the following day after being ordered from McMaster Carr


Trailer frame, rear axle, and jackshaft all lined up and bolted down into place

Drive chain sized up and installed from wheel to jackshaft sprocket and tightened

Chain sized up from gearbox to jackshaft BUT in need of a #41 master link before I can tighten chain and bolt engine down

Working on the front bracket which will attach to the bicycle... all done, just waiting for the paint to dry


YES... that is olive drab green! Going with an Army theme so main parts got painted!

I wanted to make an important suggestion for your jackshaft above the drive wheel. You need to add some more bracing to your current all-thread that holds your bearings above the wheel. All-thread is low grade steel, and bends easily. You need to run a couple pieces of the flat stock you've been using down to the frame to form a triangle on both sides. I'd also run one from one of the bearing mounting feet down to the frame on the other side.

Erich
 

Attachments

  • Triangulation Bracing.jpg
    Triangulation Bracing.jpg
    94.6 KB · Views: 177
Last edited:
I wanted to make an important suggestion for your jackshaft above the drive wheel. You need to add some more bracing to your current all-thread that holds your bearings above the wheel. All-thread is low grade steel, and bends easily. You need to run a couple pieces of the flat stock you've been using down to the frame to form a triangle on both sides. I'd also run one from one of the bearing mounting feet down to the frame on the other side.

Erich


Those are actually grade 5 full threaded bolts I am using, and not all thread

I knew about allthread being close to pot metal status and went for grade 5 hardware where needed

I will watch them for bending or snapping, but I think they will hold in place... only time will tell
 
Jus' as a FYI

While "all thread" is commonly available as coarse threaded, hot rolled, cold drawn, low carbon steel... in actuality it's offered in many thread pitches, grades & alloys *shrug*
 
wow this is really cool

do these builds work as efficiently as the other 2 types


I've personally built and ridden every type of MB you could think of... and I would have to say that a pusher is my favorite!

Gearing can easily be worked out to give you the speed or power you want... there is absolutely NO vibration in the bike itself from the engine... and being low to the ground and a few feet behind you makes for a VERY quiet ride!

My previous pusher was a 5 horse horizontal shaft engine which was extremely powerful... going for a smaller type pusher this time
 
Jus' as a FYI

While "all thread" is commonly available as coarse threaded, hot rolled, cold drawn, low carbon steel... in actuality it's offered in many thread pitches, grades & alloys *shrug*


All the local hardware stores around me only have the semi-pot metal version... where might one find grade 5 or grade 8 allthread???
 
Lost my #41 master link so I am waiting on a few to show up from McMaster Carr... should be here tomorrow

While waiting for the master links, I took another look at her and decided to make her smaller lengthwise... should work out to be right about 6" shorter in length

Trimmed down the horizontal engine plate and slid the engine closer to the back tire which pushed the engine back 2"

Decided to cut off the gas tank area that would of been between the front of the engine and the trailer hitch which gave me 4"

Waiting on the master link so I can tighten the chain from the engine to jackshaft and then cut down the front trailer frame rails by 6"

New measurements should be

18" long x 12" wide x 17" high


I am going to make a trailer frame cover out of 1/2" PVC pipe and fittings which will rest on top of the trailer frame and cover the whole unit

Will leave the front of the cover open to access pull start handle and for ventilation

Will run a tube from exhaust down and to the rear of the tire to get rid of the heat and fumes

The top of the trailer cover will be wood screwed to the PVC pipe for mounting a couple AMMO boxes to... remember it is an Army theme... one AMMO box will hide the gas tank, thinking a half gallon tank or so maybe

More to come
 
All the local hardware stores around me only have the semi-pot metal version... where might one find grade 5 or grade 8 allthread???

I suspect if you asked them if they had/could order different grades of threaded rod they'd be happy to help, but there is also always this: Google Product Search
w/keywords: all thread rod - which returns w/various grades and alloys, mild, galvanized, stainless, even titanium;
Amazon.com: Grade 2 Titanium Threaded Rod, ASTM B-348, #8-32, 36" Overall Length (Pack of 1): Industrial & Scientific
 
That is one Rube Goldberg looking build, how do you plan on attaching it to the bike?
FR
P.S. you were better when the dog was still lost.
 
Back
Top