
You are using an out of date browser. It may not display this or other websites correctly.
You should upgrade or use an alternative browser.
You should upgrade or use an alternative browser.
Staton Robin Subaru crank shift kit
- Thread starter MaxPower
- Start date

spad4me
New Member
He often sells fad type items.
For example
He sold an odd version of a cvt drive for a while.
Then there was BiMoto That fizzled out.
I bought a nuvinci hub from him for a good discount only to have him refuse to lace it up.
He later after I purchased the hub.
Unilaterally changed the warranty to exclude powered use,
only foot power.
I use it on a human powered bicycle.
Good luck!!
More like CYA than , you get what you pay for.
") but it will arrive in 5 more days
but it will arrive in 5 more days MaxPower
New Member
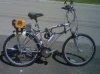
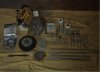
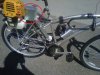
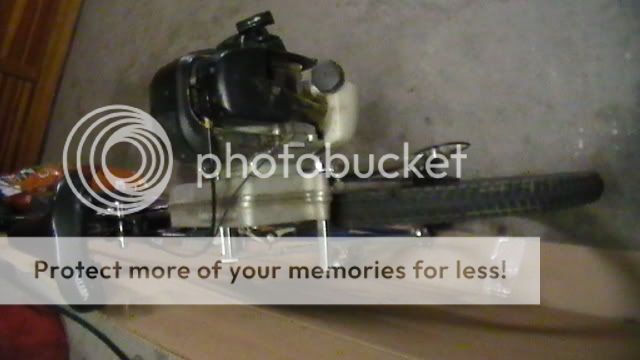
Here it is. It would be installed on my bike but I stupidly striped the threads on my crank. I'm having my local bike shop fix it. Word of wisdom when pulling cranks, be sure you thread the tool all the way in before using it. I'm retarded.
Attachments
moonshiner
New Member
looks like a bit of a complicated kit , is your bike a e-bike ?
Here it is. It would be installed on my bike but I stupidly striped the threads on my crank. I'm having my local bike shop fix it. Word of wisdom when pulling cranks, be sure you thread the tool all the way in before using it. I'm retarded.
Also, make sure to check your new bearing cup holder threads before installing or they may strip if the cup threads have not been cut to full thread depth..........I had to clean mine up with a lathe skim cut.
And also check your chain ring assembly for concentricity runnout, mine had some wobble that had to be straightened by simply re-assembling the chain rings/freewheels/spacers on the production cranshaft before torquing.
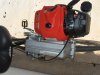
I have over a thousand extreme off road miles on this kit/build setup and it is very solid, robust and near bullet proof for the hardiest requirements. Bike components like spokes, rims, and tires will fail before any on the kit stuff, if properly setup.
The only kit component breakage that I have faced is a shattered carberator manifold that happened while tumbling down a creek bed that I thought I could jump but didnt quite make.............Don
http://motorbicycling.com/f3/extreme-off-road-bike-staton-saburo-29994.html#post285864
Lance Portnoff
New Member
dont worry the transmission you ordered is the best and once u get it hooked up u will be stoked I have been to the staton factory and dave knows his stuff and makes a great american made product, thats why I buld my USA made frames around his system
MaxPower
New Member
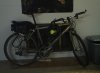
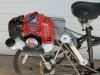
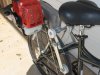
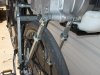
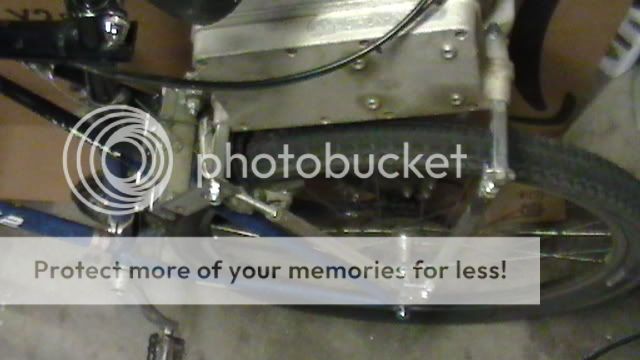
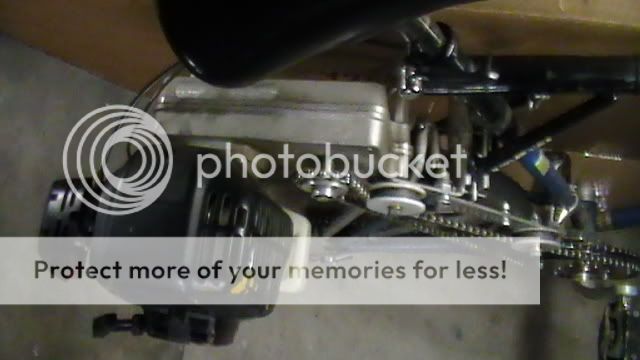
I finally got the striped crank arms off (dremel tool and angle grinder, bike shop could not help). Had a **** of a time with that. learned a lot too. Then I problems with the bearing adapters. The right side went on just fine (beautifully) but the left side was a whole other story. The threads were not cut properly! my old cups threaded in fine and I had to cut off all but the last five threads of Statons adapter to make it thread properly. I was very upset at that. Another thing I don't like about the adapters is that they are soft aluminum and deform when you tighten them down. You shouldn't have to put too much torque on them but I had to because of the machining on the threads. All this could be because of my ineptitude of course but the kit should be a little more straight forward. Some more issues I'm having with the kit. The sprockets sit out too far (see picture). the largest sprocket (not the engine sprocket) sits out further that the last sprocket on rear cassette so there is no way to get a straight chain line. There is no way to make the sprockets closer to the bottom bracket either and the adapters cause the sprockets to sit out even further. THIS IS THE WAY IT HAS TO BE. and it's a shame. I Also don't like how one crank arm sits out further than the other. I'll find out when I finish if this is a problem for me. The kit was missing some shaft collars and a nut spacer so I'm hoping Staton will send me some. I sent him an email. for $700 I think he should. Some things I like so far. I like how the bottom bracket engine sprocket spins independently of the other sprockets. This allows you to pedal without spinning the engine chain. The engine came pre-installed on the gear box and Hardware is quality.
Attachments
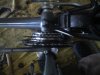
I finally got the striped crank arms off (dremel tool and angle grinder, bike shop could not help). Had a **** of a time with that. learned a lot too. Then I problems with the bearing adapters. The right side went on just fine (beautifully) but the left side was a whole other story. The threads were not cut properly! my old cups threaded in fine and I had to cut off all but the last five threads of Statons adapter to make it thread properly. I was very upset at that. Another thing I don't like about the adapters is that they are soft aluminum and deform when you tighten them down. You shouldn't have to put too much torque on them but I had to because of the machining on the threads. All this could be because of my ineptitude of course but the kit should be a little more straight forward. Some more issues I'm having with the kit. The sprockets sit out too far (see picture). the largest sprocket (not the engine sprocket) sits out further that the last sprocket on rear cassette so there is no way to get a straight chain line. There is no way to make the sprockets closer to the bottom bracket either and the adapters cause the sprockets to sit out even further. THIS IS THE WAY IT HAS TO BE. and it's a shame. I Also don't like how one crank arm sits out further than the other. I'll find out when I finish if this is a problem for me. The kit was missing some shaft collars and a nut spacer so I'm hoping Staton will send me some. I sent him an email. for $700 I think he should. Some things I like so far. I like how the bottom bracket engine sprocket spins independently of the other sprockets. This allows you to pedal without spinning the engine chain. The engine came pre-installed on the gear box and Hardware is quality.
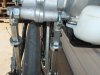
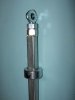
Before re-cut of threads, note flat top of threads almost like a 3/4 profile thread cut but indeed about .005"-.008" shallow of ansii standards.

After lathe skim cut, note narrower top of threads, will now hand screw into place in bottom bracket;

Still, I am very happy with this kit knowing that this full crankdrive system is a new innovation that has been out only less than a year and will take some time to fully debug by a cottage industry mfg.
Maxpower, a hot tip for you..............use any excess square tubing material from the verticle supports as spacer material for the horizontals, works much better than adding a bunch of washers, cyclindrical spacer material like pvc piping etc. I had plenty of excess since I lowered and tucked my motor installation as close to the rear tire ( about 1.5") and as far forward as possible in order to get the most compact fit as possible, while still maintaining adequate chain adjustment for installation.
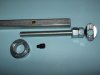
Have you figured out the use of the "j" bracket and large flat plate? At the time of my build very few photos were available and no indication of their use................hint, I dont consider them necessary and only add weight to the build but others may want to use them and the mfg. probably will always want to provide them to reduce litigation...............Don
MaxPower
New Member
use any excess square tubing material from the verticle supports as spacer material for the horizontals
That's a great Idea. I'm going to do it on my build.
Have you figured out the use of the "j" bracket and large flat plate?
the J bracket and rectangular piece with two holes is a the chain guard. Use the black allen head bolts and a nut spacer to attach it.
Attachments
MaxPower
New Member
Here are the directions I got from Staton
Instructions for the Crank Shift Kit
Be sure you have all the tools needed first before you start the job. Below is a list of what you may need.
1. 8mm Allan Wrench to remove and install the Bottom Bracket (BB) Axle bolts.
2. Tool Crank Puller Series III. 14 / 15mm 8mm Hex
3. Chain Breaker For IG / HG / UG 410H or hand grinder, file.
4. Tool to remove your old cups Bottom Bracket with the 1/2" Square Drive.
5. The Staton cups can be installed with a Large Crescent Wrench or Channel Lock pliers that open to 1.39”.
6. Small Wire or Brass Brush to clean out threads. Oil or light grease to place in the threads of the BB.
7. 7/16” Open Wrench
8. 9/16” Open Wrench
9. After you install the Staton cups with the four bearings. The Axle will be pre installed in the chain ring set along with the key way.
The three spacers will also be on the axle with black tape holding them on.
The spacers are:
One: 16mm flat washer with a 17.15mm ID and 30mm OD x 3mm thick.
Three: ¾” Snap Rings 0.40” thick each.
Outer before the crank arm goes on. Add One: 16mm flat washer with a 17.15mm ID and 30mm OD x 3mm thick. Two: ¾” Snap Ring 0.40” thick each.
Left Side, Add One: ¾” Snap Ring 0.40” thick each.
Note: You may have to Add more spacers due to the width of the bottom bracket.
Thanks
David
Attachments

MaxPower said:can you post some pictures of how you mounted the support arms to your frame on my build thread.
Hi Maxpower, I can and will post some frame pictures, but now I am not sure that I did the installation correctly............3 months ago when I got my kit there were only minimal advertising photos and no instructions for the build, so I just assemble it how I thought it should go, but now that I have viewed your photos and instructions, I can see that I did things differently although the end result was perfectly functional.............Don
Hi Maxpower, I can and will post some frame pictures, but now I am not sure that I did the installation correctly............3 months ago when I got my kit there were only minimal advertising photos and no instructions for the build, so I just assemble it how I thought it should go, but now that I have viewed your photos and instructions, I can see that I did things differently although the end result was perfectly functional.............Don


Hi Maxpower, I can and will post some frame pictures, but now I am not sure that I did the installation correctly............3 months ago when I got my kit there were only minimal advertising photos and no instructions for the build, so I just assemble it how I thought it should go, but now that I have viewed your photos and instructions, I can see that I did things differently although the end result was perfectly functional.............Don


That's a great Idea. I'm going to do it on my build.
the J bracket and rectangular piece with two holes is a the chain guard. Use the black allen head bolts and a nut spacer to attach it.
Correct about the chain guards!
One reason that your chain rings may not line up optimally with the rear gears is that it appears that you chose not to order the crank arms offered by Staton and therefore your own cranks may have a different thickness and width than the Statons which were used to develope the chainring proper positioning. It will be interesting to see how you make your own crank arms work in this setup.........................Don
I finally got the striped crank arms off (dremel tool and angle grinder, bike shop could not help). Had a **** of a time with that. learned a lot too. Then I problems with the bearing adapters. The right side went on just fine (beautifully) but the left side was a whole other story. The threads were not cut properly! my old cups threaded in fine and I had to cut off all but the last five threads of Statons adapter to make it thread properly. I was very upset at that. Another thing I don't like about the adapters is that they are soft aluminum and deform when you tighten them down. You shouldn't have to put too much torque on them but I had to because of the machining on the threads. All this could be because of my ineptitude of course but the kit should be a little more straight forward. Some more issues I'm having with the kit. The sprockets sit out too far (see picture). the largest sprocket (not the engine sprocket) sits out further that the last sprocket on rear cassette so there is no way to get a straight chain line. There is no way to make the sprockets closer to the bottom bracket either and the adapters cause the sprockets to sit out even further. THIS IS THE WAY IT HAS TO BE. and it's a shame. I Also don't like how one crank arm sits out further than the other. I'll find out when I finish if this is a problem for me. The kit was missing some shaft collars and a nut spacer so I'm hoping Staton will send me some. I sent him an email. for $700 I think he should. Some things I like so far. I like how the bottom bracket engine sprocket spins independently of the other sprockets. This allows you to pedal without spinning the engine chain. The engine came pre-installed on the gear box and Hardware is quality.
Don mentioned that you did not use Staton's crank arms.
Could it be that your BB cartridge is too wide for this Staton kit?
MaxPower
New Member
Don mentioned that you did not use Staton's crank arms.
Could it be that your BB cartridge is too wide for this Staton kit?
Staton sells regular old square taper crank arms that are the same as the ones I'm using. The problem is that there is no dish to the smallest sprocket. A flat sprocket only allows you to get the sprocket butted up to the adapters flange and not over hang the flang with a dish. Most front sprocket sets have a dish for this very reason.