OK... I am really BACK!

LincolnMercury

New Member
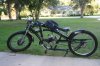
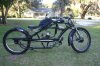
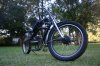
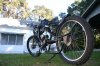
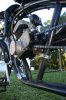
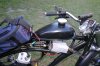
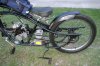
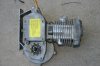
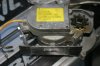
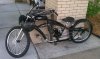
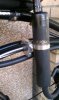
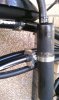
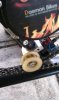
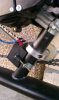
Here is my Micargi Bronco with an 80cc slant head from Daemon Bikes. The pedals hit the muffler in the normal position; so I turned it upwards and secured it with a Billet clamp from 'Buggy Billet Aluminum' (THANX RB66)! Rode the bike to the local O'Riley's and they gave me the heater hose out of the cut off's bin. Fit the hose and wrapped the hose around and out the back, secured with zip ties. I was going to weld some thin wall conduit as a front mount but my welder did not show (waiting on Harbour Freight!) Used another Billet mount with a chain tension pulley to guide the right side chain below the motor. I cut down another chain tension pulley for the motor side chain.
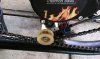
 

Attachments

  • Bronco Lft1.jpg
    Bronco Lft1.jpg
    756.8 KB · Views: 359
  • Bronco Lft2.jpg
    Bronco Lft2.jpg
    195.1 KB · Views: 349
  • Bronco Lft3.jpg
    Bronco Lft3.jpg
    763.2 KB · Views: 333
  • Muffler2.jpg
    Muffler2.jpg
    406 KB · Views: 250
  • Muffler1.jpg
    Muffler1.jpg
    428.3 KB · Views: 307
Welcome back Lincoln, you are one crazy but cool Stretch Cruiser builder, that exhaust is what can i say a bit eccentric but still cool.

C.H.
 
The CDI has a terminal block hot glued to it and an 8mm silicon sparkplug wire, again from O'Riley's fit to it. I can adjust the right side chain by moving the pulley up/down the seat tube. The motor runs great. The hardware is above average. I replaced the cover screws with cap screws from Sick Bike Parts. I am thinking of leaving the muffler inverted/reversed and as the front mount. I have already run a tank through it (16:1) in 2 days. Speed tops out around 29 MPH (courtesy road side radar display). Comments, questions are always welcome.
 

Attachments

  • Seat tube2.jpg
    Seat tube2.jpg
    719.6 KB · Views: 235
  • Seat tube3.jpg
    Seat tube3.jpg
    393.5 KB · Views: 227
  • Seat tube1.jpg
    Seat tube1.jpg
    358.8 KB · Views: 224
heres the problem. i have tried the same kinda hose and it melts after alittle bit.. we all gotta be able to find something that works better i guess..
 
70 miles of various throttle positions... including WOT for a couple of miles. I expected it to melt and it has not. I am looking for a tube roller or a muffler shop to bend me some conduit or thin wall pipe, I like the look.
 
Linc,
Your chain tensioner is on the wrong side of the chain. It should be on the slack side. That is the lower run when the engine is pulling. The top run doesn't need tension because it is already under tension when driving. Your tensioner, as installed, isn't really doing anything except keeping the slack out of the chain and absorbing all of the torque of the driven chain. I will predict premature wear on the tensioner wheel and bearings. But, hey, that's just my opinion. Whatever works, go for it.
Tom
 
Tom,

I had to look @ the pictures I posted. In the opening post showing the left side/motor drive side the tensioner is on the lower/slack side. In the second post showing ths seat tube and and right side bike chain, the tensioner is on the top to clear the chain under the motor. After riding for 2 days, I am going to use a smaller chain ring in front for a lower gear ratio/easier pedaling. This will lower the bike side drive line, possibly under the engine. I will also add a Manic Mechanic intake to lower the carb so I can raise the engine and do away with the rightside tensioner altogether. Since I pedal to start the engine and as a rolling assist at stop lights, pulley wear is not a real issue.It is definitely a work in progress. Thanks for you observations 2door. I never stop learning about this hobby/addiction from everyone who posts/replies.
 
Linc,
I apologize. I was looking at your photos in a mirror :). At first glance it looked like your engine drive chain. Now, I see it is your pedal chain that the tensioner is on. You should be good with that setup. Go for it and enjoy. Again, it's good to see you back, and with a great looking bike.
Tom
 
I am using the muffler as a front mount. When my welder gets here (come on Harbour Freight) I may weld in a piece of elbow as the front mount. After about 100 miles of riding everything is still tight. I like the "engine hanging in space" look. The Daemon engines, at least this one, is one of the smoothest running right out of the box. I can actually identify cars and people in my rear view instead of blurred shapes! I have a Manic Mechanic head and an SBP pipe that I will add after the engine is broken in. At that time I will definitely have a front mount.
 
The old Coot is losing it rotfl Now I have proof, LOL He looks a pictures inside out. rotfl I would get a better pipe for sure, Nice job tho, :)
 
Wow! That bike looks like something Ghost Rider should be ridin! :D
 

Attachments

  • Ghost_Rider.jpg
    Ghost_Rider.jpg
    47.5 KB · Views: 195
The Daemon engines, at least this one, is one of the smoothest running right out of the box. I can actually identify cars and people in my rear view instead of blurred shapes!

same here (though i don't have a side mirror right now.) i was impressed at how smooth it runs. may pull it apart to check on it since i've been beating on it alot with the expansion pipe (it's just so much fun!)
 
Here are new pics of my Bronco as it sits today! I have added a 36 volt front hub motor from Ampedbikes. Pulls nicely from a stop all the way to 20 mph on a full charge. I have yet to run the battery down past 2/3 charge. With a 27 tooth rear I get 30 mph @ half throttle. 35 mph seems to be the top speed. I am going to go up to a 32 tooth rear and see if that gets me any more top end. The other addition is the welded front mount and chain tensioner. Makes for a cleaner install and engine vibration is almost null.

I have moved from the panhandle of Florida (Panama City) to Central Florida (Oxford) where there is a HUGE retirement community (The Villages) and MILES of golf cart paths. The speed limit on the paths is 20 mph so the hub motor is perfect for that.
 

Attachments

  • 3338.jpg
    3338.jpg
    817.2 KB · Views: 181
  • 3339.jpg
    3339.jpg
    862.1 KB · Views: 173
  • 3342.jpg
    3342.jpg
    875.3 KB · Views: 170
  • 3348.jpg
    3348.jpg
    712.5 KB · Views: 172
Last edited:
Here are more pics of the conduit front engine mount I welded in, the E throttle on the left side of the handlebars and a shot of the battery pack (between the seat and tank) the E speed control (silver box under the tank).

The last shot is where I am going to move the china girl!
 

Attachments

  • 3347.jpg
    3347.jpg
    456.3 KB · Views: 170
  • 3343.jpg
    3343.jpg
    610 KB · Views: 174
  • 3344.jpg
    3344.jpg
    714.9 KB · Views: 160
  • 3353.jpg
    3353.jpg
    855.8 KB · Views: 210
This is the engine mount I welded up today. Once the engine is in the rear triangle; the battery pack is going "in frame". I am also going to weld up a rear rack out of 1/4" steel rod for a 1 gallon flat gas tank.
 

Attachments

  • IMG_3355.JPG
    IMG_3355.JPG
    637.4 KB · Views: 153
  • IMG_3358.JPG
    IMG_3358.JPG
    492.9 KB · Views: 166
Back
Top