Cranbrook rear sprocket problems!

GoldenMotor.com

lickerbox

New Member
Jan 11, 2010
11
0
0
austin,in
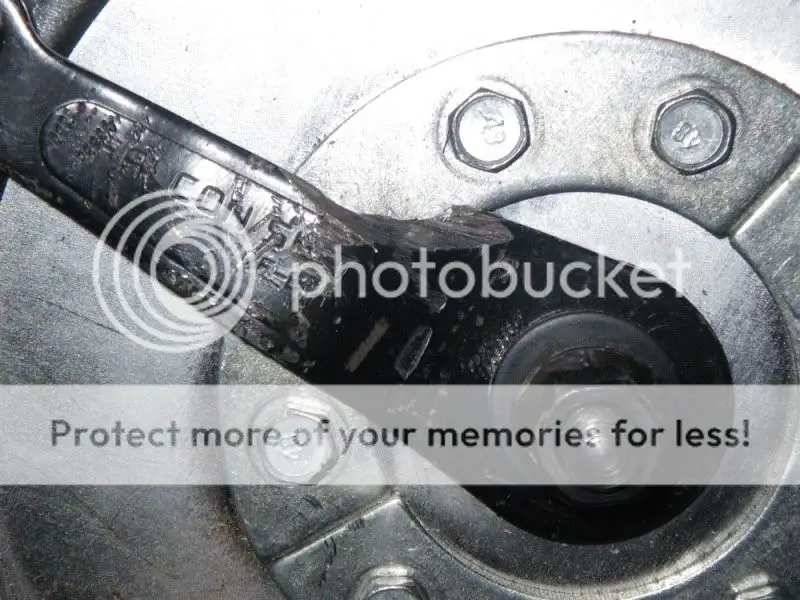
I began building my first MB and I am using a Huffy Cranbrook. I have a 66cc Flying Horse from Bikeberry and I am finding it extremely difficult with the rear sprocket. The center hole for the sprocket is about 1/4'' smaller than the hub. I have read on here to remove coaster arm, and do away with the dust cover, done that and still wont fit. I did try to fit it to give me an idea of clearence for chain and with it centered on the wheel, it still wants to rub on the lower frame legs where the coaster brake would attach. I am assuming im going to have to mill the sprocket to fit over the hub, but still not alot of clearence especially with the outer rubber spacer in place. T heres really not much of the hub sticking out past the outer spokes for the sprocket to rest on. Ive worked on motorcycles and have had less frustrating times!! My calipers are showing 1'' 5/8 on the hub, and sprocket center is 1'' 7/16. :-|| Any other suggestions would be appreciated.
 

worksmanFL

New Member
May 25, 2010
579
0
0
Palm Coast, FL
Bike Guy,

I'm doing the same bike, rubber/rag joint sprocket installation on the rear tire

How much bigger than the dust cap?
(from end of dust cap to center hole in sprocket?
- 1/8" all around?
- 1/4" all around?
- 3/8" all around?

What is the easiest way to do this? (i was going to buy pirates hub and sprocket, but they no longer make the adapter, and I don't want to shim with what they have, as ive heard its not recommended.)

What tool(s) do you recommend for this? I'd like it to look good when finished, not butchered.

Thank you. :)

What if you remove the bolt at the brake arm side, and place the sprocket in that 1/8" gap between at the dust cover/ brake arm?

would that space be too tight?
 

masterlink

New Member
May 23, 2010
13
0
0
petoskey, michigan
Im doing a build on the same bike, and ran into the same problems. My solution was to grind down the outside lip of the dust cover until it fit inside of the sprocket hole. As far as the brake arm, it will hit the sprocket mounting bolt heads, so I bent it out to clear the bolts, then bent it back in to attach it to the frame. I did grind on the brake arm a bit to get it to fit properly
 
Last edited:

worksmanFL

New Member
May 25, 2010
579
0
0
Palm Coast, FL
Thanks for the reply Masterlink!

Ive just gotten a contact who is a metal fabricator/machinist. Ill price out enlarging the center hole sprocket, im guessing an additional 3/4". 1/2 inch for "normal movement", leaving 3/8th" space if it sits just right all the way around. (between sprocket and dust cover.)

how far along is your build?
 

Kevlarr

New Member
Jul 22, 2009
1,628
4
0
Mi
Hey masterlink, why did you put the banana washers on the outside of the sprocket? Did your kit come with an extra set? They're not needed there and without them you probably wouldn't have needed to grind your brake arm.
 

asianflava

New Member
May 13, 2010
57
0
0
Colorado
Hey masterlink, why did you put the banana washers on the outside of the sprocket? Did your kit come with an extra set? They're not needed there and without them you probably wouldn't have needed to grind your brake arm.
Yep, I put all the banana washers inside the wheel. The unequal pair next to the rubber and the equal 3 on top of those with the joints staggered. The coaster brake arm cleared without any modifications.

My stack up was like this:

Bolts - sprocket - rubber rag joint - spokes - cut rubber rag joint - unequal pair of banana plates - equal 3 plates - flat washer -lock washer - nut
 

worksmanFL

New Member
May 25, 2010
579
0
0
Palm Coast, FL
Hi All, I posted this but I elsewhere, but I thought it belongs here too, same topic:

Cranbrook Sprocket Install.

??? Help ........ PLEASE ASSIST ???

Im having problems mounting the ragmount sprocket:

a. rubber discs seem too thick
b. rubber discs and metal banana attachers dont all align up,
(hitting part of hub/ sprocket too)
c. sprocket brake bar seems like it will hit the bolt heads when installed.
(some posted no mod./bending of cb arm required)

1. (went to a machine shop, and he wanted $45.00 to $70.00 to increase the sprocket hole size on 2 sprockets. ---> At this point, that option is cost prohibitive, knowing you can get a adapter, sprocket for $50.00 from PIRATE)

2.PIRATE is out of stock...it really does sound too painfully familiar.
--->JIIIIIIM! get your product out to Justin!

I've decided to either not reinstall dust cap,OR install it if it fits. (i dont want to grind down the dust cap.)

Im getting a little bit frazzled.

Sprocket concave or convex side out, whatever works.

Can anyone share several detailed PICS please of installed sprocket? and go over it with me?

I feel so inept, so stupid right now.

The instructions say 2 hours total build time - UNREAL...
I spent 4 "dry fitting"sprocket and I didn't even install a single thing!!! (not to mention the dozens of hours online trying to research the build.)

Sorry if i'm ranting.

Thanks for all your help in advance Guys/Gals.
 

Stormsorter

Member
Jun 10, 2010
122
1
16
Jasper County Illinois
My methods may seem crude but they have worked well for me. I was also impatient and short on cash at the time.

My Del Mar has the same hub, or so I'm told anyway. I just grabbed the Dremel and a cylinder shaped grinding stone. I then clamped the sprocket in a vice and started going round and round in a steady counter clockwise motion while holding the Dremel as level as I could. 30 minutes later, several stops to see if it fit yet and the sprocket slid over the hub with almost no resistance. Lucky thing to since the stone had just wore through and broke in half. I then used what was left of the stone to take off a little more so there was no resistance but I only had to take about an 1/8in off. It doesn't look butchered either, there's only 2 tiny gaps I can see light through and that was because I didn't feel like going 25 miles to get a new stone (what was left of the stone wasn't as long as the sprocket was thick).

If you don't want your bearings to fail really fast you want the dust cap. It keeps the dirt and grime out and the bearings and grease in. I just used a cutoff wheel on the dust cap, much quicker than doing it with a little Dremel grinding stone and left about 2mm of the lip but shoulda left 3mm. And if you have a big stone grinder with a flat side even better.

If the rubbers to thick just get an razor blade and cut the thing. I had some 1/8in thick rubber mats that a buddy gets from the printing press he works at and made my own. It took 2 and I might go with a 3rd to get farther from the tire, but that might make it to far out from the front sprocket.

The banana things will line up it's just the rubber likes to play tricks on us. You just have to get it all together properly and before you tighten the nuts all the way down to the bananas use a little force to get them end to end instead of overlapping each other. I would save the 3 center bolts tell your sure you got everything lined up properly.

Phone cam and Paint to resize = crap picture but heres a couple anyway.

IMG0062A2.jpg IMG0063A2.jpg
 

jeffhalfrack

New Member
Apr 18, 2010
10
0
0
geneva ny
I've posted this a few times, go to a tool rental,or a plumber, ask to rent or barrow a pipe reamer pad your vise or c clamp sprocket to the bench and ream away!! ream on the inside it will fit soo slick!! the dust cover will all most line the sprocket for you now I have done cb 110's with good results! you will have to bend break arm the benda are there just need to exagerate them and maybe grind the back of arm smooth half an hour and you are done JEFF W
 

KCvale

Well-Known Member
Feb 28, 2010
3,966
57
48
Phoenix,AZ
My first build was a Cranbrook because it was a cheap bike.
Don't bother with mods like hubs and such on it, the whole bike is cheap.
Spend the extra $30-$50 or so more and get a better bike, just the better tires alone are worth it.

That said I just flipped the sprocket over and put it right against the spoke studs and didn't use the outer gasket rag.


The sprocket fits over the hub so it's true and the dust cap goes right back on, and by having the teeth facing out it lines up great with the motor.

I rode it a couple of weeks and then sold it to a guy in my neighborhood earlier this year.
I see him all the time and he's almost wore out his second set of tires from sheer mileage and the sprocket mounting has never been an issue.

One more note about drive train...
Take the pedal chain off and size your motor chain to fit with no tensioner.
Then mess with your pedal chain size and if you can't get them to match up with a 1/2 link leave it longer and put the tensioner on that side.

If having to use a tensioner pulley on a motor powered drive chain was a good thing all motorcycles would have them.
Just put it on your barley used pedal side.

Speaking of the pedal drive side...
The coaster brake in a Huffy is a joke.
One thing worth the extra $5 is to replace the 18 tooth hub sprocket with a 19.
Not only does it make it easier to pedal up to start, it improves the crap coaster brake because you get more torque to it on back pedal.

And put on a good front brake!
 

KCvale

Well-Known Member
Feb 28, 2010
3,966
57
48
Phoenix,AZ
Another problem you will find is that most every Beach Cruiser will have a front tube that is too fat and too far away to mount directly.


On the Huffy's all you need to do is just squeeze the tube a bit with some channel lock plies. The cheap thin steel bends easy and it's better than compromising it by drilling a hole.

When I ordered my Grubee from GasBike.net I added the extra mounting kit, $15 I think, and it came with these added parts so I didn't bother to see if the motor would mount lower without the kit, check that first for yourself. A lower motor mount mean lower center of G.


I just used the longer studs and the extra U extender block to mount it.


I didn't let the unused "rag gasket" go to waste either, it worked great to insulate the motor from the bike a bit and fill in the gap.


I hope that helps all you Huffy buyers but really, I will never use any Huffy for a MB build again, they are made "Wallmart Cheap" these days and though they might last you 1000 miles don't count on not spending more to get there than you could by starting with a good bike in the first place.
 

worksmanFL

New Member
May 25, 2010
579
0
0
Palm Coast, FL
ty all for the posts.

I must have a very low tolerance for pain -

I have a very nice vendor, (not very active here) that will expand 2 sprocket center holes to clear the dustcap and hub, with his "patent pending" machine jig, as well as install the "rag joint"/sprocket to the hub.
Extremely fair, buuuuut cost shipping back and forth suuuucks.

Maybe I should have "cut to the chase" and bought a Grubee GT1 or GT2.

Have a great weekend all and happy and safe motorized bicycle riding :)
 

klb6154

New Member
Jun 20, 2010
76
0
0
pittsburgh pa
my sprocket fit but i spent 5 hours of reshaping the brake arm with a file i have alot of free time during the day because i work nights ha ha ha but the bearings from walmart are crap so must re build them have you tried the heavy duty rim w cb110 from piston bike . com i told the guy at the local bike shop about it and he said that the spoke guage is huge and will hold up much better but 75 for the set and i only paid 75 for the bike i know my mistake but srure is fun
 

moronic_kaos

New Member
Apr 6, 2010
225
0
0
Connecticut
my sprocket fit but i spent 5 hours of reshaping the brake arm with a file i have alot of free time during the day because i work nights ha ha ha but the bearings from walmart are crap so must re build them have you tried the heavy duty rim w cb110 from piston bike . com i told the guy at the local bike shop about it and he said that the spoke guage is huge and will hold up much better but 75 for the set and i only paid 75 for the bike i know my mistake but srure is fun
Wheel Master 26x2.125, Rear, B/O, C/B, H/D, Chrome Steel Wheel | BikepartsUSA

They want like $52 w/shipping to CT. Had it bookmarked forever, but waiting for the CB110 adapter to get back in stock.