Schwinn Cruiser Deluxe with GM 901 rear hub

maurtis

New Member
Hi all! I finally got my bike rolling last weekend so figured it was time to start a build thread. This build has been very slow going, months in the making, since I have been funding it with fixing and flipping scooters/minibikes/etc on Craigslist.

Previously I had a 66cc 2 stroke cruiser that I really enjoyed riding around on errands, but the wrist pin bearing blew at around 400 miles. While I loved motorized biking, there was a lot left to be desired with the HT build. So that got me thinking about electrics.

I stumbled on a Mongoose CX24V450 on Craigslist and rode that around on 24V SLA for a while. Fun, but a kid's toy. I went on to change out the rear freewheel and go to 36V lipo. Better and would do mid 20's (even hit 31 MPH once), but I was still dreaming of a little more, so the planning commenced.

I was originally going to go with an older steel mountain bike frame, like a 90's GT, but then a straight bar Schwinn Heavy Duti appeared on Craigslist that looked promising. When I got it home, on closer inspection I found that the horrible paintjob was covering up cracks in the frame... blech. Repairable, but not the most desirable start.

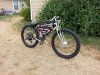
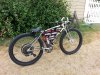
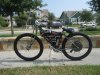
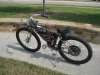
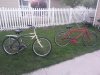
Then a few days later a 1999 Schwinn Cruiser Supreme popped up for $50, in great shape! While smaller framed than the Heavy Duti, it already had better brakes, 135mm rear dropouts (most hub motors are 135mm or 150mm), gears, etc.

attachment.php


With a goal of 35 MPH cruising and 10 miles of range, I started shopping for a motor. While contemplating massive overkill, I decided to go with a faster wind but cheaper Golden Motor Pro 901. This is the same motor used in the Yescom hub 48v 1000W kits on eBay. Not as much torque as some of the bigger guys, but very reasonably priced and I can always swap out rear wheels later.

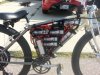
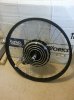
I went with just a bare motor since I knew I would be replacing the rim anyway, and went with Weinmann DH-39 for the front and rear. I laced the rear myself:

attachment.php


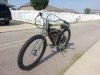
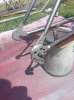
I spent a lot of time on Endless-Sphere absorbing what I could. I knew I was going to want a build that had the potential for a lot of power. Since these hub motors can eat weaker dropouts for lunch, I ordered a set of Dr. Bass' torque arms and had them welded to the frame. I then painted them silver and cleared with clear engine enamel (to help handle the heat). My dropouts no longer worry me ;)

attachment.php


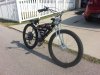
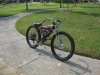
For my rear brake I am using the regen feature on my controller (a Lyen Extreme Modder 12fet) and rear v-brakes, and up front I went with a Sturmey-Archer 90mm drum. And my fork is a beehive springer from VMB. Here is a picture after mounting the controller and front fork. The tires I am running are 2.4" CST Cyclops Pros, $13 each from Amazon and beefy, with Kenda downhill tubes inside.

attachment.php
 

Attachments

  • Candidates_scaled.jpg
    Candidates_scaled.jpg
    241 KB · Views: 2,245
  • Laced_1_cross_scaled.jpg
    Laced_1_cross_scaled.jpg
    306.9 KB · Views: 1,175
  • Torque_arm_painted_scaled.jpg
    Torque_arm_painted_scaled.jpg
    361.6 KB · Views: 1,012
  • Lipos_scaled.jpg
    Lipos_scaled.jpg
    417.4 KB · Views: 1,041
Last edited:
After a loooong 2 week wait for the batteries to come off backorder from Hobby King, we were ready to get serious! I am running 24s 2p (10AH) of lipo, using the 4s hardcase batteries. I like the hardcase units since they are easy to mount and have a slightly better chance of not exploding due to accidental impact, which is a good thing!

attachment.php


I bought 10 gauge bulk wiring and 4mm bullet connectors and did the soldering myself this time, versus having someone make the harness for me like I did on the Mongoose. It took longer since I am horrible at soldering, but I felt better about the project as a whole.

The mounting board for the batteries in the triangle is pegboard. I like pegboard since it is easy to shape and the holes make for convenient mounting points. The batteries are attached with industrial strength velcro and then added zip ties for extra security. I mounted a set of clippers under the seat, so if there is an impending thermal event, I can clip the zip ties and toss the smoker (assuming I catch it in time).

I am using a Cycle Analyst eBike computer to keep track of speed, Watts, AH used, etc. At first I was going to go with a cheaper unit, but since there was so much to love about the CA, I spent a little extra.

And that layback seat post, it is an 80 degree solid layback made by our own Inked1974. I will probably have him make me a 60 degree later, but good enough for now. I love his seatposts!

It is hard to tell in this picture but the round canister on the top bar is a spice tin my wife donated to house my controller on/off switch.

attachment.php


attachment.php


attachment.php


In this picture you can see the fuse holder on top and the battery disconnect switch on the bottom:

attachment.php
 

Attachments

  • Assembled_left_scaled.jpg
    Assembled_left_scaled.jpg
    248 KB · Views: 964
  • Assembled_left_front_scaled.jpg
    Assembled_left_front_scaled.jpg
    228.6 KB · Views: 902
  • Assembled_right_front_scaled.jpg
    Assembled_right_front_scaled.jpg
    250.7 KB · Views: 945
  • Assembled_right_scaled.jpg
    Assembled_right_scaled.jpg
    249.7 KB · Views: 1,022
I LOVE riding this bike! I was afraid that with the cheaper, fast wind motor that I would not have enough low end torque. But it carries me well at 200 lbs. I just got her running yesterday so only put about 5 miles on her, which included an errand up to Walgreens, but I could not be happier with this as my first hub build.

The neighborhood speed limit is 25 MPH, and the road to downtown is 35 MPH, which she does comfortably. For giggles on the shakedown run I had to see what she had to give, I backed off at 47 MPH when I ran out of straight road! While I know spending much time in that range will kill the motor, I had to do it, just had to ;)

Next up is to clean up the wiring, install lights on the front and back, make some sort of protective covering for the batteries, and possibly fans to help cool the controller. I noticed it got really warm even on my short run, but it was close to 100 degrees outside at the time.

So overall, this build cost me around $1,100, which was almost exactly what my gas bike build cost!

- 1999 Schwinn Cruiser Supreme
- GM 901 48V 1000W hub motor
- 12 x 4s 5AH lipo batteries, 24s2p 10AH total, 89V nominal, 98V hot off the charger
- Weinmann DH-39 wheels with Cyclops CST Pro rubber
- 12 gauge spokes on the rear, 14 gauge up front
- Sturmey Archer 90mm drum brake
- Sunlite springer fork from VMB
- ebikes.ca Cycle Analyst v2.3
- Lyen 12fet controller and mounting plate
- Dr. Bass torque arms
- Inked1974 layback seat post
- A whole bunch of miscellaneous connectors, velcro, fuse holder, kill switches...
 
Last edited:
THIS GUY KNOWS HOW TO BUILD AN EBIKE! if you have time someday could you do a thread on how to build our own battery packs like with the rc packs you are using. I really like your work and instead of a million questions on how to build them ect it would be nice to have a tutorial on the forum. another question is do you charge each battery separate or as a group?
 
THIS GUY KNOWS HOW TO BUILD AN EBIKE! if you have time someday could you do a thread on how to build our own battery packs like with the rc packs you are using. I really like your work and instead of a million questions on how to build them ect it would be nice to have a tutorial on the forum. another question is do you charge each battery separate or as a group?

Thanks for the vote of confidence! It was definitely a fun build and a blast to ride.

I use a Hyperion 1420i to charge my lipos. When I first get new batteries I run each through three discharge/charge/balance cycles to check for any bad cells. If they look good, I then build the pack.

My charger only charges up to 14s at a time, so until I get another one to link them together I break the 24s pack in half into two 12s packs. I then have a parallel harness I made that plugs into the Hyperion so I can charge both 12s packs at once, with parallel connectors for the balance taps too. So the short version is I charge the whole pack at once but by splitting it in half at the series connection and making them parallel.

I also balance the cells with each charge. Some say it is overkill, but I like to play it safe.

I can definitely try to put a little FAQ together on making packs out of lipos. I had a ton of questions myself when cutting my teeth on lipos for my Mongoose build and would be more than happy to share.
 
Yes, very nice. Wouldn't work for my specific application: rain, commute, scalability, crappy roads for 20 miles. Bike didn't cost me anything, but then again it was because I already owned a mt bike with dual suspension (now what am I going to use for mt bike? oh well). Your welding of those torque arms is awesome. I was going to buy those out of desperation because there is no standard fit on this crazy mt bike frame.
 
I would have probably been fine with the universal clamp on style torque arms, but I figured a little overkill with that respect would make it easier to pop in a more powerful motor at a later point. I wish the welding job was my handiwork, but since I do not have a welder yet I farmed it out to K&K Welding in Austin. I think he did a fine job, just took 2 weeks to get it done.

I was not crazy about the look of the layback seat post raised up, so I slammed it as low as it would go and have a little clearance over the rear tire. That made the taller bars look goofy so I flipped them. I plan on getting some no-rise bars soon (likely the Nitto Promenade B617), but it will do for now. The riding position is surprisingly comfortable.

attachment.php


attachment.php


attachment.php


attachment.php
 

Attachments

  • Flipped_front_scaled.jpg
    Flipped_front_scaled.jpg
    303 KB · Views: 1,342
  • Flipped_right_front_scaled.jpg
    Flipped_right_front_scaled.jpg
    301.6 KB · Views: 1,840
  • Flipped_right_rear_scaled.jpg
    Flipped_right_rear_scaled.jpg
    329 KB · Views: 1,734
  • Flipped_rear_scaled.jpg
    Flipped_rear_scaled.jpg
    276 KB · Views: 1,402
Installed my new Nitto B617 bars last week. More of an upright riding position, which I have grown to like a lot over the last week.
 

Attachments

  • B617_left_scaled.JPG
    B617_left_scaled.JPG
    450.9 KB · Views: 698
  • B617_left_rear_scaled.JPG
    B617_left_rear_scaled.JPG
    443.9 KB · Views: 728
  • B617_rear_scaled.JPG
    B617_rear_scaled.JPG
    428.3 KB · Views: 698
  • B617_right_rear_scaled.JPG
    B617_right_rear_scaled.JPG
    469.2 KB · Views: 774
  • B617_right_front_scaled.JPG
    B617_right_front_scaled.JPG
    462.8 KB · Views: 675
And I had to know... I just had to...

I reprogrammed my controller to run 45 amps (it spiked to 52A at one point in my run), put on my motorcycle gear, and went for a high speed run. I backed off at 52 MPH... I just wanted to see 50 and not turn my motor into molten lava.

That is the first and last time I try that with this setup, but I had to see. I took my phone with the GPS turned on to verify the CycleAnalyst's speedo reading.
 

Attachments

  • 50MPH_club_GPS_scaled.JPG
    50MPH_club_GPS_scaled.JPG
    325.9 KB · Views: 674
  • 50MPH_club_CA_scaled.JPG
    50MPH_club_CA_scaled.JPG
    277.2 KB · Views: 253
Back
Top