Longtime lurker, first time poster

djnutz

Member
Hello everyone from Sioux Falls, SD. It's 5 deg outside and I am nearing completion of the 3rd reinventing of my motor assisted bicycle. It was 2009 when I saw a group of 6 people on these really cool bicycles with gas engines. I got to Googling and soon had my first kit. Since then, I have trolled these forums for tips and tricks to get my motor assisted bicycle working just right. Being a bicycle mechanic is a nice added bonus, as I can build my own wheels and such.

I am also an avid bicyclist. I am certified by The League of American Bicyclists as a safe bicycling instructor. I am president of the local bicycle club. And, like previously mentioned, I am a full time mechanic at a local bike shop. I am a "roadie" who rides 2000-3000 miles a year. I have a life goal to ride 10,000 RAGBRAI miles before I turn 50. at 39, I have just south of 3000 of those miles accounted for. If you have never heard of RAGBRAI, google it. 500 mile ride over 7 days from the Missouri River across Iowa to the Mississippi River the last full week of July. Oh yeah, and there is A LOT of beer and homemade pie involved. I'm not the only one either. Last year they estimate there were about 30,000 riders.

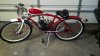
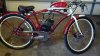
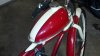
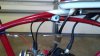
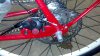
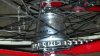
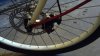
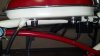
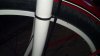
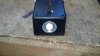
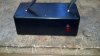
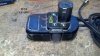
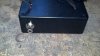
Introductions aside, here is the result of the last couple months of work:


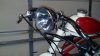
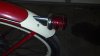
The headlight and the tail light were both a part of a flashlight from the 50's called The Big Beam. I found it at a local antique store. It had a 6 volt sealed glass main lamp and a small screw type flasher for the red lens. I removed the glass lamp and replaced it with the reflector and front lens from a cheap wally world lantern. The bulb is from an 18v Ryobi flashlight. More on that later...The taillight is a 12v automotive led lamp. The #196 I believe. I removed the screw in lamp and base and replaced it with the 196 automotive socket. The original flasher on the flashlight was on the handle and was hinged so when using the flasher, it could be in a raised position. I simply cut it off and used the dremel and a cardboard template to get it to just the right curve for the fender. The headlight had the tabs from the way it mounted to the flashlight already. I used a caster wheel as the mount. Nice and sturdy.
 

Attachments

  • IMG_20140117_101035_809.jpg
    IMG_20140117_101035_809.jpg
    262.1 KB · Views: 193
  • IMG_20140117_104915_296.jpg
    IMG_20140117_104915_296.jpg
    345.8 KB · Views: 195
  • IMG_20140117_101045_892.jpg
    IMG_20140117_101045_892.jpg
    228.2 KB · Views: 179
  • IMG_20140117_101121_290.jpg
    IMG_20140117_101121_290.jpg
    190.2 KB · Views: 167
  • IMG_20140117_101215_190.jpg
    IMG_20140117_101215_190.jpg
    240.4 KB · Views: 184
The engine is a 66cc Black Flying Horse. It's 4 years old now and has been port matched, polished, etc. It runs GREAT!. The exhaust I made from a piece of flat stock steel and a set of steel road bike handle bars. The muffler is a lawn mower/snowblower item from Ace Hardware. The "ID tag" I made to mark the date I first started this motor. It is a tag for pets that you can get at a DIY machine at Walmart. Notice also that it says 49cc on it. Never had a police officer bat an eye when they have asked me questions. These motors are so small, how would they know the difference?

I forgot to mention that the frame itself is a 1970 Huffy Men's Cruiser. I actually called and spoke with a guy from Huffy on the phone and had him research the serial number. This particular frame was built and welded in the good ole US of A. before they moved production overseas. It was a yard sale find for $25 and it was a rusty pile when I first got it.
 

Attachments

  • IMG_20140117_101201_938.jpg
    IMG_20140117_101201_938.jpg
    281.9 KB · Views: 201
  • IMG_20140117_104939_950.jpg
    IMG_20140117_104939_950.jpg
    267.2 KB · Views: 205
  • IMG_20140117_104955_581.jpg
    IMG_20140117_104955_581.jpg
    287 KB · Views: 179
  • IMG_20140117_104933_492.jpg
    IMG_20140117_104933_492.jpg
    282.7 KB · Views: 159
Last edited:
I went with Avid BB7 disc brakes front and rear. Rims are Alex 26" rims. 32 hole front, and 36 hole rear. 14G black spokes. Front hub is a run of the mill sealed bearing 6 hole disc mount. Both rotors are 160mm Avid's. For the front, I used an adapter from bicycledesigner.com. It has a tab that fits into the dropout, but on the first test before the motor was installed, I found it had WAYYYYY too much movement to be safe. I ended up replacing the fork for a beefier one with threaded bosses for fender struts. I drilled a hole in the disc caliper mount and threaded it to match the threaded boss on the fork. Ran a steel allen screw through the whole works and voila! Disc brakes. For the rear, I used some steel flat stock to make my own mount. Welded it to the frame.

The rear hub is a Sturmey Archer 8sp internal with a disc mount. This is paired up with the sickbikeparts HD shift kit. The whole thought process here is being able to cruise at 30mph without having the motor running at max rpm's.

The headset and bottom bracket shell have both been faced and chased. New stem, bars, layback seatpost...bottom bracket and crank arms came with the shift kit. I did have to order the adapter cups from them as well.

I actually welded the front motor mount to the frame as well as the rear upper mount for the shift kit. Motor vibration is all but gone it seems... at least when testing it in a bike trainer...
 

Attachments

  • IMG_20140117_101226_394.jpg
    IMG_20140117_101226_394.jpg
    293.9 KB · Views: 167
  • IMG_20140117_101247_177.jpg
    IMG_20140117_101247_177.jpg
    243.1 KB · Views: 150
  • IMG_20140117_105003_751.jpg
    IMG_20140117_105003_751.jpg
    272.8 KB · Views: 185
For the gas tank, I used chrome door edge molding around the "fin". I cut the mounting bolts shorter. Heat shrink tubing on the brackets. A small piece of bike tube rubber between the tank and bike top tube. I used chrome cap nuts, chrome flat and lock washers to tighten it all down.

Fuel filter is from a local lawnmower shop. The hose barb from the tank is from the plumbing department at Menards. Fuel tubing is from the auto parts store.

The other pic is of my solution for cables. This is a single zip tie and a small section of vacuum tubing. Tie goes through the tubing, then around the cable housing, then back through the tubing again, then around the frame as you normally would.
 

Attachments

  • IMG_20140117_101309_537.jpg
    IMG_20140117_101309_537.jpg
    222.3 KB · Views: 172
  • IMG_20140117_101327_099.jpg
    IMG_20140117_101327_099.jpg
    189 KB · Views: 188
Last edited:
On to the electrical.

So I started with a Ryobi 18v lithium battery. The slim one. I opened the case and took out the guts. I got a project box from radio shack and in went the battery. I used a voltage regulator from RS to provide 12v for the taillight. The switch is from the main battery positive to the 18v front lamp and to the voltage regulator. The 4 pin and 2 pin connectors have been wired to the charging and testing leads that are in the original battery housing. I simply hook the wires to the battery box then plug the dummy case into my Ryobi charger. I found these little vents at Ace hardware and they look great in my opinion.

It is back yard engineering at it's finest! I am still fussing with how to mount this battery box. I know it is going to fit just under the tank. I am leaning towards metal zip ties at this moment...
 

Attachments

  • IMG_20140117_101401_895.jpg
    IMG_20140117_101401_895.jpg
    243.7 KB · Views: 172
  • IMG_20140117_101408_517.jpg
    IMG_20140117_101408_517.jpg
    251.3 KB · Views: 161
  • IMG_20140117_101421_057.jpg
    IMG_20140117_101421_057.jpg
    283.9 KB · Views: 154
  • IMG_20140117_101432_907.jpg
    IMG_20140117_101432_907.jpg
    316.4 KB · Views: 165
  • IMG_20140117_102113_631.jpg
    IMG_20140117_102113_631.jpg
    284.4 KB · Views: 135
First, welcome to the forum. We're glad you've come in from the cold and joined us.
Second, congratulations on a very nice, clean, well thought-out bike build. I applaud your attention to detail and the quality of your work. You should be proud of it.
I'm sure in your 'lurking' you've read about the hazards that fenders can be. Keep a close watch on yours. Thanks for sharing your build with us.
Have fun and ride safe.

Tom
 
Welcome to the forum.. Very nice build, I like your paint and trim work. A little bit of chrome trim is great, isn't it? Covers the ugly tank edge nicely.
I've had my eye out for one of the old style flashlights that you used to be able to find that fastened on to the top of the old 6V battery, but so far no luck. I like what you did for yours, I'm going to have to come up with a rear light for my cruiser sooner or later.
 
It has been a couple years and I learned something about internally gear hubs:

Sram is the way to go.

Sturmey Archers and Shimano 5 and 8 speed hubs DO NOT like to be shifted when under a load. Both manufacturers tell you to stop peddling THEN shift. This is a bit of a challenge with the SBP Shift Kit. I burned through 2 SA's and one Shimano.

The Sram 8 speed CAN be shifted under a LIGHT load. AKA I let off the gas, shift, then back on the gas. 2 years later and this thing is rock solid.
 
Djnutz Great work and ingenious build. But we need to see the whole bike right and left side...please. Great tip on the 8 speed internal too and cable mount system. Welcome to the forum...finally! Carry on
 
One of the best looking peanut tanks I've seen. Yes i have to agree,don't know how i missed this, love the details and your process of building.............Curt
 
I just bought one of those big beam flashlights for my bike. It's exactly what I have been looking for. I have a 6v SLA battery in a saddle bag and didn't want to have to change to a 12v. I have a 6v flashlight up front, but it's a modern LED light that throws the whole look off. Plus, I have infinite access to replacement bulbs at work. Kinda nice :)
 
Thanks for the kudos. The original post included images of the right and left side of the bike. I am going to be taking some new pics soon of some tweaks I am making. I am working to tidy up all the cables. I think I am going to go with a spiral wrap and heat shrink to manage the cables at the handlebars. For the clutch, rear brake, and rear hub cables, I am going to install rivnuts
41TmPOt8OXL._SX342_.jpg

on the underside of the down tube. This will let me use downtube cable clamps
606179d1301616836-specialized-enduro-downtube-cable-clamps-img_2045.jpg

to keep the cables tucked up next to the frame.

A friend of mine used to be a bicycle engineer. He had some old bike parts laying around and had one of these

dsc00679-001-jpg.286501


I took it apart, cleaned everything, put in a D-cell battery and the thing worked! I polished it to a shine and it is mounted on the front fender. I will get some photos of it when I have everything else complete.

And finally, I am building a box to fit between the seat tube and the rear fender. It follows the curve of the rear fender and will be painted to match. I have it fleshed out in cardboard and it is going to blend it nicely. It is going to be big enough for the battery, cdi, light switch, charging connectors and the wiring.
 
Here is the completed battery box. I made it out of 16 gauge steel. The interior is insulated with thin EVA craft foam to prevent shorts. The toggle switch is for lights, the ports are the test terminals and the charge port for the ryobi battery that is in the box. The lowest switch is the lighting CDI on/off switch. The box between this battery box and the saddle is one of those blue plastic junction boxes. All the electrical connections are made under this "cap" with wire nuts. This will allow me to remove the battery box easily for servicing.
picture.php

picture.php

And here is the horn mounted on the front fender.
picture.php
 
Back
Top