Post the instruction anyways.
I like to read others invention techniques
It was rather easy to build. The majority of the time was spent waiting for the epoxy to cure.
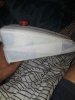
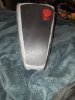
I started out with the base of a "child at play" safety zone indicator. ( see pic below.)
I cut it in half leaving the top and bottom connecting area to be bent over and plastic welded closed.
I used the top of a 2 L Coke bottle for the fill hole and cap. Coating both of those also with the epoxy.
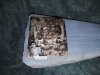
Next I had the inside coated in tank lining epoxy. The stuff I used is overkill and you can purchase tank liner from the internet. It will do the same thing.
Next i drilled a small 1/4 inch hole at the lowest parts of the tank and epoxied a small piece of chemical resistant tubing between the two to connect the two tanks and epoxied the two tanks together.
I covered the outside with a fiberglass tape that you would find in an orthopedic doctors office, the kind they make lightweight casts out of for setting broken bones. Which you can also purchase on the internet rather cheaply.
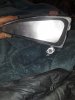
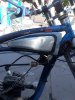
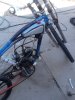
I drilled a small hole in the bottom right front corner where the petcock goes and drilled 3 small holes in the threaded area of the petcock to allow the fuel to flow into the gas line to feed the carb and epoxied that into place after epoxying a small metal plate across the bottom for rigidity. I will add an inline fuel filter when I install it on the bike.
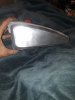
Next I cut several pieces of black rubber matting, the kind you would use to line a koi pond and used 3M spray adhesive to attach the rubber to the outside areas of the tank top bottom and sides.
I cut a couple pieces of thin aluminum flashing to the shape of the left and right sides of the tank and also used spray adhesive to attach those to the rubber matting. The metal flashing was more for looks than anything.
After waiting for all of that to cure it was ready to go. I filled it with water and did a pressure test on it and it was entirely sealed.
Unfortunately I have not had the time to install it on my bike yet but when I do I will post pictures.
It turned out pretty freaking awesome if I do say so myself. There is nothing like it on the internet and I am thinking of pitching the idea to bikeberry or one of these motorbike parts distributors.
And yes I have taken the necessary precautions to protect the patent on it. It's nothing really more than just a gas tank for a Quadrunner but shaped to fit inside the cantilever or gas tank area of the bike.
I hope I can find someone to help me get this on the market because I think it really would be a great aftermarket accessory that will make the bicycle look more like a motorcycle.
Build time minus the epoxy cure time 1 hr.


")
